
Hardware Reference Guide
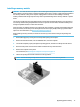
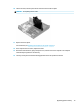
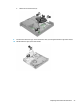

11. Locate the solid-state drive on the system board.
12. Remove the screw securing the solid-state drive to the system board (1).
13. Grasp the solid-state drive by the sides and carefully pull it out of the socket (2).
14. Remove the screw holder from the solid-state drive (3) for use on the replacement solid-state drive.
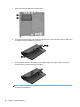
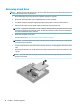
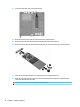
15. Insert the screw holder into the niche on the end of the new solid-state drive (1).
16. Insert the new solid-state drive into the socket on the system board and press the solid-state drive
connectors (2) rmly into the socket.
NOTE: A solid-state drive can be installed in only one way.
24 Chapter 3 Hardware upgrades