Hardware Reference Guide
© Copyright 2014 Hewlett-Packard Development Company, L.P. The information contained herein is subject to change without notice. Microsoft and Windows are trademarks of Microsoft Corporation in the U.S. and other countries. The only warranties for HP products and services are set forth in the express warranty statements accompanying such products and services. Nothing herein should be construed as constituting an additional warranty.
About This Book WARNING! Text set off in this manner indicates that failure to follow directions could result in bodily harm or loss of life. CAUTION: Text set off in this manner indicates that failure to follow directions could result in damage to equipment or loss of information. NOTE: Text set off in this manner provides important supplemental information.
iv About This Book
Table of contents 1 Product features ................................................................................................................................................ 1 Standard features ................................................................................................................................. 1 Front panel components ....................................................................................................................... 2 Rear panel components ...........
vi
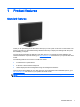
1 Product features Standard features Thank you for purchasing an HP thin client. We hope you have years of use from our thin clients. Our goal is to provide you with award-winning clients that are easy to deploy and manage with the power and reliability you expect. The next sections describe the features of the thin client. For a complete list of the hardware and software installed on a specific model, go to http://www.hp.com and search for your specific thin client model.
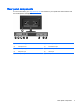
Front panel components For more information, go to http://www.hp.com and search for your specific thin client model to find the model-specific QuickSpecs.
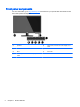
Rear panel components For more information, go to http://www.hp.com and search for your specific thin client model to find the model-specific QuickSpecs. (1) VESA mounting points 100 mm x 100 mm (6) USB 2.0 ports (4) (2) Security lock slot (7) RJ-45 Ethernet port (3) USB 2.
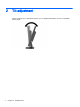
2 Tilt adjustment Tilt the computer up to 5 degrees forward or up to 15 degrees backward to set it to a comfortable viewing angle.
3 Serial number location The thin client includes a unique serial number located on the back of the thin client. Have this number available when contacting HP customer service for assistance.
A Specifications Dimensions Width (side to side) 55.68 cm 21.92 in Height (with stand) 39.95 cm 15.73 in Height (without stand) 33.97 cm 13.37 in Depth (front to back) (with stand) 16.38 cm 6.45 in Depth (front to back) (without stand) 5.65 cm 2.22 in With stand 3.99 kg 8.78 lb Without stand 3.67 kg 8.07 lb 10° to 40 °C 50° to 104 °F -30° to 60 °C -22° to 140 °F Approximate Weight Temperature Range * Operating** (max.
B Security provisions The thin client can be secured with a cable lock. This cable lock prevents unauthorized removal of the thin client, as well as locking the secure compartment. To order this option, go to http://www.hp.com and search for your specific thin client model. 1. Locate the cable lock slot on the back panel. 2. Insert the cable lock into the slot, and then use the key to lock the cable.
C Mounting the thin client This thin client incorporates four mounting points on the back of the computer. These mounting points follow the Video Electronics Standards Association (VESA) standard, which provides industrystandard mounting interfaces for Flat Displays (FDs), such as flat panel monitors, flat displays, and flat TVs. The stand must be removed to prepare the computer for mounting. 8 1. Remove all USB flash drives from the computer. 2.
The HP Quick Release connects to the VESA-standard mounting points, allowing you to mount the thin client in a variety of orientations. NOTE: When mounting to a thin client, use the 10 mm screws supplied with the HP Quick Release. To use the HP Quick Release: 1. Using four 10 mm screws included in the mounting device kit, attach one side of the HP Quick Release to the thin client as shown in the following illustration.
2. Using four screws included in the mounting device kit, attach the other side of the HP Quick Release to the device to which you will mount the thin client. Make sure the release lever points upward. 3. Slide the side of the mounting device attached to the thin client over the other side of the mounting device on the device or wall on which you want to mount the thin client. An audible 'click' indicates a secure connection. NOTE: When attached, the HP Quick Release automatically locks in position.
D Routine thin client care Use the following information to properly care for the thin client: ● Keep the computer away from excessive moisture, direct sunlight, and extremes of heat and cold. ● Operate the computer on a sturdy, level surface. Leave a 10.2-cm (4-inch) clearance on all vented sides of the computer to permit the required airflow. ● Never restrict the airflow into the computer by blocking any vents or air intakes. ● Never operate the computer with any of the access panels removed.
E Shipping information Shipping preparation Follow these suggestions when preparing to ship the thin client: 1. Turn off external devices connected to the thin client. 2. Disconnect the system components and external devices from their power sources, then from the thin client. 3. Pack the system components and external devices in their original packing boxes or similar packaging with sufficient packing material to protect them.
Index A adjusting tilt 4 altitude specifications 6 Auto/Exit button, location 2 C cable lock 7 cable lock slot 3 cautions HP Quick Release components front panel 2 rear panel 3 removing the stand 8 RJ-45 connector location routine care 11 S security 7 security cable lock 7 serial number location 5 service repair 12 shipping preparation 12 specifications 6 altitude 6 dimensions 6 hardware 6 humidity 6 relative humidity 6 temperature 6 weight 6 stand, removing 8 10 D dimensions 6 DVI-I-out port 3 E Etherne