Getting Started
Copyright and License The only warranties for Hewlett-Packard products and services are set forth in the express statements accompanying such products and services. Nothing herein should be construed as constituting an additional warranty. HP shall not be liable for technical or editorial errors or omissions contained herein. HP assumes no responsibility for the use or reliability of its software on equipment that is not furnished by HP.
Table of contents 1 Getting information ............................................................................. 1 2 Features .............................................................................................. 4 3 Setting up your computer .................................................................... 5 Connecting your computer ...................................................................... 6 Protecting your computer ...............................................................
iv Getting Started
1 Getting information Type of information Where to find ● Set up your computer. Setup documentation included with your computer. ● See how-to videos about using Visit www.hp.com/supportvideos (English only) the features of your computer. Tap the Tutorial icon (select models only) in the carousel within the HP TouchSmart application. ● Use the computer. ● Connect to the Internet. ● Recover factory settings.
Type of information ● Where to find Find computer warranty Limited Warranty and Support Guide or the Warranty and Support information. Information included with your computer. ● Get technical support. ● Get up-to-date information and www.hp.com/support/consumer-forum help from the Windows community. ● Connect to a TV. Setup documentation included with your computer. Watching and Recording TV Tap the Start button, tap All Programs, and then tap User Guides.
WARNING! Disconnect power from the equipment by unplugging the power cord from the electrical outlet. WARNING! The power supply is preset for the country/region in which you purchased your computer. If you move, check the voltage requirements for your new location before plugging the computer into an AC power outlet. WARNING! To prevent direct exposure to a laser beam, do not try to open the enclosure of the CD or DVD drives.
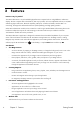
2 Features Features vary by model. The HP TouchSmart PC is a touch-enabled high-performance computer built into a high-definition widescreen display. The slim computer offers select features, that vary by model, such as an adjustable webcam, a CD/DVD and Blu-ray player and burner, Bluetooth capability, USB ports, a media card reader, Wireless 802.11n networking, full support for Beats Audio™ devices (sold separately), and high quality speakers.
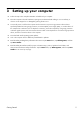
3 Setting up your computer ❑ Follow the steps in the setup documentation included with your computer. ❑ Place the computer so that all ventilation openings are unobstructed and cabling is not in a walkway or where it can be stepped on or damaged by placing furniture on it. ❑ Connect all power cords from the computer and accessories to a power surge protection device that is specifically labeled as having surge protection, an uninterruptible power supply (UPS), or a similar device.
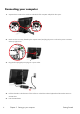
Connecting your computer 1. Squeeze the two tabs on the rear door at the back of the computer and pull the door open. 2. Reach into the rear cavity framed by the computer stand, and plug the power cord into the power connection at the top right corner. Sub in 3. 4. IR out LAN Plug the three-pronged power plug into a power outlet. Pull the white tabs in the direction of the red arrow on both the wireless keyboard and the wireless mouse to activate them. 5. 6 Press the Start button.
Protecting your computer Computer risk Computer feature Unauthorized use of the User password computer or user account A password is a group of characters that you choose to secure computer information.
Connecting to the Internet Steps to connect to the Internet: 1. Connect the hardware (sold separately). ◦ For a wired network connection, connect an Ethernet cable to the computer and to a network router or LAN device. ◦ For a wireless network connection, use a wireless router with the computer to connect to a WLAN with an Internet connection. 2. Get Internet service. ◦ Sign up with an Internet service provider (ISP).
a. Tap the Start button, tap All Programs, and then tap Get Online. b. Follow the onscreen instructions to select an ISP and set up Internet service. NOTE: Online Services provides a list of ISPs; however, you might choose another ISP or transfer an existing account to this computer. To transfer existing accounts, follow the instructions provided by the ISP. 3. Using your Internet connection through your ISP, open a Web browser and browse the Internet.
Computer orientation Your HP TouchSmart PC is designed to be operated in several orientations. The computer can be swiveled to the right and left (1). The computer can be tilted from the stand, within the range of –5 degrees to +60 degrees (2). With the stand tilted, the computer can move on the rails from an upright position to an almost horizontal position (3). Be sure to position your hands on either side of the computer (4) when making adjustments.
Connecting a game console Select HP TouchSmart610 PC models only Some computer models allow you to use your system as a high-resolution monitor for gaming. Two HDMI game console ports are located on right side of the computer, at the bottom. You can get audio from the internal speakers, from headphones, or from external speakers connected to the A/V source connector (audio out) (1) located at the back of the computer. Audio Out Sub IR out TV in LAN IR out TV in 1.
Using the remote control in gaming mode Use the A/V source button on your remote control to toggle between source modes: PC mode and gaming mode.
Adjusting incoming-video display settings with HP Picture-inPicture (PIP) application Game console models only HP Picture-in-Picture (PIP) software allows you to open and adjust the incoming video source from either HDMI input. ● You can adjust the display controls for each HDMI input: brightness, contrast, gamma (color), and volume. ● The controls have predefined settings for movie, text, and game modes. ● You can toggle between full screen and PIP mode within the application. 1.
HP My Display TouchSmart Edition allows you to adjust the screen display using the touch feature. ● You can adjust sound, brightness, and contrast. ● Viewing mode can be set to the factory default, or optimized for movie, text, or gaming. ● Status indicators let you know if the onscreen keyboard scroll lock, number lock, or caps lock are set. ● A settings screen lets you adjust color with the touch of a button.
Locate the HP TouchSmart PC in the room to minimize glare from the screen. You can also reduce glare by tilting the screen. The HP TouchSmart screen can be used as an input device; therefore, the computer should be placed so that your shoulders and neck are comfortable. The computer might need to be moved close to your body to keep your shoulders relaxed while you are touching the screen. Keep your shoulders low and your upper arm close to your body when you touch the screen.
4 Troubleshooting and maintenance Refer to the documentation provided by the product manufacturer for information about peripheral-specific problems, such as issues with a printer. The following sections present some issues you might encounter while installing, starting up, or using your computer and possible solutions. For more information or for additional troubleshooting options, see Getting information on page 1.
Power Symptom Possible solution Error message: When drive activity stops, remove the disc, and then press the spacebar on the keyboard. Invalid system disk The computer should start up. or Non-System disk or Disk error. Computer does not Press and hold the Power button until the computer turns off. Check Power Settings. turn off when the Power button is pressed. Computer shuts ● The computer might be in an exceedingly hot environment. Let it cool down.
Keyboard and mouse (with cable) Symptom Possible solution Keyboard Use the mouse to turn off the computer, unplug and reconnect the keyboard to the back of commands and your computer, and then restart your computer. typing are not recognized by the computer. Mouse (with cable) does not work or Unplug and reconnect the mouse cable to your computer. is not detected.
Symptom Possible solution Cursor responds For a mouse with a roller ball: slowly, moves only ● vertically or counterclockwise), remove the ball, and clean it by using a damp, lint-free cloth (not horizontally, or does not track smoothly. Clean the roller ball: Remove the roller ball cover from bottom of mouse (rotate it paper). Also clean the rollers on which the ball moves. ● Use a mouse pad or other rough surface under the mouse.
Keyboard and mouse (wireless) Symptom Possible solution Wireless ● Ensure that you are using the wireless keyboard or wireless mouse within range of the keyboard or receiver, approximately 10 meters (32 feet) for normal use, and within 30 cm (12 inches) mouse does during initial setup or for re-synchronization. not work or is not detected. ● Ensure that the mouse is not in Suspend mode, which occurs after 20 minutes of inactivity. Tap the left mouse button to reactivate it.
Speakers and sound Symptom Possible solution Volume is very Ensure that you connected the speakers to the Audio Out connector on the back of the low or computer. (Additional audio connectors are used for multiple-channel speakers.) Detached non- unsatisfactory. powered speakers (speakers without a separate power source, such as batteries or a power cord) do not produce satisfactory sound. Replace the non-powered speakers with powered speakers. No sound is For Windows 7: produced. 1.
Symptom Possible solution Cannot connect to For Windows 7: the Internet. 1. Tap the Start button, tap Control Panel, tap Action Center, and then tap Troubleshooting. 2. Under Network and Internet, tap Connect to the Internet. Verify that you are using the proper cables for your Internet connection type. Your computer might have an Ethernet network adapter (also called a network interface card, or NIC). The network adapter uses a network cable, to connect to a local area network (LAN).
Memory Symptom Possible Solution Computer beeps Make sure the memory modules are added in the correct order. The first and second memory after being modules go into the black slots (1, 2), and the third and fourth memory modules go into the powered on. white slots (3, 4). Check to make sure that there is a least one memory module in your computer, and that it is in a black slot.
Gaming mode Symptom Possible Solution When connecting ● Ensure that the gaming device and the computer are on. the gaming device ● Ensure that the source you want is highlighted on the PIP menu. No Signal ● Ensure that the gaming device is on. message appears ● Make sure the HDMI cable is connected from the gaming device to the computer. ● Make sure the HDMI source selected on the PIP menu matches the HDMI connector at to the game console ports, the computer keeps going back to PC mode.
To repair software problems, try these methods: ● Turn the computer off completely, and then turn it on again. Sometimes this is the easiest way to fix a problem. ● ● Update the drivers (see Updating drivers on page 25). Use Microsoft System Restore (see Microsoft System Restore on page 26) — Restore your computer to a configuration that was in use before the software was installed. ● Reinstall the software program or hardware driver.
Microsoft System Restore If you have a problem that might be due to software that was installed on your computer, use System Restore to return the computer to a previous restore point. You can also set restore points manually. NOTE: Always use this System Restore procedure before you use the System Recovery program. NOTE: Some features might not be available on systems that are shipped without a version of Microsoft Windows. To start a System Restore: 1. Close all open programs. 2.
To check the list of installable programs in the Recovery Manager: 1. Tap the Start button, tap All Programs, tap Recovery Manager, and then tap Recovery Manager. If prompted, tap Yes to allow the program to continue. 2. Under I need help immediately, tap Software Program Reinstallation. 3. Tap Next at the Welcome screen. A list of programs opens. Check whether your program is there. To uninstall a program: 1. Close all software programs and folders. 2. Uninstall the damaged program: a.
Virus scan Perform a full virus scan every week to catch viruses that might have slipped through unnoticed. Most antivirus products have a scheduling feature to keep track of this automatically. Monthly Hardware cleanup Thoroughly clean the outside of your computer. Software updates Use Windows Updates to fix operating system bugs and improve performance. Also, be sure to check for driver updates for your hardware and new versions of your favorite programs.
Cleaning the keyboard and When cleaning the keyboard keys, use a low setting on a battery-powered vacuum mouse cleaner, to avoid removing key caps and springs. 1. Vacuum between the keys of the keyboard and along the grooves. 2. Use a clean, dry cloth and isopropyl (rubbing) alcohol to clean buildup on the keyboard keys and along its edges. 3. Wipe the body of the mouse and the mouse cord by using cleaning wipes. If you have a roller-ball mouse, clean the ball and rollers inside: 1.
NOTE: Some features might not be available on systems that are shipped without a version of Microsoft Windows. You must choose one of the following methods to perform a System Recovery: ● Recovery Image — Run the System Recovery from a recovery image stored on your hard disk drive. The recovery image is a file that contains a copy of the original factory-shipped software. To perform a System Recovery from a recovery image, see System Recovery from the Windows 7 Start Menu on page 30.
If the computer is working and Windows 7 is responding, use these steps to perform a System Recovery. 1. Turn off the computer. 2. Disconnect all peripheral devices from the computer except the keyboard and mouse. 3. Turn on the computer. 4. Tap the Start button, tap All Programs, tap Recovery Manager, and then tap Recovery Manager. If prompted, tap Yes to allow the program to continue. 5. Under I need help immediately, tap System Recovery. 6. Tap Yes, and then tap Next. Your computer restarts.
If Windows 7 is not responding, but the computer is working, follow these steps to perform a System Recovery. 1. Turn off the computer. If necessary, press and hold the Power button until the computer turns off. 2. Disconnect all peripheral devices from the computer, except the keyboard and mouse. 3. Press the Power button to turn on the computer. 4.
To perform a System Recovery using recovery media: 1. If the computer is working, create a backup DVD, or backup USB flash drive, containing all the data files you want to save, and then remove the backup media from the computer. 2. Insert recovery disc #1 into the DVD drive tray, and close the tray; or if using a recovery USB flash drive, insert it into a USB port. 3. If the computer works, tap the Start button, and then tap Shut Down.
Choosing recovery media ● To create recovery discs, your computer must have a DVD writer, and you must use only high-quality blank DVD+R or DVD-R discs. NOTE: You cannot use CDs or DVD+RW, DVD-RW, DVD+RW DL, DVD-RW DL, DVD+R DL, or DVD-R DL discs to create recovery discs. ● You have the option of creating a recovery USB flash drive instead, using a high-quality blank USB drive. ● If you are creating recovery discs, be sure to use high-quality discs.
Creating recovery media To create recovery discs: 1. 2. Close all open programs. Tap the Start button, tap All Programs, tap Recovery Manager, and then tap Recovery Media Creation. If prompted, tap Yes to allow the program to continue. 3. Tap Create recovery media using blank DVD(s), and then tap Next. 4. Follow the onscreen instructions. Label each disc as you make it (for example, Recovery 1, Recovery 2). To create a recovery USB flash drive: 1. Close all open programs. 2.