
HP SmartStream 3D Command Center 3.2 installation and troubleshooting guide


Technical Newsletter | HP SmartStream 3D Command Center 3.2 installation and troubleshooting guide
5
Installation
Important: This process is for new users. If you are updating HP SmartStream 3D Command Center, please check the
notes in the Upgrade process.
The HP SmartStream 3D Command Center Server needs to be installed on a PC that has access to the devices (3D printers
and Processing Stations). This PC also needs to have access to the Internet and the HP Cloud.
It is necessary to always have this PC turned on in order to be able to send information from your devices to the HP Cloud
and to let Command Center Clients monitor the list of 3D printers/Processing Stations that have been configured.
Remember to disable the sleep/standby mode on the PC.
Only one HP SmartStream 3D Command Center Server should be installed on the network in order to avoid conflicts.
Then, you can access the 3D printer/Processing Station information by installing the HP SmartStream 3D Command
Center Client on any PC in your network, the only requirement being having access to the main PC where the Command
Center Server is installed to work.
The Command Center Server has no user interface (it just shows a Windows taskbar tray icon). It is just a couple of
processes that run on the PC in the background.
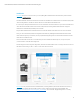
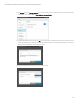
The following picture shows a typical configuration, where the Command Center Server is running on the “Server PC” and
the Clients can be running on “PC1” or “PC2” or even on the “Server PC” itself.
Important: It is very important to ensure that 3D Printers, Processing Stations, and PCs have the same time zone (e.g.
UTC/GMT). Check that the PC has the date and time correctly configured to be the same as World Official Time
(http://www.worldtimeserver.com/current_time_in_UTC.aspx). Also, check that “daylight savings time” is correctly
configured (if applicable).