
HP SmartStream 3D Command Center 3.2 installation and troubleshooting guide


Technical Newsletter | HP SmartStream 3D Command Center 3.2 installation and troubleshooting guide
7
Client installation
1) Download HP SmartStream 3D Command Center Client from the HP website under the Support section.
The version must be 3.2.x: http://www.hp.com/go/jetfusion3D4200/software/.
2) Install HP SmartStream 3D Command Center Client on all the computers where you want to see the status of your
devices. It is recommended to install it on the Server PC as well in order to check network issues more easily.
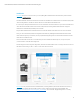
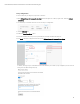
3) Open HP SmartStream 3D Command Center Client and click the gear icon on the top-right corner. Then click “Network
connectivity.”
4) Verify that there is a valid server found:
Important: In this version of Command Center, HTTPS connection has been enabled. Therefore, only secured servers
(with HTTPS) will be autodetected now. This means that all servers with a lower version than 3.2 will not be discovered.
In addition, non-secured servers (without https, port 8080) cannot be added manually.
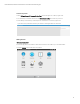
a. If it is autodetected automatically, the Server PC’s IP address will be shown. The Client will be connected
automatically to the autodetected Server if there is just one. You can save autodetected Servers by adding them
to your favorites. If not autodetected, you should select the Server you wish to connect to.
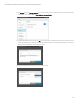
b. If it does not appear in the Servers list, you can add it manually with the “Add Server” option. Include the Server’s
IP address and port (from 8443 to 8449). The IP and the port are also displayed in the tray icon.
Important: Remember that it is strongly recommended to configure a hostname or static IP address rather than a DHCP
address for the “Server PC” in order to allow Command Center Clients to always be able to find the Command Center
Server, as IPs can change in DHCP environments.