HP JetAdvantage Connect Discovery Server Technical Reference Administrator’s Guide
Copyright and License © Copyright 2016 HP Development Company, L.P. Reproduction, adaptation, or translation without prior written permission is prohibited, except as allowed under the copyright laws. The information contained herein is subject to change without notice. The only warranties for HP products and services are set forth in the express warranty statements accompanying such products and services. Nothing herein should be construed as constituting an additional warranty.
Table of Contents 1 Introduction .......................................................................................................................................... 0 1.1 Purpose ......................................................................................................................................... 0 1.2 Intended Audience ........................................................................................................................ 0 1.3 Reference Documents............
7.3.1 Set VPN Search Domains..................................................................................................... 25 7.4 Example: Create the printer Zones in DNS on the JAC Discovery Server................................... 26 7.5 Example: Add JAC “Delegation” to the DNS server.................................................................... 34 7.6 Example: Add DNS-SD Records to the DNS Server..................................................................... 39 7.6.
1 Introduction 1.1 Purpose The purpose of this document is to provide a complete technical description of the HP JetAdvantage Connect Discovery Server, as well as the set of instructions to perform the necessary server setup. 1.2 Intended Audience The intended audience for this document is system or IT administrators who are or will be administering the server elements for HP JetAdvantage Connect functionality.
2 Overview The HP JetAdvantage Connect Discovery Server (JAC Discovery Server or simply Discovery Server) is a server configuration that is intended to provide support for mobile printing within an enterprise environment. The Discovery Server enables DNS Service Discovery (DNS-SD) such that mobile devices can discover printers or print servers within the enterprise environment, which may not be discoverable on the local subnet where the mobile device is connected.
Requests for domains that are handled or forwarded by the main DNS server (such as google.com or amazon.com, etc.) will never be forwarded to the Discovery Server, since the delegate for that server is specified for a specific Search Domain. If some misconfiguration of DNS has occurred that causes unplanned requests to be routed to the Discovery Server, the requests will be ignored, as the Discovery Server will only be configured to process DNS-SD print service requests.
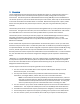
3 Architecture The following diagram shows a basic network architecture that includes the HP JAC server components. DNS-SD / Delegation Cellular Network DHCP DNS Active Directory Internet HP JAC Discovery Server (DNS-SD) HP JAC Print Server (AirPrint, Policy) HP AC Server (PullPrinting) VPN HP MPL Server Mobile Clients Andriod 4.4 and above, iOS 8 and above Connect through VPN OR Android Required Components HP JAC Android App.
• • An environment that allows mobile devices to connect to the customer’s network (either by connecting through a wireless access point, or through a VPN). This environment must provide the mobile device with access to DNS. The DNS Service being used must support EDNS0 as fully described in rfc2671. Recommended enterprise configuration items: • • • Server OS: DNS Service: VPN (if used): Windows 2012 R2 Microsoft DNS Cisco or Pulse – Configured to vend Search Domains to mobile devices. 3.
4 HP JAC Discovery Server Setup The following section provides an explanation of the steps required to setup the Discovery Server. Later sections provide detailed examples of the setup steps. If you are already familiar with DNS-SD and/or HP JAC, you may find it useful to go directly to Appendix A – HP JAC Discovery Server Setup - Quick Reference 4.
There is a technical limitation within DNS that will restrict the number of printers that can be returned using DNS-SD queries. This restriction limits the number of printers that can be organized into a zone to a maximum value. The following guideline has been established based upon empirical testing. Guideline: Maximum number of printers per zone: 64 If the total number of printers exceeds this maximum value, you will be required to organize the printers into multiple zones.
4.3 Setup the new JAC Discovery Server A new server must be added to the existing environment in order to host the Discovery Server functionality. This server may be a virtual machine, or a physical bare-metal server. This server must run some implementation of DNS, in order to implement DNS-SD. The Setup of the Discovery Server will include: 1. Setup of the Operating System 2. Installing of the DNS service (if a non-native DNS service is to be used) 3.
4.4 Setup a “Search Domain” to point to the DNS server When mobile devices connect to a company’s enterprise network infrastructure, it is necessary that the client is provided with a “Search Domain” that references the DNS server. This is necessary so that the client can initiate DNS-SD queries during the discovery process. The value of the necessary “Search Domain” is the fully qualified server name where the DNS service is running.
4.7 Add DNS-SD records to the DNS server DNS-SD requires that specific PTR records be setup within DNS to enable Domain Enumeration queries. The PTR records need to be setup to respond to the following query strings: b._dns-sd._udp. db._dns-sd._udp. r._dns-sd._udp. dr._dns-sd._udp. lb._dns-sd._udp. The records need to point to the fully qualified name of the JAC printer zone.
4.8 Configure the JAC Discovery Server Configuring the Discovery Server involves running the Discovery Setup Utility on the Discovery Server, and perhaps running it on other clients within the enterprise environment. The Discovery Setup Utility will create one or more DNS data files which contain all of the DNS records necessary for DNS-SD discovery of the desired printers. The DNS data files then need to be loaded into the DNS service running on the Discovery Server.
5 HP JAC Discovery Setup Utility 5.1 General Use The HP JAC Discovery Setup Utility (Discovery Setup Utility) is a command line based tool, and is intended to be run with administrator privileges. The Discovery Setup Utility runs natively on Windows Server 2012 R2, or any Windows system with .Net v4.5 installed. The HP Setup Utility can be run on Mac OS X using the Mono framework.
5.2 User Input & Default Behavior User input can be provided for each of the options either by editing certain settings in a configuration file, or by providing additional parameters on the command line. If no command line options are provided, and if no changes are made to the default configuration file, the Discovery Setup Utility will perform the following steps: 1. The default DNS zone name will be: hpprinters. 2. DNS-SD records will be created for the zone. 3.
5.2.1 Configuration File Settings The name of the configuration file for the Discovery Setup Utility is: HP.jacdiscsetup.exe.config This configuration file is in XML format, and contains multiple configuration items which may be edited to fit the run-time needs of setting up the JAC environment. These configuration items are utilized when overriding command line options are not provided. Details concerning the available configuration settings are listed below. 5.2.1.
5.2.1.6 PrinterDataFilePath Description: String value containing the path to a directory where JAC Printer Data Files will be written to and read from (on subsequent runs of the utility). Default value: \output\ XML Example: Note: The default output directory is called “output” and is relative to the directory on the computer where the utility is being run.
5.2.2 Command Line Options The command line help text (which includes a listing of the main options) is shown below. Command line help text for each of the main options is also provided.
Command line help text for the “run” option is shown below.
Command line help text for the “addprinters” option is shown below.
Command line help text for the “removeprinters” option is shown below.
Detailed descriptions of the all the command line parameters are listed below. 5.2.2.1 Save Location (-s, --savelocation) Providing this parameter overrides both the DnsFilePath and the PrinterDataFilePath configuration file entries, or their respective default values. This parameter is valid for the run, addprinters, and removeprinters options. When performing updates to existing DNS data files, this option must be included if the save location is different from the default. See Section 5.3 below. 5.2.2.
5.2.2.8 Version (--version) Shows the current version of the setup utility. This parameter is valid for the run, addprinters, and removeprinters options. 5.3 Maintaining printer entries The Discovery Setup Utility will need to be re-run when adding/removing printers, such that the printer records on the DNS-SD server accurately reflect the printers that are available and that are to be presented by the Discovery Server.
6 Validate Configuration After all of the server setup steps have been completed, you can validate that the printers are now able to be discovered by clients that support DNS-SD. If the steps below fail and you are unable to validate that the server configuration is correct, refer to Appendix E- Troubleshooting section of this document. 6.
7 Setup Example The following example will show the steps involved in setting up and configuring a specific instance of the Discovery Server. This example will utilize Microsoft Windows Server 2012 R2 and the associated management tools provided within the OS. Where appropriate, screen shots are provided. This example will walk through the process of setting up the Discovery Server within an established environment. The domain used for this example is named: ems2.hpitest.com 7.
7.3 Example: Setup a “Search Domain” to point to the DNS server Since, for the purposes of this example, Windows Server is being used, setting DHCP Scope Option 15 is the appropriate way to set the “Search Domain”. The following screen shot shows the domain name set in the Scope Option 15 setting.
7.3.1 Set VPN Search Domains If mobile devices are to connect to the enterprise network via a VPN, it is mandatory that the VPN in use be configured to vend out the necessary search domain. The specific configuration necessary for each VPN will be dependent upon the VPN in use, and possibly on the enterprise environment. 7.3.1.1 Supported (Tested and Verified) VPNs The following VPNs have been tested, and settings have been established that allow for vending of search domains.
7.4 Example: Create the printer Zones in DNS on the JAC Discovery Server The following example shows how to create the initial printer zones on the Discovery Server. 1. On the Discovery Server, run the DNS Manager. 2. Create new zones as follows: a. This example illustrates creating a new “hpprinters” zone in the “ems6.hpitest.com”. b.
c. Click “Next”.
d. Select “Primary zone”, and click “Next”.
e. Enter the full name of the zone (including the domain), and click “Next”.
f. Select “Create a new file with this name:”, then verify the file name and click “Next”.
g. Keep the selection “Do not allow dynamic updates”, then click “Next”.
h. Click “Finish”.
i. Verify that the zone was created successfully.
7.5 Example: Add JAC “Delegation” to the DNS server The following example shows how to create a new delegation on the DNS server to delegate all DNS queries for the JAC printer zone(s) to the Discovery Server. On the main DNS server, create a new delegation to handle the print service requests, and forward them to the hpprinters domain. a.
b. In the “New Delegation Wizard”, Click “Next” c. Type in “hpprinters” for the Delegated domain. a.
b. Click on “Add” then add the Fully Qualified Domain Name of to the Discovery Server, and click “Resolve”. c.
d. Click “Next” e. Click “Finish” f. Delegate has been created.
Here is an example of the DNS record created by the DNS manager after going through the above steps: ; ; Delegated sub-zone: ; hpprinters ; End delegation hpprinters.ems2.hpitest.com. NS emsddppd.ems2.hpitest.com.
7.6 Example: Add DNS-SD Records to the DNS Server This step will add the necessary DNS-SD PTR to the main DNS server. Two example are provided below, both of which apply to Microsoft Server DNS. The specific steps necessary for enterprise environments that use other DNS implementations may be different. The DNS-SD PTR records will point to the “hpprinters” domain that will be setup on the Discovery Server. 7.6.
c. d. e. f. Scroll down and select “Pointer (PTR)” and click “Create Record”. For the “Host IP Address” field, enter “b”. For the “Host name” field, click “Browse”. Change the “Record Types” to “All Records” and click “OK”.
g. Browse to and highlight “hpprinters”. h. Select the “(same as parent folder)” entry, and click “OK”. i. Click “OK” to finish creating the record.
j.
The following screen shows the completed DNS SD pointer records: The result of these steps is that the following DNS records have been added: b._dns-sd._udp db._dns-sd._udp dr._dns-sd._udp lb._dns-sd._udp r._dns-sd._udp PTR PTR PTR PTR PTR hpprinters.ems2.hpitest.com. hpprinters.ems2.hpitest.com. hpprinters.ems2.hpitest.com. hpprinters.ems2.hpitest.com. hpprinters.ems2.hpitest.com.
7.6.2 Add DNS-SD Records to the DNS Server using PowerShell On the DNS Server, you can use the PowerShell command “Add-DnsServerResourceRecordPtr” to add the DNS-SD PTR records (which point to the “hpprinters” domain). Below are examples of the PowerShell “Add-DnsServerResourceRecordPtr” command that add the DNSSD records to the DNS server. Add-DnsServerResourceRecordPtr -Name "b._dns-sd._udp.0" -PtrDomainName "hpprinters.ems2.hpitest.com." -ZoneName "hpprinters.ems2.hpitest.
7.7 Example: Configure the JAC Discovery Server 7.7.1 Entering Printers 7.7.1.1 Adding printers based upon Bonjour discovery results (local sub-net) Since Bonjour (mDNS) printer discovery is enabled by default, the run option of the setup utility does not requires additional parameters to add printers found via Bonjour discovery.
Example Procedure: 1. Run the setup utility on the Discovery Server first, adding one or more printers (or print servers) to the printer zone. Here is an example command line that manually adds a single printer (with IP address 15.41.142.178) to the zone and saves the files to the share location: HP.jacdiscsetup.exe addprinters –a 15.41.142.178 -s \\SharedFiles\HpJac\Printers -z PrinterZone000.domain.comp.com 2. Copy the Discovery Setup Utility to a laptop client PC. 3.
HP.jacdiscsetup.exe addprinters –a 15.31.142.179 -s \\SharedFiles\HpJac\Printers -z PrinterZone002.domain.comp.com HP.jacdiscsetup.exe addprinters –a 15.21.142.169 -s \\SharedFiles\HpJac\Printers -z PrinterZone003.domain.comp.com 2. Copy the Discovery Setup Utility to a laptop client PC. 3. Connect the laptop to Sub-net 1, and run the command line shown below. Command line: HP.jacdiscsetup.exe run -s \\SharedFiles\HpJac\Printers -z PrinterZone001.domain.comp.com 4.
• • o http://site.printerAdmin.company.com/hpmpa/hpmpl/?mplId=2 o http://site.printerAdmin.company.com/hpmpa/hpmpl/?mplId=3 Include the printers found from all three MPLs in a single zone named “PrinterZone004.domain.comp.com”. Save the DNS file to a file share location: \\SharedFiles\HpJac\Printers . Command lines: HP.jacdiscsetup.exe run --mplserver http://site.printerAdmin.company.com/hpmpa/hpmpl/?mplId=1 -s \\SharedFiles\HpJac\Printers -z PrinterZone004.domain.comp.com HP.jacdiscsetup.
Command lines: HP.jacdiscsetup.exe run --mplfile C:\HpJacDisc\Setup\MplFiles\hpmpl-5.xml \\SharedFiles\HpJac\Printers -z PrinterZone005.domain.comp.com Output: A DNS data file named “PrinterZone005.domain.comp.com.dns” is created at \\SharedFiles\HpJac\Printers. These DNS files can then be loaded into the DNS service running on the Discovery Server (see section 7.7.3 below). Note: It is acceptable to add printers from different MPLs into different printer zones. See Section 7.7.1.
7.7.1.6 Adding printers in bulk using a list of IP addresses For this example, the printers are to be added as follows: • Add multiple printers from a list of IP addresses. o A text file “C:\HpJacDisc\Setup\Printers\printer_ip_list.txt” contains the following: 10.86.162.162 10.86.162.152 10.86.162.163 10.86.162.132 10.86.162.178 10.86.162.211 10.86.164.63 10.86.162.128 10.86.162.182 10.86.162.129 10.86.162.90 10.86.162.169 10.86.162.171 10.86.162.180 10.86.162.
The printers that have failed to be added are listed in the file ipp_failed_printers.json which is located in the output folder (relative to where the Discovery Setup Utility was run). The possible reasons for this failure are as follows: • • • • The printer is offline. The IP address provided for the printer is incorrect. A route does not exist between the printer and the machine running the Discovery Setup Utility.
7.7.2 Removing printer entries 7.7.2.1 Removing a single printer For this example, the entry for a specific printer is to be removed as follows: • • • For the zone named “PrinterZone000.domain.comp.com” Using the data files located at: “\\SharedFiles\HpJac\Printers” Remove the printer that corresponds to the following IP address: o 15.86.162.162 Command lines: HP.jacdiscsetup.exe removeprinters -a 15.86.162.162 -s \\SharedFiles\HpJac\Printers -z PrinterZone000.domain.comp.
7.7.2.2 Removing printers in bulk using a list of IP addresses For this example, the printers are to be added as follows: • • • For the zone named “PrinterZone000.domain.comp.com”. Using the data files located at: \\SharedFiles\HpJac\Printers. Remove multiple printers from list of IP addresses. o A text file “C:\HpJacDisc\Setup\Printers\printer_ip_list.txt” contains the following: 10.86.162.162 10.86.162.152 10.86.162.163 10.86.162.132 10.86.162.178 10.86.162.211 10.86.164.63 10.86.162.128 10.86.162.
7.7.3 Loading DNS data files on the JAC Discovery Server After running the Discovery Setup Utility, you will need to load the DNS data files that it created into the DNS service that is running on the Discovery Server. 1. Copy the *.dns files created by the Discovery Setup Utility to the following location on the Discovery Server: • C:\Windows\System32\dns • 2. 3. 4. 5.
c. Click “Next”.
d. Select “Primary zone”, and click “Next”.
e. Enter the full name of the zone (including the domain), and click “Next”.
f. Select “Use this existing file:”, then verify the file name and click “Next”.
g. Keep the selection “Do not allow dynamic updates”, then click “Next”.
h. Click “Finish”.
i. Verify that the zone was created successfully.
j. Open the zone, and verify that A/AAAA records for the expected printers are listed there. k. Repeat steps a – j for each zone that needs to be created.
8 Appendix A – HP JAC Discovery Server Setup - Quick Reference 1. 2. 3. 4. 5. Planning: a. Make note of the Domain where the JAC Discovery Server is to be installed i. Example: div01.thiscompany.com b. Plan printing zones i. Assume single zone: hpprinters.div01.thiscompany.com ii. Obtain list of IP addresses for printers or MPL list of printers c. Verify mobile device connectivity: i. Can mobile devices connect via wireless and have access to DNS? 1. Directly connect via Wifi? 2. Connect via VPN? ii.
9 Appendix B – Notes on using BIND DNS (named) on OS X Server The Discovery Server can be setup on OS X Server. OS X Server provides a DNS service using BIND (also known as named) which provides all the necessary capabilities to support DNS-SD. As noted earlier in this document, the Discovery Setup Utility can be run on OS X using the Mono framework. The operation of the Discovery Setup Utility on OS X is the same as what has been described earlier in this document.
10 Appendix C – Notes on Multi-site Configurations. The following pages capture notes and diagrams for some potential Discovery Server configurations that could be used to accommodate corporate DNS configurations across multiple geographic sites. Note that in the following diagrams, the term “DNS-SD Server” is analogous to “Discovery Server”.
Multi-site Client Discovery (direct company access) Example Sequence of events corp.com Forrest Root Corporate DHCP & DNS Servers boi.corp.com1 Corporate DHCP & DNS Servers sd.corp.com1 atl.corp.com1 hpprinters delegate DNS-SD Server Corporate DHCP & DNS Servers Corporate DHCP & DNS Servers hpprinters.corp.com2 sd.hpprinters.corp.com4 (San Diego Printers - SD) boi.hpprinters.corp.com3 (Boise Printers - BOI) bldg01.boi.hpprinters.corp.com (Boise Building 1 – BOI01) atlanta.hpprinters.corp.
Multi-site Client Discovery (VPN access) Example Sequence of events corp.com Forrest Root Corporate DHCP & DNS Servers VPN boi.corp.com1 Corporate DHCP & DNS Servers sd.corp.com1 atl.corp.com1 hpprinters delegate DNS-SD Server Corporate DHCP & DNS Servers Corporate DHCP & DNS Servers hpprinters.corp.com2 sd.hpprinters.corp.com4 (San Diego Printers - SD) boi.hpprinters.corp.
68
Multi-site Client Discovery (VPN access) Corporate DHCP & DNS Servers Client Client Corporate DHCP & DNS Servers Discovery Server Corporate DHCP & DNS Servers Client Connect to network Connect to network IP, Netmask, DNS IP, Netmask, DNS Request domains Discovery Server Request domains (using in-addr.arpa reverse lookup zone) DNS-SD Discovery Server domain (hpprinters.corp.
11 Appendix D - Troubleshooting 11.1 Display the DNS servers and search domains that are set (Mac OS X client only) Connect a Mac OS X (10.11.x) client to the network under test, and open a terminal window. This step will verify that search domains have been configured correctly. scutil --dns Use this command to view the current DNS configuration. The first resolver displayed is the “default”, and should show the IP address of the main DNS server (nameserver), and the search domains that are set.
11.2.2 Display a list of printers (print services) for a zone This step will verify that the Discovery Server has been correctly configured, and that the delegation from the DNS server to the Discovery Server is correct. dns-sd -B _ipp._tcp The list of configured printers will be shown. If the JAC Print Server is setup in the zone listed, it should be shown in the list of print services.
11.3 Verify correctness of DNS records for a zone The DNS Data file for each printer zone should include the DNS records listed below. 1. DNS-SD records created for that zone: b._dns-sd._udp db._dns-sd._udp r._dns-sd._udp dr._dns-sd._udp lb._dns-sd._udp PTR PTR PTR PTR PTR name> name> name> name> 2. DNS records for each printer created within that zone: a. A Record (with the IP address of the printer) A b. SRV Record ._ipp.
11.4 Verify printers If a particular printer is expected to be displayed in the list of configured printers, but is not, the following steps may help diagnose the issue. 11.4.1 Verify that the Printer is online Ping IP address of the printer to verify that the printer is connected on the network and online. ping If you are unable to ping the printer, check to make sure the printer is connected on the network, powered on, and that the IP address is correct.
If a printer supports IPP, ipptool will display the XML result returned by the printer, and the field for the printer-make-and-model will be filled in with the value corresponding to the printers make and model name. If a printer does not support IPP, ipptool may show an error message. In some cases, ipptool may show output, but the printer-make-and-model will not be filled in.