
Software Suite for Microsoft SQL Licenses User guide

NOTE: If the backup server is running the NetBackup client interface, NetBackup cannot validate
the policy.
NOTE: If you add the NetBackup path to the system’s PATH environment variable after you install
HP 3PAR Recovery Manager Software for Microsoft SQL Server, you must restart Recovery Manager
for your changes to take effect.
Configuring HP Data Protector
Requirements
• HP Data Protector Software 6.2
• Data Protector patch for omnidl (# DPWIN_00514)
• Each data list name (also known as the backup specification) must be unique across the entire
system
Setting Up the HP Data Protector Backup Specification
To use HP Data Protector with Recovery Manager, you must set up a default backup specification.
The backup specification specifies the default mount point and the necessary devices for tape
backup.
1. Open the Data Protector GUI.
2. Select Backup→Add Backup.
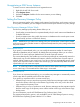
3. In the Create New Backup dialog box, select Blank_Filesystem_Backup and click OK.
4. Click Next (do not select any items).
5. Select the device that Data Protector is to use for backups.
6. Click Next until the Manual add... appears.
7. Click Manual add...
8. Select Windows filesystem and click Next.
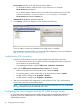
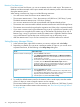
9. Enter the appropriate client system, mount point, and description. HP recommends:
<server_used_as_backup_client>Client system
C:Mount point
defaultDescription
NOTE: Recovery Manager uses this information only to create a backup template. Recovery
Manager does not use the actual data entered.
10. Click Next until the Finish button is enabled.
11. Save the backup specification.
When you issue the RMSql backup command with the -dl option, use the name with which
you saved the backup specification (e.g., DPbackup) as the value of the -dl option.
Setting Up HP Data Protector Cell Manager Access
To use HP Data Protector with Recovery Manager, you must enable the system accounts on the
registered client system to access the Data Protector Cell Manager.
1. Open the Data Protector GUI.
2. In the toolbar drop-down list, select Users.
3. Under the Users folder in the left pane, select admin→SYSTEM.
4. In the Client system drop-down list on the General tab in the right pane, select <Any>.
Configuring HP Data Protector 25