
Operating System Software User Manual
4. Type your new password, and then retype the password to confirm.
5. Select Configure the Device, then select the device to configure, either eth0 or eth1.
6. Change the device’s static IP address to an IP address of your choice. See “Configuring a
Static IP Address” (page 264).
7. Click OK, and then click Save & Quit to save the IP address and close the screen.
8. Select DNS configuration.
9. Change the default Hostname setting from localhost.localdomain to
server.domain.com.
By default, the primary DNS is set to 192.168.1.2, and the secondary DNS is set to
192.168.1.3.
10. By default, the DNS Search Path setting is udu.pa.hp.com. Change this to the appropriate
path.
11. Click OK, and then click Save & Quit to save the configuration and close the screen.
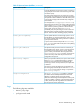
12. The Authentication menu appears. You can accept the default settings, or toggle any of them
on or off by assigning or removing the * character.
13. The NIS Settings screen appears. Add the correct domain (for example, udu.pa.hp.com),
then the Hostname of the server, if needed, and then click OK. HP 3PAR Quorum Witness
starts.
14. Log in with your user name and password:
Username
root
Password
(the password you set in 4)
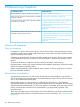
Configuring a Static IP Address
The HP 3PAR Quorum Witness virtual machine requires a static IP address.
To configure a static IP address, follow these steps:
1. Stop the network manager:
service network stop
2. Ensure correct service boot behavior:
chkconfig network off
chkconfig network on
3. Change the /etc/sysconfig/network with the following settings:
NETWORKING=yes
HOSTNAME=server.domain.com
GATEWAY=192.168.1.1
4. Change /etc/sysconfig/network-scripts/ifcfg-eth0 with the following settings:
DEVICE=eth0
BOOTPROTO=static
BROADCAST=192.168.1.255
IPADDR=192.168.1.10
NETMASK=255.255.255.0
NETWORK=192.168.1.0
ONBOOT=yes
5. Change /etc/resolv.conf with the following settings:
search domain.com
nameserver 192.168.1.2
264 HP 3PAR Quorum Witness Deployment