
HP Color LaserJet Managed MFP E47528 User Guide
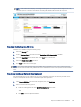
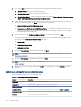

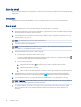


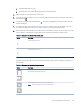
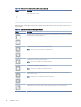
Table Of Contents
- Printer overview
- Paper trays
- Supplies, accessories, and parts
- Copy
- Scan
- Fax
- Manage the printer
- Solve problems
- Control panel help system
- Reset factory settings
- A “Cartridge is low” or “Cartridge is very low” message displays on the printer control panel or EWS
- Printer does not pick up paper or misfeeds
- Clear paper jams
- Paper jam locations
- Auto-navigation for clearing paper jams
- Experiencing frequent or recurring paper jams?
- 31.13 jam error in the document feeder
- 13.B2.D1 jam error in tray 1
- 13.B2.D2 jam error in tray 2
- 13.A3 jam error in tray 3
- 13.B2 jam error in rear door
- 13.B4, 13.B5 jam error in fuser input
- 13.B9 jam error in fuser output
- 13.D1, 13.D3 jam error in the duplexer
- 13.E1 jam error in the output bin
- Resolving color print quality problems
- Improve copy image quality
- Improve scan image quality
- Improve fax image quality
- Solve wired network problems
- Solve wireless network problems
- Solve fax problems
- Service and support
- HP limited warranty statement
- HP's Premium Protection Warranty: LaserJet toner cartridge limited warranty statement
- Long life consumable and maintenance kit limited warranty statement
- HP policy on non-HP supplies
- HP anticounterfeit Web site
- Data stored on the toner cartridge
- End User License Agreement
- Customer self-repair warranty service
- Customer support
- Environmental product stewardship program
- Protecting the environment
- Ozone production
- Power consumption
- Toner consumption
- Paper use
- Plastics
- HP LaserJet print supplies
- Paper
- Material restrictions
- Battery information
- Disposal of waste equipment by users (EU, UK, and India)
- Electronic hardware recycling
- Brazil hardware recycling information
- Chemical substances
- Product Power Data per European Union Commission Regulation 1275/2008 and the UK Relevant Statutory Requirements
- SEPA Ecolabel User Information (China)
- The regulation of the implementation on China energy label for printer, fax, and copier
- Restriction on Hazardous Substances statement (India)
- WEEE (Turkey)
- Substances Table (China)
- Material Safety Data Sheet (MSDS)
- EPEAT
- Substances Table (Taiwan)
- For more information
- Regulatory information
- Regulatory statements
- Regulatory model identification numbers
- European Union & United Kingdom Regulatory Notice
- FCC regulations
- Canada - Industry Canada ICES-003 Compliance Statement
- VCCI statement (Japan)
- EMC statement (Korea)
- EMC statement (China)
- Power cord instructions
- Power cord statement (Japan)
- Laser safety
- Laser statement for Finland
- Nordic Statements (Denmark, Finland, Norway, Sweden)
- GS statement (Germany)
- Eurasian Conformity (Armenia, Belarus, Kazakhstan, Kyrgyzstan, Russia)
- EMI statement (Taiwan)
- Product stability
- Telecom (fax) statements
- Regulatory statements
- Index

3. If you clicked Add, the Quick Sets Setup page opens. Complete the following information:
a. Quick Set Name: Enter a title for the new Quick Set.
b. Quick Set Description: Enter a description of the Quick Set.
c. Quick Set Start Option: To set how the Quick Set starts, click either Enter application, then user presses
Start or Start instantly when selected from the Home Screen.
4. Select a default location where scanned les are saved on USB storage devices inserted into the USB port
on the control panel, and then click Next. The default location options are:
● Save at root directory of the USB storage device.
● Create or place in this folder on the USB Storage Device — The path to the folder on the USB storage
device must be specied when using this le location option. A backslash \ must be used to separate
folder\subfolder names in the path.
5. Select an option from the Condition on Which to Notify: drop-down list, and then click Next.
This setting determines if, or how, users are notied when a Save To USB Quick Set job completes or fails.
The options for the Condition on Which to Notify: setting are:
● Do not notify
● Notify when job completes
● Notify only if job fails
6. Choose the Scan Settings for the Quick Set, and then click Next.
NOTE: For more information on the available scan settings, see Default scan settings for Scan to USB
Drive setup on page 90
7. Choose the File Settings for the Quick Set, and then click Next.
NOTE: For more information on the available le settings, see Default scan settings for Scan to USB Drive
setup on page 90
8. Review the summary of settings, and then click Finish to save the Quick Set, or click Previous to edit the
settings.
Default scan settings for Scan to USB Drive setup
Review the default settings for Scan to USB Drive setup.
Table 6-14
Scan settings for Scan to USB Drive setup
Feature Description
Original Size Select the page size of the original document.
Original Sides Select whether the original document is single-sided or double-sided.
Optimize Text/Picture Select to optimize for the output of a particular type of content.
Content Orientation Select the way the content of the original document is placed on the page: Portrait or Landscape.
Background Cleanup Select a value to remove faint images from the background or to remove a light background color.
Darkness Select a value to adjust the darkness of the le.
90 Chapter 6 Scan