Technical white paper HP LaserJet Enterprise M406, M407, M455, MFP M430, M431 M480, Managed E40040, E45028, MFP E42540, E47528 - Unable to print from PC or Printer is Offline or not responding while printing from the PC Table of contents Overview 2 Make sure the printer is ready to print 2 Download the correct printer driver 3 Resolve an offline printer (Windows) 3 Step 1: Manually set the default printer 3 Step 2: Check the printer port and Windows services status 5 Step 3: Create a manual IP connec
Overview On your Windows computer or Mac, the printer status might show “Offline” and the printer does not print. Use the troubleshooting steps in this document in the order presented when your printer is “Offline” status using a Windows or Mac /macOS operating system. Make sure the printer is ready to print Your printer should be on, have paper in the input tray, have sufficient toner, and display no errors or blinking lights. 1. Make sure that the printer is not off or in sleep mode.
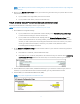
Download the correct printer driver Follow these steps to download the printer driver for your printer: 1. Go to HP Customer Support. 2. In the Identify your product for manuals and specific product information section, type your printer model in the text box, and then click the Submit button. 3. On the product home page, click Software, Drivers and Firmware. 4. Click the plus sign (+) to expand the driver section and view the latest driver available. 5.
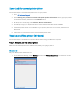
2. Make sure that the Let Windows manage my default printer check box is not selected or not checked. 3. From the list of printers, click the printer name that matches the name of your printer, and then click Manage. If there are multiple names listed, select the printer that has a status of idle or online. 4. Click the Manage button, and then click Set as default. 5. Try to print. If the printer remains offline, continue to the next step.
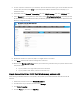
Step 2: Check the printer port and Windows services status If your printer uses a WSD port, check the status of Windows Function Discovery services, and then add a TCP/IP port if necessary. 1. Search Windows for 'Control Panel' to open Control Panel, and then click View devices and printers to open the “Devices and Printers window. 2. Right-click your printer, select Printer Properties, and then click the Ports tab. 3. Check if your printer uses a WSD port.
NOTE: A Host Name is preferred when creating the port because the printer IP address may change in a DHCP network. 11. Return to the Devices and Printers window, press the F5 key, and then click your printer name to view the printer status. If your printer is no longer offline, the issue is resolved. If your printer is still offline, continue to the next step. Step 3: Create a manual IP connection (network connections only) Use the printer IP address to manually connect to your printer.
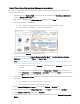
5. From a computer connected to your network, open an internet browser, type one of the URLs into the address field, and then press Enter to open the printer’s EWS. If the EWS does not display, try a different browser. 6. In the EWS, click the Network or Networking tab, click “TCP/IP Settings” and click “TCP/IP(v4)” tab. 7. Select Manual IP by clicking the drop-down menu under “IP Configuration Method”. Manually type the IP address.
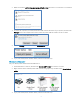
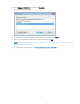
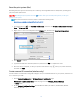
5. Select Standard TCP/IP Port, and then click New Port. Figure 2: Creating a new TCP/IP Port 6. Type the printer’s IP address that you wrote down earlier, and then click Next. 7. Select the new Standard TCP/IP Port from the list, and then click OK. NOTE: You might see a second printer device display in the list of devices. Do not uninstall either printer device. Leave both printer devices. 8. Try printing. If problems persist, see Troubleshoot your printer connection.
Resolve an offline printer (Mac/ macOS) Remove and re-add your printer Delete your printer from the print queue to clear errors, and then re-add it. 1. Click the Apple icon , click System Preferences, and then click Printers & Scanners, Print and Scan, or Print and Fax. 2. Highlight the printer you want to remove, and then click the Minus sign of printers. at the bottom of the list 3. Click Delete Printer. 4. Click the Plus sign . 5. Select your printer from the list. 6.
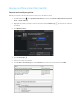
Reset the print system (Mac) Resetting the print system can clear any error states by removing all HP and non-HP printers, pending print jobs, and printer preferences. CAUTION: Resetting the print system removes all printers. After you reset the print system, re-add your printers to the queue. Follow the instructions in this document or watch the following video: https://www.youtube.com/watch?v=fd_aYuvLuTU 1.
Under 802.11 Wireless, the Status should be Connected. Under 802.11 Wireless, find the printer's IP Address, Subnet Mask, and Default Gateway numbers. If you see different numbers for IPv4 and IPv6, you only need the IPv4 numbers. Under General Information, find the URL(s) for Embedded Web Server. Your printer might have more than one URL. 3.
5. Select Manual IP, and then provide your printer information. To auto-fill all fields, click Suggest a Manual IP Address, and then make sure the fields for Manual IP Address, Manual Subnet Mask, and Manual Default Gateway match your printer's information on the Network Configuration Page. If Suggest a Manual IP Address is not available, type the information from the Network Configuration page into the IP Address, Subnet Mask, and Default Gateway fields. 6.
Troubleshoot your printer connection HP Printers - Troubleshoot a Wi-Fi Printer Connection HP Printers - Troubleshoot a USB Printer Connection HP Printers - Troubleshooting a Wired Printer Connection To read more about this issue, go to https://support.hp.com support.hp.com Current HP driver, support, and security alerts delivered directly to your desktop. © Copyright 2021HP Development Company, L.P. The information contained herein is subject to change without notice.