
Reference Guide
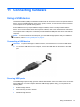
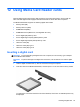


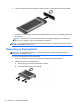

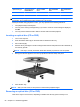
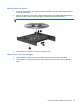
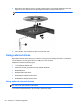
Table Of Contents
- Notebook tour
- HP Write Filters
- Configuration
- Applications
- Pointing devices and keyboard
- Using pointing devices
- Using the keyboard
- Using hotkeys
- Displaying system information
- Decreasing screen brightness
- Increasing screen brightness
- Switching the screen image
- Muting speaker sound
- Decreasing speaker sound
- Increasing speaker sound
- Playing the previous track or section of an audio CD or a DVD
- Playing, pausing, or resuming an audio CD or a DVD
- Playing the next track or section of an audio CD or a DVD
- Using hotkeys
- Using the keypads
- Power
- Power control and light locations
- Shutting down the computer
- Setting power options
- Using battery power
- Using external AC power
- Multimedia
- Wireless
- Modem and LAN
- Security
- Connecting hardware
- Using Media Card Reader cards
- Using ExpressCards
- Hardware upgrades
- MultiBoot
- Computer Setup
- Routine care
- Index

When the disc tray opens
1. Press the release button (1) on the drive bezel to release the disc tray, and then gently pull out
the tray (2) until it stops.
2. Remove the disc (3) from the tray by gently pressing down on the spindle while lifting the outer
edges of the disc. Hold the disc by the edges and avoid touching the flat surfaces.
NOTE: If the tray is not fully accessible, tilt the disc carefully as you remove it.
3. Close the disc tray and place the disc in a protective case.
When the disc tray does not open
1. Insert the end of a paper clip (1) into the release access in the front bezel of the drive.
2. Press in gently on the paper clip until the tray is released, and then pull out the tray (2) until it
stops.
Using optical drives (select models only) 59