
HP LaserJet Managed MFP E72425, E72430 - User Guide
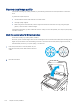
Table Of Contents
- Printer overview
- Paper trays
- Supplies, accessories, and parts
- Copy
- Scan
- Set up Scan to Email
- Set up Scan to Network Folder
- Set up Scan to USB Drive
- Scan to Job Storage
- Scan to USB drive
- Use HP JetAdvantage business solutions
- Additional scan tasks
- Fax
- Manage the printer
- Solve problems
- Customer support
- Control panel help system
- Reset factory settings
- A “Cartridge is low” or “Cartridge is very low” message displays on the printer control panel or EWS
- Printer does not pick up paper or misfeeds
- Clear paper jams
- Introduction
- Paper jam locations
- Auto-navigation for clearing paper jams
- Experiencing frequent or recurring paper jams?
- Clear paper jams in the document feeder (31.13.yz)
- Clear paper jams in Tray 1 (multipurpose tray) (13.A1)
- Clear paper jams in Tray 2, Tray 3 and the optional 2 x 520-sheet trays (13.A2, 13.A3, 13.A4)
- Clear paper jams in the output bin (13.E1)
- Clear paper jams in the right door and fuser area (13.B9, 13.B2, 13.FF)
- Resolve print-quality problems
- Introduction
- Troubleshoot print quality
- Update the printer firmware
- Print from a different software program
- Check the paper-type setting for the print job
- Check toner-cartridge status
- Print a cleaning page
- Visually inspect the toner cartridge or cartridges
- Check paper and the printing environment
- Try a different print driver
- Check the EconoMode settings
- Adjust print density
- Troubleshoot image defects
- Improve copy image quality
- Improve scan image quality
- Improve fax image quality
- Solve fax problems
- Checklist for solving fax problems
- General fax problems
- The fax failed to send
- No fax address book button displays
- Not able to locate the Fax settings in HP Web Jetadmin
- The header is appended to the top of the page when the overlay option is enabled
- A mix of names and numbers is in the recipients box
- A one-page fax prints as two pages
- A document stops in the document feeder in the middle of faxing
- The volume for sounds coming from the fax accessory is too high or too low
- USB flash drive is not responding
- Index

Check the paper settings
Follow these steps if copied pages have smears, fuzzy or dark print, curled paper, or areas where pigment has
dropped out.
Check the paper selection options
Use the following steps to check the paper selection options.
1. From the Home screen on the printer control panel, navigate to the Copy application, and then select the
Copy icon.
2. Select Options, and then scroll to and select Paper Selection.
3. Select Paper size, and then select one of the predened options.
4. Select Paper type, and then select one of the predened options.
5. Select Paper tray, and then select one of the predened options.
6. Select Done to save the paper selection options.
Check the image-adjustment settings
Adjust the settings in the
Copy menu to optimize image quality.
● Sharpness: Clarify or soften the image. For example, increasing the sharpness could make text appear
crisper, but decreasing it could make photos appear smoother.
● Darkness: Increase or decrease the amount of white and black used in colors in scanned images.
● Contrast: Increase or decrease the dierence between the lightest and the darkest color on the page.
● Background Cleanup: Remove faint colors from the background of scanned images. For example, if the
original document is printed on colored paper, use this feature to lighten the background without aecting
the darkness of the image.
● Automatic Tone: Available for Flow printers only. The printer automatically adjusts the Darkness, Contrast,
and Background Cleanup settings to the most appropriate for the scanned document.
1. From the Home screen on the printer control panel, navigate to the Copy application, and then select the
Copy icon.
2. Select Options, and then scroll to and select Image Adjustment.
3. Adjust the sliders to set the levels, and select Done.
4. Select Copy to start the copy job.
NOTE: These settings are temporary. After you have nished the job, the printer returns to the default
settings.
Optimize copy quality for text or pictures
Optimize the copy job for the type of image being copied: text, graphics, or photos.
1. From the Home screen on the printer control panel, navigate to the Copy application, and then select the
Copy icon.
148
Chapter 9 Solve problems