
HP LaserJet Managed MFP E72425, E72430 - User Guide
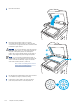
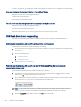

Table Of Contents
- Printer overview
- Paper trays
- Supplies, accessories, and parts
- Copy
- Scan
- Set up Scan to Email
- Set up Scan to Network Folder
- Set up Scan to USB Drive
- Scan to Job Storage
- Scan to USB drive
- Use HP JetAdvantage business solutions
- Additional scan tasks
- Fax
- Manage the printer
- Solve problems
- Customer support
- Control panel help system
- Reset factory settings
- A “Cartridge is low” or “Cartridge is very low” message displays on the printer control panel or EWS
- Printer does not pick up paper or misfeeds
- Clear paper jams
- Introduction
- Paper jam locations
- Auto-navigation for clearing paper jams
- Experiencing frequent or recurring paper jams?
- Clear paper jams in the document feeder (31.13.yz)
- Clear paper jams in Tray 1 (multipurpose tray) (13.A1)
- Clear paper jams in Tray 2, Tray 3 and the optional 2 x 520-sheet trays (13.A2, 13.A3, 13.A4)
- Clear paper jams in the output bin (13.E1)
- Clear paper jams in the right door and fuser area (13.B9, 13.B2, 13.FF)
- Resolve print-quality problems
- Introduction
- Troubleshoot print quality
- Update the printer firmware
- Print from a different software program
- Check the paper-type setting for the print job
- Check toner-cartridge status
- Print a cleaning page
- Visually inspect the toner cartridge or cartridges
- Check paper and the printing environment
- Try a different print driver
- Check the EconoMode settings
- Adjust print density
- Troubleshoot image defects
- Improve copy image quality
- Improve scan image quality
- Improve fax image quality
- Solve fax problems
- Checklist for solving fax problems
- General fax problems
- The fax failed to send
- No fax address book button displays
- Not able to locate the Fax settings in HP Web Jetadmin
- The header is appended to the top of the page when the overlay option is enabled
- A mix of names and numbers is in the recipients box
- A one-page fax prints as two pages
- A document stops in the document feeder in the middle of faxing
- The volume for sounds coming from the fax accessory is too high or too low
- USB flash drive is not responding
- Index

Check the output-quality settings
This setting adjusts the level of compression when saving the le. For the highest quality, select the highest
setting.
1. From the Home screen on the printer control panel, navigate to the Scan application, and then select the
Scan icon.
2. Select one of the following Scan features:
● Scan to Email
● Scan to Network Folder
● Scan to USB Drive
● Scan to SharePoint®
3. Select Options, and then select File Type and Resolution.
4. Select one of the predened Quality and File Size options, and then select Done.
5. Select Send or Save to start the scan.
Improve fax image quality
If the printer is having fax quality problems, try the following solutions in the order presented to resolve the
issue.
Try these few simple steps rst:
● Use the atbed scanner rather than the document feeder.
● Use high-quality originals.
● When using the document feeder, load the original document into the feeder correctly, using the paper
guides, to avoid unclear or skewed images.
If the problem still exists, try these additional solutions. If they do not x the problem, see “Improve print quality”
for further solutions.
Check the scanner glass for dirt and smudges
Learn about solving copy-quality debris problems.
Over time, specks of debris might collect on the scanner glass and document feeder white plastic backing, which
might cause print defects. Use the following procedure to clean the scanner if the printed pages have streaks,
unwanted lines, black dots, poor print quality, or unclear text.
1. Press the power button to turn the printer o, and
then disconnect the power cable from the electrical
outlet.
Check the output-quality settings 153