
HP DesignJet T100 and T500 Printer Series - User Guide


Use Windows forms
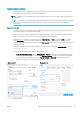
1. From the Start menu, or from the Control Panel, click Printers then from the File menu, select Server
Properties.
Windows 7: From the Start menu, or from the Control Panel, click Devices and Printers, then Select Printer.
2. In the Forms tab, check the Create a new form box.
3. Enter the name and dimensions of your new paper size. Leave the margins as 0.00.
4. Click the Save Form button.
5. Go to the printer driver, and select the Paper/Quality or Paper tab (depending on the driver version).
6. Select More… from the drop-down list of paper sizes.
7. Select your new paper size from the group of Custom sizes.
A custom paper size created with Windows forms has the following characteristics:
● The paper size is permanent. It will not disappear if the driver is closed or the computer is turned o.
● Restricted users cannot create paper forms. The “manage documents” role in the Windows Active Directory
is the minimum required.
● The paper size is local to the computer. It will be seen in all the printer queues that have been created on
the computer and that support paper of that size.
● If a printer queue is shared, this paper size will appear in all the client computers.
● If a printer queue is shared from another computer, this paper size will not appear on the driver´s
document size list. A Windows form in a shared queue needs to be created in the server.
● If the printer queue is deleted, the paper size is not deleted.
Select margins options
By default, the printer leaves a 5 mm margin between the edges of your image and the edges of the paper.
However, you can change this behavior in the following ways:
● In the Windows V3 driver dialog: Select the Paper/Quality tab and then click the Margins/Cutter setting
button. In the Layout and Margins window, you can see the options described below.
● In the Windows V4 driver dialog: Select the Layout tab and then check the Layout Mode area, where you
can see the options described below.
If you want to change the default cutter options, select the Output tab, and click the Roll options.
You will then see at least some of the following options.
● Standard or Use application settings (depending on the driver architecture). Your image will be printed on a
page of the size you have selected, with the default margin between the edges of the image and the edges
of the paper. The image should be small enough to t between the margins.
● Oversize. You should load paper that is larger than the size you selected in the application or driver. If you
cut o the margins after printing, you will be left with a page of the size you selected, with no margins
remaining between your image and the edges of the paper. This is useful when you want your image to
cover the whole area of the paper.
● Clip Contents By Margins. Your image will be printed on a page of the size you have selected, with the
default margin between the edges of the image and the edges of the paper. In this case, if the image is the
same size as the page, the printer assumes that the extreme edges of the image are either white or
ENWW Printing from a computer using a printer driver (Windows only) 39