User's Guide HP Fax 700/750
Contents :KDW V LQ 7KLV *XLGH 8QSDFNLQJ DQG &RQQHFWLQJ
6HQGLQJ D )D[ 'LDOLQJ /RDGLQJ WKH GRFXPHQW 0DNLQJ WKH LPDJH OLJKWHU RU GDUNHU DQG FKDQJLQJ UHVROXWLRQ 0DNLQJ &RSLHV
9LHZLQJ DQG 3ULQWLQJ 5HSRUWV 9LHZ DQG 3ULQW D UHSRUW IRU WKH ODVW WUDQVDFWLRQ VHQW 3ULQW D UHSRUW IRU WKH ODVW WUDQVDFWLRQV 3ULQW D OLVW RI $XWR 'LDO DQG 2QH 7RXFK QXPEHUV 3ULQW D UHSRUW RI WKH VHWWLQJV FRQWUROOLQJ \RXU )D[
7DNLQJ &DUH RI
What's in This Guide Take a look at : The Menu Options foldout at the front of this guide. The foldout gives you an overview of tasks and menu items. Then check Using the Front Panel. It gives you a quick guide to what the buttons can do for you. The Setting up section includes information on navigating the menus and detailed instructions for entering the the date, time, name, and number for this fax. Tasks like Sending a Fax and Making Copies are described in detail.
Unpacking and Connecting Your HP FAX-700/750 To unpack and connect your HP FAX-700/750, follow the instructions on the following pages to: P P P P P Unpack and remove packing material Connect the power and cord phone line Load paper Install the print cartridge Open the document trays When you have completed unpacking and connecting, turn to Setting up Your HP FAX-700/750.
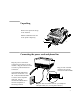
Unpacking Remove the tape from the top of the machine. Pull the cardboard insert out of the printer output tray. el-45 Connecting the power cord and phone line Plug the power cord into the connection at the left rear of the machine. Plug the other end of the cord into a grounded electrical connection. Your HP FAX-700/750 has three line connections. Use the connection labeled LINE to connect to the telephone wall jack. Use the connections labeled TEL to connect a telephone or answering machine.
Loading paper ek_4 ek_1 Open the paper tray. Slide the paper guide to the left for U.S. Letter and U.S. Legal size paper, or to the right for A4 size paper. Be sure to change the Paper Size in the Settings Menu when you change sizes. See "Customizing Your FAX-700/750" in this guide. ek 6 ek_5 Slide paper into the paper tray. Not more than about 100 sheets. 4 Then close the paper tray.
Installing the print cartridge If a cartridge is already installed, remove it. STOP ek 47 ek 27 Turn on the fax, then open the top cover. Handle the new print cartridge only by the green top. Gently remove both pieces of tape. Be careful not to touch the ink nozzles or the copper contacts. ek 18 ek 19 Put the print cartridge into the cradle. Push the print cartridge forward firmly until it snaps into place. Then close the top cover.
Opening the document trays ek 7 Reach under the front panel and slide the document out tray forward, until it stops. 6 ek 8 Extend both the document in tray and out tray. Press down on the front edge of the out tray, and the back edge of the in tray to flip them open.
Navigate move cursor Access stored numbers Using the Front Panel Read messages and Menus Erase mistakes Edit One-Touch and Auto Dial numbers Cancel an activity Display Menus One-Touch Dialing Stop Auto Dial Backspace Store Number Enter/Monitor Redial/Pause Resolution Start/Copy Report/Space Photograph Contrast Dial stored number Dial, enter names, select from menus Begin sending or copying Select, save, or perform or dial interactively Print reports or enter a space Control how faxes a
Using Buttons and Keys The HP LearnFAST User Interface allows you to use more than one button or key to move around in menus. You can also choose options and select settings in more than one way.
Using Menus and Navigating Menus are lists of tasks that you can perform, and settings that you can use to control how your HP FAX-700/750 works. Displaying the menus Press Menu to display Menu Options. The number of options or tasks in each menu is displayed next to the title of the menu. See the menu options foldout at the front of this guide to review settings. Browsing the menus You can press the down arrow to browse down through the numbered list of menu options.
Selecting settings Some settings, like Yes/No, are displayed side by side, with the cursor blinking on one of the choices. Use the arrow keys to move the cursor to the setting you want, then press Enter. You can also use the Yes and No buttons, or Start/Copy. Entering letters and symbols in names Use the keypad to enter letters and symbols when you store names. P P P P P Press a key to display the first letter above that key.
Setting up Your HP FAX-700/750 To set up your HP FAX-700/750, follow the instructions on the following pages to: P P P Set the date and time Set the number and name Set the dialing method When you have completed these setup procedures, your HP FAX-700/750 is ready to send and receive faxes, and to make copies.
` Setting up the Date and Time These instructions show you, in detail, how to set the date and time that will print on each fax that you send. To do this, you will use menus, buttons and the keypad on the front panel. There are several ways to use buttons and keys with the HP LearnFAST User Interface. The instructions in this guide show you one, easy method. Follow the instructions below by first reading the text in the Do This column, then pressing the buttons and keys in the Using These Buttons column.
Setting up the Date and Time (Continued) Press the up and down arrows. When the month you want is displayed, press the right arrow to move to day. Browse to the day you want, then press the right arrow to move to year. Browse to the new year. If you make a mistake, use the left and right arrows to move to the mistake, then the up and down arrows to browse again. Date (MM/DD/YYYY) [Oct]10/20/1994 Save the Date Press Enter. Note that the display has changed.
` Setting up the fax number and name These instructions show you in detail how to set the number and name of your fax machine that will print on each fax you send. To do this, you will use menus, buttons and the keypad on the front panel. There are several ways to use buttons and keys with the HP LearnFAST User Interface. The instructions in this guide show you one, easy method.
Setting up the fax number and name (Continued) Use the keypad to enter your fax number. Press 0 through 9 for numbers, press * to enter a plus (+) sign. The right and left arrow buttons move the cursor. The Report/Space button enters a space. You cannot enter dashes in your number. Save the number Press the Enter button. Enter the name to print on each fax sent. Up to 20 characters. Number for this fax Name for this fax Name for this fax Press a key to enter the first letter above the key.
` Setting the dialing method The factory default dialing method is Tone, or touch dialing. If your telephone system uses a Pulse, or rotary dialing method, follow these instructions to select Pulse.
Testing the setup When you have completed the setup procedures on the previous pages, your fax machine is ready to send and receive faxes, and to make copies. You can verify the setup by printing and reviewing the Settings Report. Press Report/Space, then use the down arrow to display Settings, and press Enter. The Settings Report shows the fax name and number and date and time that were entered for this fax.
If you wish to connect a telephone or an answering machine to your fax machine, follow the procedures on the following pages. Warning When you first set up your HP FAX, be sure to leave it on for at least 12 hours to charge the backup battery. The battery saves information you enter during set up. Topics of Interest Connecting a telephone, 20 . . . . . . . . .
Connecting the handset to the HP FAX-750 Your HP FAX-700/750 has three line connections. Use the connection labeled LINE to connect to the telephone wall jack. Use the connections labeled TEL to connect a telephone or answering machine. ek 37 ek 14 Plug the small end of the coiled phone cord into the back of the handset. Lift the left side of the fax and snap the telephone base into the slots in the bottom edge of the fax machine.
Connecting a telephone Your HP FAX-700/750 has three line connections. Use the connection labeled LINE to connect to the telephone wall jack. Use the connections labeled TEL to connect a telephone or answering machine. ek 17 Telephone Wall Jack Plug one end of the phone cord into the back of the telephone. Plug the other end of the phone cord into one of the connections marked TEL. When you have connected the telephone, turn to Managing incoming calls and set the Reception mode.
Connecting a telephone answering machine Your HP FAX-700/750 has three line connections. Use the connection labeled LINE to connect to the telephone wall jack. Use the connections labeled TEL to connect a telephone or answering machine. ek_51 Plug one end of the answering machine line into the back of the answering machine Telephone Wall Jack Plug the the other end of the answering machine line into one of the connections marked TEL.
Managing incoming calls For this connection: Set Reception mode to: Then read this note: A telephone or answering machine on the same line Set Remote Reception to Enable To receive a fax in this mode, answer the extension phone and press Start/Copy on the front panel, or dial the remote reception code (123). An extension phone on Answer the telephone line not Manually connected directly to the fax When Answer Manually is selected the fax machine never answers incoming calls.
Sending a Fax Do This To Display Using These Buttons Dial the number, like you would a telephone Dial, Load Doc, 'START' Load the document, face down Document ready Press Start/Copy Dialing P Press Stop to stop sending. Dialing Use the numeric keys to dial numbers like you would dial a telephone. To get a dial tone, press the Enter/Monitor button before you begin dialing. Use this method when you need to wait for dial tones or respond to prompts.
Making the image lighter or darker and changing resolution To temporarily change the contrast or resolution for all of the pages in a fax that you are sending, press the Contrast or Resolution button on the front panel. If your document contains a photograph, press the Photograph button. The light next to a setting shows which setting is selected. After you send a fax, contrast and resolution return to the option selected in the settings menu, and photograph turns off.
Making Copies Do This Using These Buttons To Display Press Start/Copy Copy Number of copies=01 Select up to 99 copies Copy Number of copies=02 Load the document, face down Document ready Press Start/Copy P Copying 01 of 02 Press Stop to end copying. Loading the document Adjust the guides on the document in tray, above the front panel, to fit the document. Load the document face down in the document in tray. Be sure that the document is not stapled, paper clipped, or torn.
Controlling How Faxes and Copies Look To send a fax, or make a copy of this type document 6 point . . . . . . . . . . . . . . . . Alphabet . 8 point . . . . . . . . . . . Alphabet Consider choosing these settings Fine 9 point . . . . . . . . . Alphabet To change the setting for a single fax, use the Resolution button on the front panel. The light above the button shows which setting is on. 10 point . . . . . . Alphabet 11 point . . . . . Alphabet 12 point . . . Alphabet 14 point . .
To send a fax, or make a copy of this type document Consider choosing these settings Photograph When your document includes a picture with several shades of grey or many colors, press the Photograph button on the front panel. After you send a fax, or make a copy, Photograph returns to off. Set Photo Quality in the settings menu to the setting you will usually use, Quality or Economy. When you choose Quality, it requires more time to process, but produces a better reproduction.
Storing Numbers for Faster Dialing You can store frequently used numbers so that they can be dialed quickly. Follow the instructions on the following pages to: P P P P Store One-Touch and Auto Dial numbers Store Group Lists of One-Touch and Auto Dial numbers Review, change, or delete stored Auto Dial numbers Review, change, or delete stored Group Lists About Auto Dial numbers Auto Dial numbers allow you to store, or program, frequently called numbers. You can also store Group Lists of Auto Dial numbers.
This graphic represents how you can store and dial numbers. Read About Auto Dial numbers on the previous page for more detail.
Storing Auto Dial numbers Do This Press Store/Number Store Number (1-2) 1:Auto Dial Number Choose 1: Auto Dial Number Auto Dial (1-50):01 FAX Nbr: Unused The first unused code is shown.
Storing Group Lists of Auto Dial numbers Do This Using These Buttons To Display Press Store/Number Store Number (1-2) 1:Auto Dial Number Browse to 2: Group List Store Number (1-2) 2:Group List Choose 2: Group List Group List (1-50):XX 1St Nbr: Unused The first unused code is shown.
Reviewing, changing, or deleting stored numbers To review, change, or delete a One-Touch or Auto Dial number, use the same procedure that you use to store the number. When the number you want is displayed, you can change it, or space over the number to delete it. When you delete a number, the name stored with it is also deleted. After you have stored at least one group list, you can chose Edit Old in the Group List display.
Dialing with One-Touch and Auto Dial Do This Using These Buttons To Display To dial One-Touch numbers: Press the One-Touch key assigned to the number to dial Auto Dial (01-50) [01]:Name:Number To dial Auto Dial numbers: Press Auto Dial to access stored numbers Auto Dial (01-50) [01]:Name:Number Enter the Auto Dial code assigned to the number to dial Auto Dial (01-50) [01]:Name:Number Browse to a different number if you wish, in both One-Touch and Auto Dial Auto Dial (01-50) [01]:Name:Number When
Sending to a Distribution List You can send the same fax to more than one number. The instructions that follow show you how to: P P Send to two or more numbers with the menu. Enter more than one fax number when you send a fax. You can can also store One-Touch and Auto Dial numbers in group lists.
Sending to two or more numbers with the menu Do This Using These Buttons To Display Display the Menu Menu Options (1-9) 1:Scan & Send Browse to 4: Send to 2 or More Menu Options (1-9) 4:Send to 2 or More Choose Send to 2 or more Enter 1st number Dial a number, manually, One-Touch, or Auto Dial Save the number Enter another number now Repeat the above for each number you want to send to.
Entering more than one number when you send a fax Do This To Display Using These Buttons Dial a number, manually, One-Touch, or Auto Dial Dial, Load Doc, 'START' Save the number "START" to send Dial another number, manually, One-Touch, or Auto Dial Dial 2 of 2 Repeat the above for each number you want to send to. Up to 10 manually dialed and 40 One-Touch and Auto Dial numbers.
Sending a Scanned or Scheduled Fax You can reduce telephone connection time by first scanning, then sending a fax. You can also schedule a fax for a time when telephone rates may be lower, or when you know someone will be there to receive the fax. When you choose Scan and Send from the menu, documents are scanned into memory before the telephone connection is made. This generally results in faster transmission of the fax.
Scanning and sending from memory Do This Using These Buttons Press Menu Menu Options (1-9) 1:Scan & Send Choose 1:Scan & Send Enter number Dial a number, manually, One-Touch, or Auto Dial Load the document, face down Press Start/Copy P 38 To Display Press Stop to cancel Enter number Document ready Storing document
Sending a fax at a later time Do This Using These Buttons To Display Press Menu Menu Options (1-9) 1:Scan & Send Browse to 5: Schedule Send Fax Menu Options (1-9) 5:Schedule Send Fax Choose Schedule Send Fax Enter number Dial a number, manually, One-Touch, or Auto Dial Enter number Enter the time you want the fax sent Enter time to send 24Hr Clk [5:30] 17:30 If you entered only one number, store the fax, or leave it in the in tray Send from Intray/Memory Load the document, face down Document
Reviewing, changing, or canceling scheduled faxes Do This Using These Buttons Press Menu Menu Options (1-9) 1:Scan & Send Browse to 5: Schedule Send Fax Menu Options (1-9) 5:Schedule Send Fax Choose 5: Schedule Send Fax Schedule new fax or review? New/Review Choose Review 'ENTER' selects fax 01:(18:30) 1 619 592-> Browse to the fax you want to change or review 'ENTER' selects fax 03:(21:00) 1 814 335 -> Select the fax Cancel fax? Yes/No 03:(21:00) 1 814 335 -> Choose Yes to cancel, or No to re
Sending and Receiving by Polling Polling allows you to make documents available for others to retrieve by calling your fax machine if their fax has polling capability. It also allows you to call another fax machine that is set up for polling and retrieve documents if the other fax machine doesn't require a password or security code. For example, you may have a document that you want to make available to a group of people whenever they need it.
Allowing another to poll your fax machine Do This Using These Buttons Display the Menu Menu Options (1-9) 1:Scan & Send Browse to 8: Polling Menu Options (1-9) 8:Polling Choose 8: Polling Polling (1-2) 1:Being Polled Choose 1: Being Polled Being Polled (1-3) 1:Off Browse to 2: One Time Only Being Polled (1-3) 2:One Time Only Choose 2: One Time Only if you want the fax sent just once Send from Memory/in tray Choose to store the fax, or leave it in the in tray OR Send from Memory/in tray Brows
Receive from another fax machine by polling Do This Using These Buttons Press Menu Browse to 8: Polling Choose 8: Polling Browse to 2: Polling Choose 2: Polling Dial a number, manually, One-Touch, or Auto Dial P To Display Menu Options (1-9) 1:Scan & Send Menu Options (1-9) 8:Polling Polling (1-2) 1:Being polled Polling (1-2) 2:Polling Dial Number Dialing Press Stop to cancel Note Your HP FAX-700/750 allows you to poll another fax machine, if that machine doesn't require a password or security c
Viewing and Printing Reports Do This To Display Press Report/Space Print Report (1-4) 1:Last Transaction Choose the report you want: 1: Last Transaction 2: Last 32 Transactions 3: Auto Dial Directory 4: Settings Send OK Pages=XX Print Report? Yes/No When you choose Last Transaction, read the display. Choose Yes to print a copy.
View and Print a report for the last transaction sent When you choose Print Report Last Tranaction, the following report is generated: LAST TRANSACTION REPORT FOR HP FAX-700 SERIES FAX NAME: FAX NUMBER: VERSION: 01.0 DATE: TIME: DATE TIME REMOTE FAX NAME AND NUMBER DURATION PG RESULT DIAGNOSTIC S=FAX SENT O=POLLED OUT(FAX SENT) TO PRINT THIS REPORT AUTOMATICALLY, SELECT AUTOMATIC REPORTS IN THE SETTINGS MENU. TO PRINT MANUALLY, PRESS THE REPORT/SPACE BUTTON, THEN PRESS ENTER.
Print a report for the last 32 transactions When you choose Last 32 Transactions from the reports menu, the following report is generated: 32 TRANSACTION REPORT FOR HP FAX-700 SERIES VERSION: 01.00 FAX NAME: FAX NUMBER: DATE TIME DATE: TIME: REMOTE FAX NAME AND NUMBER DURATION PG RESULT DIAGNOSTIC S=FAX SENT R=FAX RECEIVED I=POLL IN(FAX RECEIVED) O=POLLED OUT(FAX SENT) Your HP FAX-700/750 transaction report can contain up to 32 records.
Print a list of Auto Dial and One-Touch numbers When you choose Auto Dial Directory from the reports menu, the following reports are generated: AUTO DIAL DIRECTORY FOR HP FAX 700 SERIES VERSION: 01.00 FAX NAME: FAX NUMBER: AUTO DIAL NO. NAME DATE: TIME: NUMBER NO. OF AUTO DIAL NUMBERS ASSIGNED = GROUP LIST DIRECTORY FOR HP FAX-700 SERIES VERSION:01.00 FAX NAME: FAX NUMBER: GROUP AUTO DIAL NO. NAME DATE: TIME: NUMBER The Auto Dial Directory lists all One-Touch and Auto Dial numbers in numeric order.
The One-Touch dialing overlay report is printed so that you can cut it out and place it under the plastic cover on the front panel. One-Touch DIALING OVERLAY FOR HP FAX-700 SERIES VERSION 01.
Print a report of the settings controlling your Fax When you choose Settings from the reports menu, the report reproduced on the next page is generated. All of the settings are listed with the options available. The current and standard, or factory settings, are shown to the right of each setting. To change any of the settings that control your HP FAX-700/750, see Customizing Your HP FAX-700/750.
SETTINGS REPORT FOR HP FAX-700 SERIES VERSION: 01.
The Automatic Power Failure Report If a power failure happens while documents are stored in memory, the following report is automatically printed when power is restored: POWER FAILURE REPORT FOR HP FAX-700 SERIES FAX NAME: FAX NUMBER: VERSION: 01.
Using the Telephone with the HP FAX-750 Placing and Answering Calls To get a dial tone, lift the handset from the base. To answer a call, press START. To hang up, either replace the handset on the base, or press the switchook. Controlling Ringer Volume The RINGER switch allows you to turn the telephone ringer off, or to set it to high or low ringer volume. Redialing The last number dialed is always stored for redialing. To dial the same number again, lift the handset and press REDIAL.
Using One-Touch Dialing You can store three telephone numbers, each up to 16 digits, for One-Touch dialing. To store a number, press PROG, enter the number, then press the One-Touch key M1, M2, or M3, to save the number. To dial a stored number, press the One-Touch key. To change a previously stored number, follow the steps above, The new number replaces the old one. When you store numbers, it's a good idea to write the number, or name, on the directory card located under the handset.
Set ringer volume Set Dialing for Tone or Pulse Dial stored One-Touch numbers Redial the last number Turn off the handset microphone Store One-Touch numbers EK 39 54
Customizing Your HP FAX-700/750 Your HP FAX-700/750 is shipped with settings that conform to the most common forms of usage. You can customize your fax by making changes in the menus to reflect how your phone system and office are set up. To access the settings, press the Menu button, then enter 6 and press Enter. Now use the up arrow and down arrow buttons to scroll to the setting you want to change.
This sample Settings Report shows how your HP FAX-700/750 was set up when shipped from the factory. To print your settings report choose 2: Print Report from the Main Menu, then choose 4: Settings from the Print Report Menu. SETTINGS REPORT FOR HP FAX-700 SERIES VERSION:01.
Settings for your telephone system P P P P Dialing Method Select the Dialing Method provided by your telephone system. Select Pulse if you have a pulse or rotary system, or Tone if you change to a Tone, or touch system. Reception Mode Select the reception that matches the devices you have connected to your fax. See Managing incoming calls for a description of reception modes. Distinctive Ring Some telephone systems allow multiple phone numbers on a single line.
Settings for your office P P P P P P P P 58 Date & Time The Date and Time are printed on each fax you send, and on reports. Fax Number & Name The Fax Number and Name you enter are printed on each fax you send, and on reports. Fax Resolution The factory default for Fax Resolution is Standard. You can select Fine if this is the resolution you usually use. To change the resolution for a single fax, use the Resolution button on the front panel. Copies are automatically made at fine resolution.
P P P P P P Header Location The factory default for Header Location is Outside Fax Area. The name and number you enter for this fax are printed at the top of each fax you send. You can change the location for the header to Inside Fax Area. Paper Size The factory default for Paper Size is Letter (U.S.). Change this to Legal (U.S.), or A4 (Metric), when you change the paper loaded for faxes and copies. The dimensions for these sizes are: Letter (U.S.) . 8.5 in by 11 in Legal (U.S.) . 8.
Taking Care of Your HP FAX-700/750 P P This information suggests solutions to common problems. If your HP FAX-700/750 is not operating properly and these suggestions do not solve your problem, try using one of the following support services to obtain assistance. For information by fax, call HP FIRST at (800) 333-1917. HP FIRST provides 24-hour toll-free technical information to you by fax.
Changing the paper separator If documents continually feed more than one page at a time, you may need to change the paper separator. Follow these instructions to change the paper separator. Open the front panel Paper Separator Assembly Notch Pry the paper separator assembly out at the notch using your fingers, a coin, or a small screwdriver. Install a new paper separator by pressing it firmly into place. Then close the front panel firmly, until both top corners snap into place.
Cleaning the scanner window glass When transmitted faxes or copies have lines or spots on them, follow these instructions to clean the scanner window glass and scanner plate. Lift the front panel to open it Scanning Glass Scanner Plate Use a lint-free cloth moistened with water to clean the scanner window glass. Then close the front panel until both top corners snap into place.
Clearing document and paper jams ek_10 To clear a document jam: Lift the front panel and remove the jammed document. Then close the cover. Caution: be sure to press both sides of the cover until it snaps closed. Note: If a document jam happens while you are storing to memory, press Stop on the front panel to clear memory, then start over. ek_22 ek_32 To clear a paper jam: Lift and remove the paper delivery tray. Do not attempt to clear paper from the print cartridge area. Remove the jammed paper.
Loading multipage documents to prevent jams When "Reload Document" is displayed, you may have to follow this procedure if your document contains many pages. Hold the document by the top and bottom edges. Bend it upwards to fan the bottom edges. Load the document so that the pages are fanned as they feed into the in tray.
Understanding display messages The messages in the following alphabetical list are displayed when problems occur. The meaning of the message is further defined in the Meaning column. The steps you should follow to correct the problem are in the Remedy column. See Avoiding Problems for hints and tips on how to best use your HP FAX. Message Meaning Remedy Call for service Your HP FAX requires service. Contact the HP Customer Support Center. The Customer Support Center is open Weekdays 7am to 6 pm.
Message Meaning Remedy Load paper There is no paper loaded, or the paper needs to be straightened and reloaded. Slide the paper tray out, load paper, set the paper guide to the left for letter or legal size paper, or to the right for A4 size paper. Slide the paper tray closed, then try again. Faxes received while paper is out are received to memory and printed when paper is loaded. See Also Loading paper, 4 Nothing stored, see Setting Up in guide The backup battery is discharged.
Message Meaning Remedy Replace ink cartridge The print cartridge is out of ink, or ink is not flowing from the cartridge. First, check to see that all pieces of tape are removed from the print cartridge. If the print cartridge is empty, install a new cartridge. If the cartridge is not empty, it could be that it needs cleaning. Use a lint-free cloth moistened with water to gently clean the contacts on the cartridge and the cartridge cradle. Reinstall the print cartridge.
Interpreting error codes When errors occur while you are sending or receiving faxes, an error message is included on the Last Transaction and Last 32 Transaction reports. The RESULT column of the report contains the word ERROR and an error code is printed to the right of the message. These codes report the following error conditions. If you resend a fax that reported an error, watch the front panel display for messages. For help on messages, see "Understanding display messages".
Avoiding Problems The following hints and tips will help you avoid problems when you use your HP FAX-700/750. Problem Hints and Tips Fax and Copy Problems Copies are missing information. If your copies aren't complete, adjust the print reduction setting. The factory default for copy reduction is 100%. You can change this to a reduction percentage within the range of 70% to 100%. Document jam. If you are having problems with documents jamming, check to see that the front cover is completely closed.
Problem Hints and Tips Telephone and Answering Machine Problems There is no dial tone, I'm unable Be sure that the fax and telephone lines are connected correctly. The fax to dial out. LINE must connect to the telephone wall jack. Telephones and answering The fax rings, but doesn't receive machines must connect to a connection marked TEL on the fax machine. faxes. A connected telephone rings even when I've set the fax ring volume to off. Be sure that the handset or telephone ring volume is set to off.
Replacement part numbers In tray extender C3530-43056 One-Touch overlay C3530-85010 Top cover assembly C3530-63051 Print cartridge 51626A ek 8 HP FAX-750 telephone C3781-60001 Paper separator C3530-62913 ek-22 Paper delivery tray C3530-62351 For ordering information, see page 73 71
HP FAX-700/750 specifications Paper Type Plain paper Paper Sizes Letter, legal, A4 Print Technology Inkjet Paper Tray Capacity Document Feeder Capacity 100 pages 20 pages (20-lb paper) Maximum Resolution Send 203 X 196 dpi Receive 203 X 196 dpi Copy 203 X 300 dpi Halftone levels 32 Transmission Speed* 9 seconds per page Memory* 256 KB (12 pages) Auto Dialing 50 auto dial numbers (10 One-Touch, 40 Auto Dial) Group Dialing Yes (up to 5 groups) Warranty 1 year overnight HP Express Exchang
Identifying and Solving Problems At Hewlett-Packard, we do everything we can to make sure that you'll never have to read this page. But if you do have a problem, just follow the steps in the problem solving process, and you'll soon be faxing again. First Year Warranty Programs HP guarantees the operation of HP FAX facsimiles during the first year of ownership. HP will either replace or repair any HP FAX facsimile that fails under normal use during the warranty period.
Whom to call if you're in the United States: The following Customer Resource table provides the Hewlett-Packard organizations to call for various types of product support.
Whom to call if you're in the United States (continued): Internet ftp address: 92.6.71.2 or (HP ftp site) ftp-boi-external.hp.com Printer drivers by mail Information on products, printer drivers and support for anyone with ftp access to the Internet 24 hours per day 7 days per week (303) 339-7009 Printer drivers may be obtained by contacting the software application manufacturer.
Whom to call if you're in the United States (continued): Post Warranty Support (fee -based support) (900) 555-1500 ($2.50* per minute U.S.
Whom to call if you're in Canada: The following Customer Resource table provides the Hewlett-Packard organizations to call for various types of product support.
Internet ftp address: 192.6.71.2 (HP or ftp site) ftp-boi-external.hp.
Warranty This warranty gives you specific legal rights. You may also have other rights which vary from state to state or province to province. One-Year Limited Warranty Hewlett-Packard warrants the HP FAX facsimile against defects in materials and workmanship for a period of one year from receipt by the end user. During the warranty period, Hewlett-Packard will, at its option, either repair or replace products that prove to be defective.
Notice to Users of the U. S. Telephone Network - FCC Requirements This equipment complies with FCC rules, Part 68. On this equipment is a label that contains, among other information, the FCC Registration Number and Ringer Equivalence Number (REN) for this equipment. If requested, provide this information to your telephone company. An FCC compliant telephone cord and modular plug is provided with this equipment.
Electromagnetic or Radio Frequency Interference - FCC Requirements This equipment generates and uses radio frequency energy and may cause interference to radio and television reception. Your facsimile complies with the specifications of Part 15 of the Federal Communications Commission rules for a Class B digital device. These specifications provide reasonable protection against such interference in residential installation.
$ DFFHVVLQJ PHQXV VHH 'LVSOD\LQJ WKH PHQXV $') VHH /RDGLQJ WKH RULJLQDO GRFXPHQW %URZVLQJ &RQWLQXHG WKURXJK FKDUDFWHUV VHH (QWHULQJ OHWWHUV DQG V\PEROV LQ QDPHV WKURXJK PHQX RSWLRQV EXWWRQV DQG NH\V XVLQJ $GMXVW 9ROXPH VHWWLQJ $GMXVWLQJ FRQWUDVW UHVROXWLRQ $OORZLQJ \RXU ID[ PDFKLQH WR EH SROOHG E\ DQRWKHU $OSKDEHWLF VHH (QWHULQJ OHWWHUV DQG V\PEROV LQ QDPHV $QVZHU PDQXDOO\ VHH 0DQDJLQJ LQFRPLQJ FDOOV DQVZHULQJ PDFKLQH FRQQHFWLQJ DUURZ NH\V XVLQJ WR EU
FRSLHV PDNLQJ PLVVLQJ LQIRUPDWLRQ QXPEHU RI VHH 0DNLQJ &RSLHV FRUGV FRQQHFWLQJ FXUVRU PRYLQJ VHH %URZVLQJ WKURXJK PHQXV &XVWRPL]LQJ \RXU +3 )$; ' 'DWH 7LPH VHWWLQJ GDWH VHWWLQJ GHIHUUHG ID[ VHH 6HQGLQJ D )D[ DW D /DWHU 7LPH GHOHWLQJ $XWR 'LDO DQG 2QH 7RXFK QXPEHUV 'LDO WRQH VHH 'LDOLQJ 'LDOLQJ 2QH 7RXFK DQG $XWR 'LDO QXPEHUV VHH 6HQGLQJ D )D[ 'LDOLQJ 0HWKRG VHWWLQJ GLUHFWRU\ $XWR 'LDO DQG 2QH 7RXFK SULQWLQJ
, ,' QXPEHU VHWWLQJ VHH 6HWWLQJ XS WKH ID[ QXPEHU DQG QDPH LPDJH PDNLQJ OLJKWHU RU GDUNHU PHGLD VHH &OHDULQJ GRFXPHQW DQG SDSHU MDPV VHH /RDGLQJ SDSHU PHPRU\ VFDQQLQJ DQG VHQGLQJ IURP PHQX RSWLRQV EURZVLQJ LQ WUD\ VHH /RDGLQJ WKH RULJLQDO GRFXPHQW VHH 2SHQLQJ WKH GRFXPHQW WUD\V RSWLRQV EURZVLQJ WKURXJK RSWLRQV FKRRVLQJ RSWLRQV 0RYLQJ GLUHFWO\ WR LQFRPLQJ FDOOV PDQDJLQJ ,QVWDOOLQJ WKH SULQW FDUWULGJH ,QWHUSUHWLQJ HUURU FRGHV VHQGLQJ RU PRUH QXP
QXPEHUV &RQWLQXHG 6WRULQJ $XWR 'LDO 2 2Q 2II VZLWFK VHH ,QVWDOOLQJ WKH SULQW FDUWULGJH 2QH 7RXFK DQG $XWR 'LDO QXPEHUV GLDOLQJ ZLWK SULQW D OLVW RI 5HYLHZLQJ FKDQJLQJ RU GHOHWLQJ VWRULQJ LQ JURXS OLVWV 3ULQW &RQWLQXHG D UHSRUW IRU WKH ODVW WUDQVDFWLRQ D UHSRUW RI WKH VHWWLQJV FRQWUROOLQJ \RXU )D[ 7KH DXWRPDWLF 3RZHU )DLOXUH 5HSRUW SULQW FDUWULGJH LQVWDOOLQJ 3ULQW 5HGXFWLRQ VHWWLQJ SULQWLQJ UHSRUWV SUREOHP VROYLQJ VHH 7DNLQJ &DUH RI \RXU +3 )$;
5HSRUWV &RQWLQXHG 9LHZLQJ DQG 3ULQWLQJ 5HVHDW RU ORDG LQN FDUWULGJH PHVVDJH 5HVHW WR 'HIDXOWV VHWWLQJ UHVROXWLRQ FKDQJLQJ WHPSRUDULO\ UHYLHZLQJ VFKHGXOHG ID[HV 5HYLHZLQJ FKDQJLQJ RU GHOHWLQJ $XWR 'LDO QXPEHUV 6 VFDQQHG RU VFKHGXOHG ID[ VHQGLQJ VFDQQHU ZLQGRZ JODVV FOHDQLQJ 6FDQQLQJ DQG VHQGLQJ IURP PHPRU\ 6FKHGXOH 6HQG )D[ VHH 6HQGLQJ D )D[ DW D ODWHU WLPH VFKHGXOHG ID[HV UHYLHZLQJ FKDQJLQJ RU FDQFHOLQJ VFKHGXOHG RU VFDQQHG ID[ VHQGLQJ VFUROO VH
WHOHSKRQH XVLQJ ZLWK WKH +3 )$; 7HVWLQJ WKH VHWXS WLPH GHOD\ VHH 6HQGLQJ D )D[ DW D /DWHU 7LPH WLPH VHWWLQJ 8VLQJ %XWWRQV DQG .