
HP Color LaserJet Enterprise M855 and Flow MFP M880 - Hole Punch Kit Installation Guide

8
7 8
1
4
5
2
3
1
ON
234
5
6
9
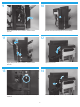
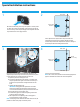
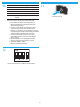
Locate the switches and LEDs on the punch controller PCA.
• SW601 (callout 1)
• LED602 (callout 2)
• LED601 (callout 3)
• SW602 (callout 4)
• SW603 (callout 5)
NOTE: SW601 has four electronic switches that can be congure
in the ON or OFF position. The punch controller PCA is marked ON
and OFF to show the current switch position.
Set SW601 to the settings above.
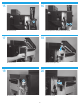
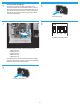
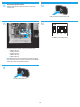
Set the punch hole assembly type.
Two types of punch hole assemblies are available: the 2/3
punch hole assembly (part number A2W94-67901), or the 2/4
punch hole assembly (part number CZ999-67902). Refer to the
part number on the replacement part to determine the type of
assembly you are installing. Follow the steps below to set the
punch hole assembly type.
Turn the product o.
Turn the product power on.