
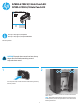
HP Color LaserJet Enterprise M855 and Flow MFP M880 - Hole Punch Kit Installation Guide

9
12
1
ON
234
10
11
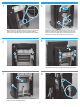
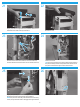
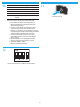
Return all of the switches on SW601 to the OFF position.
Follow these steps to set the punch hole assembly type.
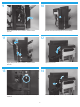
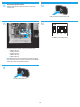
a. Press SW602 and observe the blinking pattern of
LED601 and LED602. The table above explains the
dierent blinking patterns.
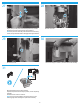
b. Continue pressing SW602 until the blinking pattern
matches the type of punch hole assembly you are
installing. For example, if you are installing a 2/4 punch
hole assembly (part number CZ999-67902), press SW602
until both LED601 and LED602 blink three times.
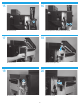
c. Once the LEDs are blinking in the correct pattern,
press SW603 to store the punch hole assembly type
value in memory.
d. Wait until LED601 is not lit and LED602 is blinking
steadily to indicate the type setting is complete.
e. Press either SW602 or SW603.
f. Wait until only LED602 is blinking.
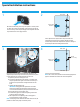
LED601 LED602 LED blinking pattern explanation
Blinking one time Not applicable
Blinking two times 2/3 punch hole assembly selected
Blinking three times 2/4 punch hole assembly selected
Blinking four times Waiting for type setting completion
Not lit Blinking
steadily
Type setting completed
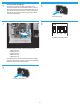
Turn the product o.