Implementation of an ActivCard® smart card solution on HP CCI Introduction . . . . . . . . . . . . . . . . . . . . . . . . . . . . . . . . . . . . . . . . . . . . . . . . . . . . . . . . . . . . 2 Prerequisites . . . . . . . . . . . . . . . . . . . . . . . . . . . . . . . . . . . . . . . . . . . . . . . . . . . . . . . . . . . . 2 Reference hardware and software . . . . . . . . . . . . . . . . . . . . . . . . . . . . . . . . . . . . . . . . . . . . . 2 Configuration compatibility . . . . . . . . . . . . .
This white paper discusses the implementation of ActivCard® smart cards on HP Consolidated Client Infrastructure (CCI). This white paper is not intended as a comprehensive overview of ActivCard smart card technology. NOTE: The images and instructions in this white paper use Microsoft Windows XPe; however, HP also tested procedures using Microsoft XP Professional and Microsoft Windows CE.NET. NOTE: The images in this white paper were created using ActivClient™.
• Blade Enclosure. • HP e-class blade enclosure. • Blade PCs • HP bc1000 blade PC running Microsoft Windows XP SP2 w/HPSAM blade service installed. • HP bc1500 blade PC running Microsoft Windows XP SP2 w/HPSAM blade service installed. • Clients • HP Compaq t5000 series thin client running Microsoft Windows XPe w/HPSAM blade service installed. • HP Compaq t5000 series thin client running Microsoft Windows CE w/HPSAM blade service installed.
Software configuration Configure the following items to set up a smart card solution on CCI: 1. Certificate Authentication (CA) service 2. Group policy settings 3. Middleware running on a HP blade PC 4. Smart card client driver Step 1: Configuring a Certificate Authentication (CA) service Configure a CA service. This white paper uses Microsoft Certificate Services to configure certificates. Detailed instructions for installing a CA service is beyond the scope of this white paper.
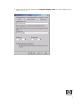
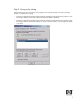
4. Type a name for the new template in the Template display name box. This example uses CCI Smartcard Logon.
5. Click the Request Handling tab. 6. Select or type 1024 in the Minimum key size box. 7. Click the CSPs button. 8. Select Requests can use any CSP available on subject's computer. 9. Click the Security tab.
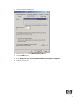
10. In the Permissions for Authenticated Users box, in the Allow column, select Read and Enroll. You have completed creation of the template. 11. Copy the CCI Smartcard Logon certificate template into the Certificate Templates folder under the certificate server. a) Expand the Certification Authority object in the MMC you created in step 1. b) Expand your CA name. c) Right-click on the Certificate Templates folder under the CA server.
d) Select New > Certificate Template to Issue. 12. Select the template, and then click OK to import the template.
Step 2: Group policy setting Apply the following smart card group policy settings to the computer through a user policy setting or through a computer policy setting: • Computer Configuration\Windows Settings\Security Settings\Local Policies\Security Options - Interactive Logon: Require smart card, enable or disable.
Step 3: HP blade PC middleware configuration The following provides HP blade PC software configuration: • For the purposes of this white paper, an HP CCI implementation with the hardware and software components listed in “Reference hardware and software” on page 2 was used. • Install one of the following ActivCard middleware packages on the HP Blade PCs: • ActivCard ActivClient v5.4 • ActivCard Gold v2.2 Step 4: Client smart card driver configuration Configure thin client software (XPe and CE).
• USB CAC approved smart card reader (SCM Microsystems SCR331 Reader) Driver: SCR33X2K.sys, version 4.27.00.01 NOTE: For Microsoft Windows CE.NET, you may need to copy the drivers from the folder where they were installed (\Windows) to the \Hard Disk\Program Files folder so the drivers will be written to flash memory. • Serial CAC approved smart card reader (SCM Microsystems SCR131 Reader) NOTE: For Microsoft Windows CE.
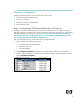
d) In the right pane, expand Smart card readers. e) Select the installed smart card reader. f) Under Device status, verify the message “This device is working properly.” 3. To begin the enrollment from the blade PC side, open the Remote Desktop Connection window by clicking Start > All Programs > Accessories > Communications. 4. Select the Local Resources tab.
5. In the Local Devices area, select Smart cards. 6. Connect to the blade PC on which you will set up the smart card and log in as a domain-authenticated user. 7. Verify the ActivCard icon is displayed in the system tray. 8. Insert an unprogrammed ActivCard-compatible smart card into the reader. The ActivCard icon in the system tray changes from red to blue. 9. Select the ActivCard icon in the system tray to open the ActivCard utility. 10. Select Tools > New Card to initialize the smart card. 11.
Initialization of the smart card using HP Session Allocation Manager Client (HPSAM Client) 1. Power on the thin client with the smart card reader installed. 2. Open Device Manager to verify that the drivers for the card reader are installed: a. Click Start. b. Right-click on My Computer and select Manage. c. In the left pane, select Device Manager. d. In the right pane, expand Smart card readers. e. Select the installed smart card reader. f.
6. Connect to the blade PC on which you will set up the smart card, and then log in as a domainauthenticated user. 7. Verify the ActivCard icon is displayed in the system tray. 8. Insert an unprogrammed ActivCard-compatible smart card into the reader. The ActivCard icon in the system tray changes from red to blue. 9. Select the ActivCard icon in the system tray to open the ActivCard utility. 10. Select Tools > New Card to initialize the smart card. 11.
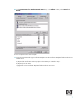
Requesting a certificate from the blade PC 1. Open Internet Explorer and go to the Certification Server enrollment Web site. The address of this Web site was determined when the Certification Server was set up (see “Step 1: Configuring a Certificate Authentication (CA) service” on page 4). If you do not know the Web address, consult your network administrator. In this example, the address used is http://pecert/certsrv. 2. Click the Request a Certificate task. 3.
6. If a warning message displays about a potential scripting violation, press Yes to continue with the certificate request. 7. After the system generates the public and private keys, the page to install the certificate displays. Select Install this certificate. This command installs the users’s certificate onto the smart card. 8. If a warning message displays about a potential scripting violation, press Yes to continue with the certificate request. 9.
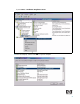
To verify that the CCI SmartCard Logon certificate for the user is installed on the smart card: 1. Click the ActivCard icon in the system tray to open the ActivCard Gold utility. 2. In the right pane, select the My Certificates icon. The system displays the username ID. 3.
Usage cases Usage case 1: User authentication from client device to blade PC using RDP The following steps provides instructions for performing a functional test of the CCI SmartCard Logon certificate: 1. Log out of the RDP session. 2. Open the Remote Desktop Communications window and initiate a connection to the blade. 3. Make sure a smart card is installed in the reader. The system requests the smart card PIN. 4. Type the PIN that you assigned.
2. Open the HPSAM client window and initiate a connection to the blade PC. 3. Make sure a smart card is installed in the reader. The system requests the smart card PIN. 4. Type the PIN that you assigned. The user is logged into the blade PC. Usage case 3: Accessing secure Web site The following steps provide instructions for accessing a secure Web site using an ActivCard through a blade PC.
4. In Internet Explorer, type the address of a secure Web site. 5. If the system displays security alert messages, click OK. The LED on the card reader indicates when the Web site is accessing the smart card to verify whether the certificate is approved for the site. 6. After the secure Web site displays, a lock icon in the lower right corner of Internet Explorer confirms that you are connected to a secure Web site.
4. In the Company Name box, type the name for the VPN connection (for example, Work), and then click Next. 5. Select Do not dial the initial connection, and then click Next. 6. In the text box, type the host name or IP address of the VPN tunnel, and then click Next. 7. Select Use my smart card, and then click Next. 8. Select Add a shortcut for this connection to my desktop, and then click Finish.
2. Right-click on the VPN connection icon and select Properties. You can initiate the VPN connection after setting it up, as follows: 1. Start the VPN connection. 2. In Smart card PIN, type the PIN, and then click OK. While establishing the VPN connection, the system displays Verifying username and password and Authenticated.
After the connection is established, the network connection icon displays in the system tray. Additional information For more information about HP Consolidated Client Infrastructure, see http://h71028.www7.hp.com/ enterprise/cache/9885-0-0-225-121.html. For more information about ActivCard, see http://www.activcard.com. © 2006 Hewlett-Packard Development Company, L.P. The information in this document is subject to change without notice.