
Installation Manual

A. Mount the Router
1. Make sure the router’s power cord is correct for your country’s ac
power receptacle. Do not attach the power cord until the router is
mounted.
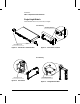
2. Mount on a wall, rack, or table as follows:
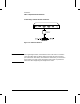
For Rack or Cabinet Mounting: Using a Phillips or cross-head
screwdriver, attach the mounting brackets to the router with 10-mm
#M4 screws. Position the router in the rack or cabinet and slide it up
or down until the rack holes align with the bracket holes. Then
attach the router to the rack with
5
⁄
8
-in. #12-24 screws. These two
types of screws are included in the accessories kit with the router.
(A cabinet may require
5
⁄
8
-in. #10-32 screws instead, available as p/n
2680-0302. Make sure you have screws that fit your cabinet or rack
before mounting the router.)
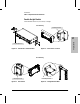
For Table Mounting: Attach the self-adhesive rubber feet to the
bottom of the router. Set the router on a table near the power source.
For Wall Mounting: Using a Phillips or cross-head screwdriver,
attach the mounting brackets to the router with 10-mm #M4 screws,
included in the accessories kit with the router. Then attach the
router to a wood surface (minimum
1
⁄
2
-in. plywood or equivalent)
with
5
⁄
8
-in. #12 wood screws or equivalent (not included).
Installation
1
Installation
Phase 3: Prepare the Router Hardware
1-7