User’s Guide
The information in this document is subject to change without notice. Neither Hewlett-Packard ® Company nor Apple Computer, Inc. make any warranties of any kind with regard to this material, including, but not limited to, the implied warranties of merchantability and fitness for a particular purpose. Neither HP or Apple shall be liable for errors contained herein or for incidental or consequential damages in connection with the furnishing, performance, or use of this material.
Contents 5 7 Quick Start What You Need to Get Started 9 Setting Up iPod to Play Music 13 Using iPod 13 Using iPod Controls 20 Connecting and Disconnecting iPod 25 Organizing and Transferring Your Music 33 Transferring and Viewing Digital Photos 44 Adjusting iPod Settings 49 Using the Extra Features of Your iPod 52 Charging the iPod Battery 57 Tips and Troubleshooting 3
67 Learning More, Service, and Support 69 Safety and Cleaning 77 Index 4 Contents
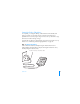
1 Quick Start Congratulations on purchasing your Apple iPod from HP. Read this section to get started using iPod quickly. iPod works with your PC. Import and organize songs and photos on your PC, then transfer them to iPod for listening and viewing on the go.
Learning to Use iPod Read this chapter to set up iPod and get started playing music quickly. To learn more about playing music on iPod and using some of its other features, see “Using iPod” on page 13. iPod Features iPod is a music player and much more.
What You Need to Get Started To use iPod with a PC, you must have: • A PC with: • Built-in high-power USB 2.0 (or a high-power USB 2.0 card installed) • Or built-in FireWire® (or a FireWire card installed) and the optional iPod Dock Connector to FireWire Cable High-power USB 2.
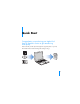
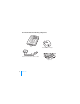
Your iPod includes the following components: iPod iPod USB Power Adapter iPod Dock Connector to USB 2.
Setting Up iPod to Play Music To set up iPod, you charge the battery, install software from the iPod CD, and import songs from your music CD collection or from the iTunes Music Store (available in some countries/regions only) into iTunes. Then you transfer the songs from iTunes to iPod for listening on the go. To import and view photos on iPod, follow the instructions in this chapter to set up iPod, then see “Transferring and Viewing Digital Photos” on page 33.
Step 2: Install the Software Insert the iPod CD into your PC to install iTunes and the iPod software. Step 3: Import Music to Your PC Complete this step if you haven’t already transferred music to your PC. You can import music from your audio CDs, or if you have an Internet connection, you can buy music online and download it to your PC using the iTunes Music Store. To import music to your PC from an audio CD: 1 Insert a CD into your PC.
Step 4: Connect iPod and Transfer Music Connect iPod to your PC using the included iPod Dock Connector to USB 2.0 Cable. To transfer songs to iPod: When you connect iPod to your PC, iTunes opens. Follow the simple onscreen instructions to transfer songs and playlists to iPod. Note: Be sure you have charged the battery using the iPod Power Adapter before you transfer songs to iPod. See “Charging the iPod Battery” on page 52 for more information. If your PC doesn’t have a high-power USB 2.
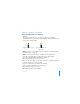
Step 5: Play Music When the song transfer is complete, the main menu or a large battery icon appears. Squeeze both sides of the Dock connector to disconnect the cable from iPod. Then use the Click Wheel and Select button to browse for a song. Press the Play or Select button and enjoy! To learn how to import photos to your PC, transfer them to iPod, and view them on iPod or on a television, see “Transferring and Viewing Digital Photos” on page 33.
1 Using iPod Read this section to learn about using iPod controls, transferring music, transferring and viewing photos, charging the battery, and using the extra features of your iPod. Using iPod Controls Press any button to turn on iPod. The main menu appears.
Use the Click Wheel and Select button to navigate through onscreen menus, play songs, change settings, and view information. Move your thumb lightly around the Click Wheel to highlight a menu item. Press the Select button to select the item. Press Menu on the Click Wheel to go back to the previous menu.
To do this... Do this Reset iPod (For use during troubleshooting) Toggle the Hold switch (set it to Hold, then turn it off again). Then press the Menu and Select buttons simultaneously for about 6 seconds, until the Apple logo appears. Turn on iPod Press any button. Turn off iPod Press and hold Play/Pause. Turn the backlight on or off Press and hold Menu or select Backlight from the main menu.
To do this... Do this Skip to any point in a song From the Now Playing screen, press the Select button to show the scrubber bar (if you see album artwork, press it again). Then scroll to any point in the song. Skip to the next song Press Next/Fast-forward. Start a song over Press Previous/Rewind. Play the previous song Press Previous/Rewind twice. Fast-forward a song Press and hold Next/Fast-forward. Rewind a song Press and hold Previous/Rewind.
Disabling iPod Buttons Using the Hold Switch ■ If you’re carrying iPod in your pocket and you don’t want to press the buttons or turn it on accidentally, you can make the buttons inactive. Set the Hold switch to Hold. Slide the switch toward the center (so you can see the orange bar) to disable the controls.
Making Playlists on iPod You can set iPod to play the songs you want in the order you want. When you create a list of songs on your iPod, the songs appear in an On-The-Go playlist. To create an On-The-Go playlist: 1 Highlight a song and press and hold the Select button until the song title flashes. 2 Repeat step 1 for other songs you want to add. 3 Select Music > Playlists > On-The-Go to view your list of songs. You can also queue entire lists of songs at once.
■ To transfer On-The-Go playlists to your PC: If iPod is set to transfer songs automatically (see page 29), and you create an On-The-Go playlist, the playlist automatically transfers to iTunes when you connect iPod. You see the new On-The-Go playlist in the iTunes Source list. You can rename or delete the new playlist, just as you would any other playlist in iTunes. Rating Songs You can assign a rating to a song (from 1 to 5 stars) to indicate how much you like it.
To see album artwork on your iPod: 1 Play a song that has album artwork. 2 From the Now Playing screen, press the Select button. If you don’t see artwork, either that song doesn’t have album artwork, or you need to set iTunes to allow iPod to display album artwork (see above). For more information about album artwork, open iTunes and choose Help > iTunes Help. Connecting and Disconnecting iPod You connect iPod to your PC to transfer music and photos, and, in most cases, to charge the battery.
By default, iPod imports songs automatically when you connect it to your PC. When this automatic transfer is done, you can disconnect iPod. If you connect iPod to a different PC and it is set to transfer songs automatically, iTunes prompts you before transferring any music. Clicking No, maintains the songs you currently have on your iPod. Disconnecting iPod You shouldn’t disconnect iPod while music is being transferred. You can easily see if it’s OK to disconnect iPod by looking at the screen.
■ To eject iPod: Click the Eject button ( ) next to iPod in the iTunes Source list. You can eject iPod by clicking the Safely Remove Hardware icon in the Windows system tray and selecting your iPod. To disconnect iPod: • If iPod is connected to an iPod cable, squeeze both sides of the Dock connector to disconnect the cable from iPod. • If iPod is in the Dock, simply remove it. Important: Don’t disconnect iPod if you see the “Do not disconnect” message. You could damage files on iPod.
Connecting iPod Using the iPod Dock (Available Separately) The iPod Dock holds iPod upright as it charges or transfers music. Connect the Dock to your PC using the iPod Dock Connector to USB 2.0 Cable, then put iPod in the Dock. The optional iPod Dock (for iPod with color display) is available for purchase at http://www.hpshopping.
Dock connector port iPod connector Line Out port S-video Out port Port Use Dock connector port Connect the Dock to your PC or the power adapter using the included USB 2.0 cable. iPod connector Place iPod into the Dock to charge iPod, transfer songs, view photos, and listen to music. Line Out port Connect speakers using an audio cable with a standard 3.5 millimeter stereo miniplug (see page 25). Or connect the optional iPod AV Cable to view photos on a television (see page 33).
To play music from iPod using the Dock: 1 Place iPod in the Dock. 2 Connect the speakers or stereo to the Dock Line Out port using an audio cable with a 3.5 millimeter stereo miniplug. 3 Use the iPod controls to play a song. When the Dock is connected to an external audio source, use the volume controls on the external source to change the volume. Organizing and Transferring Your Music For instructions for getting started playing music on iPod, see “Setting Up iPod to Play Music” on page 9.
• Add music from CDs to your music library, so you don’t need to have the CD in the drive to play music • Make your own CDs (if your PC has a CD burner) • Publish your playlists, called “iMixes,” to the iTunes Music Store • Create dynamic “Party Shuffle” playlists • Listen to Internet radio stations This guide explains how to transfer songs to iPod using iTunes and manage songs on iPod. For information about using the other features of iTunes, open iTunes and choose Help > iTunes and Music Store Help.
Audio File Formats Supported by iPod • AAC (M4A, M4B, M4P) (up to 320 Kbps) • Apple Lossless (a high-quality compressed format) • MP3 (up to 320 Kbps) • MP3 Variable Bit Rate (VBR) • WAV • AA (audible.com spoken word, formats 2, 3, and 4) • AIFF A song encoded using Apple Lossless format has full CD-quality sound, but takes up only about half the amount of space as a song encoded using AIFF or WAV format. The same song encoded in AAC or MP3 format takes up even less space.
You can create as many playlists as you like using any of the songs in your PC’s music library. Putting a song in a playlist doesn’t remove it from the library. When you connect and update iPod, the playlists are transferred to iPod. To browse through playlists, select Music > Playlists on iPod. About Smart Playlists Using iTunes, you can automatically create customized Smart Playlists from the songs in your library.
Transferring Songs and Playlists to iPod Automatically By default, iPod updates automatically when you connect it to your PC. ■ To transfer music to iPod automatically: Simply connect iPod to your PC using the included USB 2.0 cable. iPod must be set to transfer music automatically. To set iPod to transfer music automatically: 1 Select iPod in the iTunes Source list and click the Options button. Options button 2 Select “Automatically update all songs and playlists.
To update iPod with only certain songs: 1 In iTunes, check the boxes next to songs you want to transfer (by default, all songs are checked). 2 Select iPod in the iTunes Source list and click the Options button. Options button 3 Select “Only update checked songs.” To set iPod to update only selected playlists: 1 In iTunes, select iPod in the Source list and click the Options button. 2 Select “Automatically update selected playlists only.
To set iPod to transfer songs manually: 1 In iTunes, select iPod in the Source list and click the Options button. Options button 2 Select “Manually manage songs and playlists.” ■ To transfer a song or playlist to iPod manually: In iTunes, drag a song or playlist to iPod in the Source list. Deleting Songs and Playlists From iPod Manually If you have set iPod to transfer songs manually (see above), you can delete songs and playlists from iPod individually.
To create a new playlist on iPod: 1 Select iPod in the iTunes Source list and click the Add (+) button. 2 Drag songs to the new playlist. ■ To modify a playlist on iPod: Drag a song to a playlist on iPod to add the song. Select a song in a playlist and press the Delete key on your keyboard to delete the song. Listening to Spoken Word Audio You can purchase and download spoken word audiobooks from the iTunes Music Store (available in some countries/regions only) or from audible.
Seeing How Many Songs and Photos Are on iPod To see how many songs and photos are stored on iPod, how much disk space is left, and other information, select Settings > About in the iPod main menu. Transferring and Viewing Digital Photos You can import digital photos from a digital camera to your PC, then transfer them and view them on iPod. You can connect iPod to a television and view photos in a slideshow with music.
To transfer photos from a PC to iPod using Photoshop Album or Photoshop Elements: 1 Open iTunes and select iPod in the iTunes Source list. Then click the Options button. Options button 2 Click Photos and select “Synchronize photos from.” Then choose Photoshop Album or Photoshop Elements from the pop-up menu. 3 If you want to import all of your photos, select “Copy all photos.
2 Open iTunes and select iPod in the iTunes Source list. Then click the Options button. Options button 3 Click Photos and select “Synchronize photos from.” 4 Choose “Choose Folder” from the pop-up menu and select the folder containing your photos. To transfer full-resolution image files to iPod: When you transfer photos to iPod, iTunes optimizes the photos for viewing. Full-resolution image files aren’t transferred by default.
Transferring Photos Directly From a Camera or Photo Card Reader to iPod: Using the optional iPod Camera Connector or an iPod–compatible photo card reader (available for purchase at http://www.hpshopping.com/musicaccessories) and a standard digital camera, you can store and view photos on iPod, then delete them from the camera or photo card and take more pictures. Then later you can transfer the photos from iPod to your PC using a standard digital photo application.
To import photos from a USB digital camera or photo card reader to iPod: 1 Turn on iPod and attach the optional iPod Camera Connector. 2 Turn on your camera (or card reader) and connect it to iPod using the USB cable that came with your camera. 3 On iPod, select Import.
To store photos from an iPod-compatible photo card reader on iPod: 1 Insert a photo card into the photo card reader and connect the photo card reader to the Dock connector port on iPod. 2 Select Import. Photos are listed on iPod by roll number. Note: Some digital photo storage devices may work differently. Consult the instructions that came with the device. To view imported photos on iPod: 1 Select Photos > Photo Import and select the roll number.
To erase photos from a camera or photo card: 1 Import photos from the camera or card (see above). 2 Select Erase Card. All photos are deleted from the camera or card. For more information about using an iPod–compatible photo card reader, see the instructions that came with the reader. Transferring Photos from iPod to a PC If you transfer full-resolution photos from your PC to iPod (see page 35) they’re stored in a Photos folder on iPod.
Viewing Photos You can view photos on iPod manually or as a slideshow. If you have the optional iPod AV Cable, you can connect iPod to a television and view photos as a slideshow with music. To view photos on iPod: 1 On iPod, select Photos > Photo Library. Or select Photos and choose a photo album to see only the photos in the album. Note: Photos may take a moment to appear. 2 Highlight the photo you want and press the Select button to view a full-screen version.
• To set the length of time each slide is displayed before advancing, select Time Per Slide and choose a time. • To set the music that plays during slideshows, select Music and choose a playlist. If you’re using iPhoto, you can choose From iPhoto to copy the iPhoto music setting. Only the songs that you have transferred to iPod play. • To set slides to repeat, set Repeat to On. • To set slides to display in random order, set Shuffle Photos to On.
To connect iPod to a television: Your television must have RCA video and audio ports, or an S-video port. 1 Connect the optional iPod AV Cable to the Headphones port on iPod. You can also connect the iPod AV Cable to the Line Out port on the iPod Dock and put iPod in the Dock. You must use an iPod Dock for iPod with color display. Other iPod Docks won’t work. Note: Use the iPod AV Cable made specifically for iPod. Other similar RCA-type cables won’t work. You can purchase the iPod AV Cable at http://www.
Connecting iPod using S-video: For increased visual clarity, you can also connect iPod to a television, video receiver, or other device that has an S-video port using an S-video cable and the iPod Dock. You can purchase audio and S-video cables at http://www.hpshopping.com/musicaccessories To hear music with the slideshow, you must connect an audio cable to the Line Out port on the iPod Dock and to an audio input port on the television or receiver.
To view a slideshow on a television: 1 Connect iPod to a television as shown above. 2 Turn on your television and set it to display from the input ports to which your iPod is connected. See the documentation that came with your television for more information. 3 On iPod, select any photo or album and press Play. Or select any full-screen photo and press the Select button. To pause the music and the slideshow, press the Play/Pause button.
To set iPod to shuffle songs or albums every time you play a song: 1 Select Settings from the iPod main menu. 2 Set Shuffle to Songs or to Albums. When you set iPod to shuffle songs by selecting Settings > Shuffle, iPod shuffles songs within the list (album or playlist, for example) from which the songs are playing. When you set iPod to shuffle albums, it plays all the songs on an album in order, then randomly selects another album in the list and plays through it in order.
Setting the Click Wheel Sound When you scroll through menu items, you can hear a clicking sound through the iPod internal speaker to let you know the Click Wheel is working. You can set the Click Wheel sound to play through the headphones instead, or you can turn it off. ■ To set how iPod plays the Click Wheel sound: Select Settings from the iPod main menu. • To set the Click Wheel sound to play through the headphones, set Clicker to Headphones. • To turn off the Click Wheel sound, set Clicker to Off.
■ To set iPod to use the iTunes volume settings: Select Settings > Sound Check. If you have not activated Sound Check in iTunes, setting it on iPod has no effect. Using the Equalizer ■ You can use equalizer presets to change iPod sound to suit a particular music genre or style. For example, to make rock music sound better, set the equalizer to Rock. Select Settings > EQ and select an equalizer preset.
Adding or Removing Items From the Main Menu You can add often-used items to the iPod main menu. For example, you can add a “Songs” item to the main menu, so you don’t have to select Music before you select Songs. ■ To add or remove items from the main menu: Select Settings > Main Menu. Setting and Viewing the Date and Time ■ ■ ■ To set the date and time: Select Settings > Date & Time. To view the date and time: Select Extras > Clock.
Using the Extra Features of Your iPod Using iPod as an External Hard Disk You can use iPod as a hard disk, to store and transfer data files. To enable iPod as a hard disk: 1 In iTunes, select iPod in the Source list and click the Options button. Options button 2 Click General and select “Enable disk use.” When you use iPod as a hard disk, the iPod disk icon appears as the next available drive letter in Windows Explorer.
Preventing iTunes From Opening Automatically If you use iPod primarily as a hard disk, you may want to keep iTunes from opening automatically when you connect iPod to your PC. To prevent iTunes from opening automatically when you connect iPod to your PC: 1 In iTunes, select iPod in the Source list and click the Options button. 2 Click General and deselect “Open iTunes when attached.
Setting the Alarm You can use iPod as an alarm clock. To set an alarm: 1 Select Extras > Clock > Alarm Clock. 2 Set Alarm to On. 3 Select a sound. If you select Beep, the alarm is audible through the internal speaker. If you select a playlist, you’ll need to connect iPod to speakers or headphones to hear the alarm.
Recording Voice Memos You can record voice memos using an optional iPod-compatible microphone (available for purchase at http://www.hpshopping.com/musicaccessories). You can store voice memos on your iPod and transfer them to your PC. Playing Games iPod has a number of games. ■ To play a game: Select Extras > Games and select a game. Charging the iPod Battery iPod has an internal, non–user–replaceable battery. If iPod isn’t used for a while, the battery may need to be charged.
To charge the battery using your PC: Connect iPod to a high-power USB 2.0 port on your PC. The PC must be turned on and not in sleep mode. Important: While songs, photos, or files are transferred using USB 2.0, the iPod battery loses charge. Transferring songs or files when iPod isn’t sufficiently charged can cause incomplete transfer, loss of the information being transferred, and may require a restore (see page 65). It’s best to charge iPod using the iPod Power Adapter before transferring songs or files.
To charge the battery using the iPod Power Adapter: 1 Connect the AC plug adapter to the power adapter (they may already be assembled). 2 Connect the iPod Dock Connector to USB 2.0 Cable to the power adapter, and plug the other end of the cable in to iPod. 3 Plug the power adapter in to a working electrical outlet. AC plug adapter iPod Dock Connector to USB Cable iPod USB Power Adapter Warning Make sure the power adapter is fully assembled before plugging it in to an electrical outlet.
Battery States When iPod is not connected to a power source, a battery icon in the top-right corner of the iPod screen shows about how much charge is left. Battery less than 20% (red) Battery about halfway charged If iPod is connected to a power source, the battery icon changes to show that the battery is charging or fully charged. Battery charging Battery fully charged You can disconnect and use iPod before it is fully charged.
Earphones iPod comes with a pair of high-quality earbud headphones with two pairs of earphone covers. If you like, you can place the earphone covers over the earphones. ■ To use the earbud headphones: Plug them in to the Headphones port, then place the earbud in your ear as shown. Warning Permanent hearing loss may occur if earbuds or headphones are used at high volume. You can adapt over time to a higher volume of sound, which may sound normal but can be damaging to your hearing.
1 Tips and Troubleshooting Most problems with iPod can be solved quickly by following the advice in this chapter. If Your PC Does Not Complete the Start-up Process When iPod is Connected With the USB Cable On some PCs, when iPod is connected with the USB cable, it’s possible that your PC will not complete the start-up process. If you encounter this, simply disconnect iPod from the PC. The start-up process will then complete. Once the PC start-up process is complete, reconnect iPod for normal operation.
Resetting iPod Most problems with iPod can be solved by resetting it. To reset iPod: 1 Connect iPod to a power outlet using the iPod Power Adapter. 2 Toggle the Hold switch on and off (set it to Hold, then turn it off again). 3 Press and hold the Select and Menu buttons for at least 6 seconds, until the Apple logo appears. Identifying Your PC USB Port Type You can check what type of USB port your PC is using. 1 Click Start on the taskbar. 2 Click Control Panel.
If Your iPod Won’t Turn On or Respond • Make sure the Hold switch is off. • If that doesn’t work, connect iPod to the iPod Power Adapter and connect the adapter to a working electrical outlet. Your iPod battery may need to be recharged. • If that doesn’t work, your iPod may need to be reset (see above). • If that doesn’t work, you may need to restore iPod software. See “iPod Software Update and Restore” on page 65.
If Your iPod Isn’t Playing Music • Make sure the Hold switch is off. • If you’re using the optional iPod Remote, make sure the remote’s Hold switch is off. • Make sure the headphones connector is pushed in all the way. • Make sure the volume is adjusted properly. • If that doesn’t work, push the Play/Pause button. Your iPod may be paused. • Make sure you are using iTunes 4.7 (included on the iPod CD) or later.
• If you’re connecting iPod to a portable or notebook PC using the iPod Dock Connector to USB 2.0 Cable, connect the PC to a power outlet before connecting iPod. • If that doesn’t work, restart your PC. • If that doesn’t work, you may need to restore iPod software. See “iPod Software Update and Restore” on page 65. If You See a Folder With an Exclamation Point on the iPod Display • iPod may need to be reset (see page 58). • If that doesn’t work, your iPod battery may need to be recharged.
If Songs or Data Transfer More Slowly Over USB 2.0 • If you transfer a large amount of songs or data using USB 2.0 and the iPod battery is low, iPod goes into a power-saving mode. Transfer speeds slow down considerably. This is normal. • If you want to transfer at higher speeds, you can stop the transfer, eject the iPod, and connect it to a power outlet using the iPod Power Adapter. Let iPod charge for about an hour, then connect it to your PC again to transfer music.
If You Accidentally Set iPod to Use a Language You Don’t Understand You can reset the language. 1 Push Menu repeatedly until the main menu appears. 2 Select the fourth menu item (Settings). 3 Select the last menu item (Reset All Settings). 4 Select the second menu item (Reset) and select a language. Other iPod settings, such as song repeat, are also reset. Note: If you have added or removed items from the iPod main menu (see page 48), the Settings menu may be in a different place.
If You Can’t See Photos on Your Television • If you transferred photos directly from a camera or card reader to iPod, you can’t see them in a slideshow on a TV. You must transfer photos from your camera to your PC, then transfer them to iPod using iTunes. • Be sure your television is set to display images from the correct input source (see the documentation that came with your television for more information). • Be sure all cables are connected correctly (see page 42).
iPod Software Update and Restore iPod software is periodically updated to improve performance or add features. It is recommended that you update your iPod to use the latest software. You can choose either to update or to restore the iPod software. • If you choose to update, the software is updated, but your settings and songs are not affected. • If you choose to restore, all data is erased from your iPod, including songs, files, contacts, photos, calendar information, and any other data.
4 Follow the onscreen instructions to update or restore iPod software. If you use the iPod Updater application and it doesn’t see that iPod is connected to your PC, reset iPod (see page 58). If you want to restore iPod software and you don’t have an Internet connection, you can use the iPod Updater application that was installed on your PC when you installed the software from the iPod CD.
1 Learning More, Service, and Support There is more information about using iPod in onscreen help and on the Web. Onscreen Help • To learn more about using iTunes, open iTunes and choose Help > iTunes and Music Store Help. Online Resources For the latest information on iPod, go to http://www.hp.com/music For iPod service and support information, go to http://www.hp.com/support To register iPod (if you didn’t do it when you installed software from the iPod CD), go to http://register.hp.com.
Obtaining Warranty Service If the product appears to be damaged or does not function properly, please follow the advice in this User’s Guide, the onscreen help, and the online resources. If the unit still does not function, go to your Warranty and Support Guide for instructions on how to obtain warranty service. Finding the Serial Number of Your iPod The serial number is printed on the back of your iPod. You can also find it by selecting Settings > About.
1 Safety and Cleaning Read on to learn about using iPod safely and cleaning iPod. Important Safety Instructions When setting up and using your iPod, remember the following: • Read all the installation instructions carefully before you plug your iPod USB Power Adapter in to a power outlet. • Keep these instructions handy for reference by you and others. • Follow all instructions and warnings dealing with your iPod. Warning Electrical equipment may be hazardous if misused.
Avoid Hearing Damage Warning Permanent hearing loss may occur if earbuds or headphones are used at high volume. You can adapt over time to a higher volume of sound, which may sound normal but can be damaging to your hearing. Set your iPod volume to a safe level before that happens. If you experience ringing in your ears, reduce the volume or discontinue use of your iPod.
Using the Power Adapter • Use only the power adapter that came with your iPod. Adapters for other electronic devices may look similar, but they may damage your iPod. • The only way to shut off power to your power adapter completely is to disconnect it from the power source. • Always leave space around your power adapter. Do not use this equipment in a location where airflow around the power adapter is confined, such as a bookcase.
About Operating and Storage Temperatures • Operate your iPod in a place where the temperature is always between 0º and 35º C (32º to 95º F). • Store your iPod in a place where the temperature is always between –20º and 45º C (–4º to 113º F). Don’t leave iPod in your car, since temperatures in parked cars can exceed this range. • iPod play time may temporarily shorten in low-temperature conditions. • When you’re using your iPod or charging the battery, it is normal for the bottom of the case to get warm.
Do Not Make Repairs Yourself Warning Do not attempt to open your iPod or power adapter, disassemble it, or remove the battery. You run the risk of electric shock and voiding the limited warranty. No user-serviceable parts are inside. For service, see “Learning More, Service, and Support” on page 67. Cleaning Follow these general rules when cleaning the outside of your iPod and its components: • Make sure your iPod is unplugged. • Use a damp, soft, lint-free cloth. Avoid getting moisture in openings.
Communications Regulation Information FCC Compliance Statement This device complies with part 15 of the FCC rules. Operation is subject to the following two conditions: (1) This device may not cause harmful interference, and (2) this device must accept any interference received, including interference that may cause undesired operation. See instructions if interference to radio or television reception is suspected.
Important: Changes or modifications to this product not authorized by Hewlett-Packard Company could void the EMC compliance and negate your authority to operate the product. This product was tested for EMC compliance under conditions that included the use of HP peripheral devices and HP shielded cables and connectors between system components.
Battery Your iPod contains a battery. Dispose of iPod according to your local environmental laws and guidelines. HP and the Environment At HP, we recognize our responsibility to minimize the environmental impacts of our operations and products. Taiwan: For more information, go to http://www.hp.com Nederlands: Gebruikte batterijen kunnen worden ingeleverd bij de chemokar of in een speciale batterijcontainer voor klein chemisch afval (kca) worden gedeponeerd.
1 Index Numerics 3.
battery charge time 52 charging 9, 52 charging on your PC 53 charging with iPod Power Adapter 54 disposing 76 icons 53 states 55 browsing for music 26 browsing for songs 12 buying music 10 C camera 36 charging the battery 9 cleaning 73 click wheel setting sound 46 clock 48 connecting 20 connecting to a different PC 21 D 78 disabling buttons 17 disabling buttons 15 disconnecting 20 disconnecting cable 12 disconnecting message 22 displaying album art 19 Dock 23 about 24 connector port 24 iPod connector 24
G games 52 getting started 5 H handling 73 hard disk 49 headphones 56 using 70 hearing damage avoiding 70 Help 67 hold switch 17 I importing photos 37 installing software 10 iPod AV port 42 connecting 20 connecting to a television 42 disconnecting 12, 21 disconnecting cable 22 disconnecting from a dock 22 ejecting 22 features 6 headphone port 42 Index main menu, adding 48 main menu, removing 48 resetting 15 S-video, connecting 43 turning off 15 turning on 15 using as external hard disk 49 iPod Camera Co
N notes reading 51 storing 51 NTSC television broadcast 41 O online resources 67 On-The-Go playlists adding a song 16 clearing 18 creating 18 playing 18 removing songs 18 saving on iPod 18 transferring 19 P PAL television broadcast 41 pausing 15 photo card reader 36 photos erasing 39 importing 37 number of stored 33 scrolling through 16 selected transfer 34 80 Index skipping 16 starting a slideshow 16 storing 38 transferring 34 from a camera 36 from a folder 34 from a photo card 36 full-resolution imag
R recording voice memos 52 registering 67 regulation information 74 repairing 73 repeating songs 45 resetting iPod 15, 58 rewinding 16 right sound input port 42 S safety information 69 serial number 68 setting slideshows 40 shuffling songs 44 sleep timer 50 slideshow settings 40 skipping 16 starting 16 viewing 41 viewing on a television 44 Smart Playlists 28 software installing 10 software updates 65 Index songs browsing 15 deleting 31 fast-forwarding 16 number of stored 33 pausing 15 playing 15 playing
spoken word audio 32 setting the reading speed 32 stored photos 33 stored songs 33 supported file formats 27 S-video connecting 43 S-video input port 43 S-video Out port 43 T television audio ports 42 broadcast standards 41 connecting to an iPod 42 RCA video 42 S-video port 42 viewing a slideshow 44 temperature operating 72 storing 72 time displaying 48 setting 48 viewing 48 82 Index tips 57 transferring music 10, 29 automatically setting 29 from a CD 10 manually setting 31 select songs 30 to iPod 11 tr
U USB 2.0 card 7 2.
http://www.hp.com/music http://www.hp.