
Building a Common Image - Developing a common software image for the HP dc7900, Elite 8000 and 6000 Pro desktop models

Creating a Common Image for Windows Vista /
Windows 7
This section specifically addresses Windows Vista / Windows 7 and focuses on
assembling Plug and play drivers on the reference machine. These drivers may be
identical or different for platforms in the same family. However, the following
discussion will show one way of integrating the Plug and Play drivers into a
common image that will make these drivers available to the respective platform on
which it is installed.
After obtaining the relevant drivers, using one of the methods described above,
copy the INF files to a location on the drive. You may create unique folder name for
each type. However, assigning names that reflect the type of drivers that are
installed is helpful in establishing a process flow. For example, HP uses the
following directories and paths for drivers:
C:\Swsetup\Drivers\Audio1; C:\Swsetup\Drivers\Chipset1
C:\Swsetup\Drivers\Video1; C:\Swsetup\Drivers\Modem1
C:\Swsetup\Drivers\Video2; C:\Swsetup\Drivers\Audio2
C:\Swsetup\Drivers\Chipset2; C:\Swsetup\Drivers\Modem2
C:\Swsetup\Drivers\Video; C:\Swsetup\Drivers\Chipset
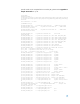
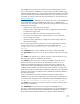
The INF files of each driver are placed in these locations and the
“C:\Swsetup\Drivers”path is added to the “Microsoft-Windows-
PnpCustomizationsNonWinPE” component in a SYSPREP.XML answer file (see
SYSPREP.XML file below). Using an answer file while SYSPREPing the image allows
the drivers to be copied to the driver store of the Windows installation during the
AuditSystem configuration pass. Later when the deployed image is first booted, and
the system runs Plug and Play, these drivers will be available to install hardware on
the target computer.
After all customizations have been made on the reference machine and drivers
have been copied to desired locations, the system is ready to be prepared for
imaging. This is accomplished by running a Microsoft tool named SYSPREP.
SYSPREP.exe is located in the %WINDIR%\system32\SYSPREP directory. SYSPREP
must always be run from the %WINDIR%\system32\SYSPREP directory and must
run on the version of Windows with which it was installed. SYSPREP can be run
using three different methods:
From the command line
From the UI (User Interface)
From an answer file
Running SYSPREP from an answer file is chosen primarily because of the ability to
instruct Windows Vista / Windows 7 how to configure itself on first boot after the
image is applied to a PC. An answer file will automate OS setup – Computer
name, product key, time zone, and others (see SYSPREP.xml example below).
Most importantly, one can add settings to the answer file in the OOBE and audit
configuration passes that will be processed on the target PC on first boot. Further
detailed information on how SYSPREP works is available on Microsoft Technet at
www.microsoft.com.