
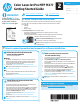
HP Color LaserJet Pro MFP M277 - Getting Started Guide


4
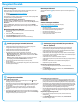
11.
Set up fax (optional)
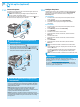
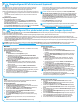
Connect the printer
The printer is an analog device. HP recommends using the printer on a
dedicated analog telephone line.
NOTE: Some countries/regions might require an adapter for the
phone cord that came with the printer.
Connect the phone cord that came with the printer to the Fax port on
the printer and to the telephone jack on the wall.
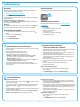
How do I connect an answering machine or
extension phone?
1. Remove the plug from the phone port .
2. Disconnect the answering machine phone cord from the phone
jack, and then connect it to the phone port on the printer.
3. Connect the phone cord that came with the printer to the fax port
on the printer and to the telephone jack on the wall.
How do I set up HP printers in digital phone
environments?
setting up the printer for fax.
Note: Depending on the phone company, the printer might not be
compatible with all digital service lines or providers, in all digital
environments, or with all digital-to-analog converters. Contact the phone
company to determine which setup options are best.
Note:
to dial the printer fax number using an external number for recording
the ring pattern.
Congure the printer
the fax feature. The easiest method is to use the Fax Set-Up Utility.
Basic Setup menu.
Fax Set-Up Utility
1. From the Home screen on the printer control panel, touch the
Setup button.
2. Select Fax Setup, and then select Fax Set-Up Utility.
3.
fax settings.
Basic Setup menu
1. From the Home screen on the printer control panel, touch the
Setup button.
2. Select Fax Setup, and then select Basic Setup.
3. Select Time/Date.
4. Select the 12-hour clock or 24-hour clock.
5. Use the keypad to enter the current time, and then touch the
OK button.
6. Select the date format.
7. Use the keypad to enter the current date, and then touch the
OK button.
8. Select Fax Header.
9. Use the keypad to enter the fax number, and then touch the
OK button.
NOTE: The maximum number of characters for the fax number
is 20.
10. Use the keypad to enter your company name or header, and then
touch the OK button.
To enter special characters that are not on the standard keypad,
touch the @#$ button to open a keypad that contains special
characters.
NOTE: The maximum number of characters for the fax header is 40.
Learn more!
For more information about other ways to send faxes, such as
scheduling a fax to be sent later or sending faxes from a computer, see
the user guide www.hp.com/support/colorljMFPM277.
machine, or for use with an answering machine or extension phone,
see the user guide on the printer CD.
11.1 11.2