HP Blade Server BH Series Operating System Guide July 2002 Manufacturing Part Number: Version: First Edition USA Copyright 2002
Notice The information contained in this document is subject to change without notice. Hewlett-Packard makes no warranty of any kind with regard to this material, including, but not limited to, the implied warranties of merchantability and fitness for a particular purpose. Hewlett-Packard shall not be liable for errors contained herein or for incidental or consequential damages in connection with the furnishing, performance, or use of this material.
Preface Overview Blade servers are comprehensive computing systems that include processor, memory, network connections, and associated electronics, all on a single motherboard called a blade. This high-density technology addresses the current trend among large computing centers to reduce space requirement while lowering their total cost of ownership and getting a higher return on their IT investments.
1 Using Linux-Based Server Blades Overview The information in this chapter was previously contained in the HP Blade Server bh7800 Installation Guide and comes from chapter two of the guide. Please see the HP Blade Server bh7800 Installation Guide for detailed information as to wha t has happened prior to this point. The quick overview up to this point is that server power source has been determined to be within specifications as determined in chapter one of the HP Blade Server bh7800 Site Preparation Guide.
the prompt for now. f. You see a blinking underscore for less than a minute, as the blade tries unsuccessfully to boot from a “Removable Device” (this is the factory default setting). g. The server blade now boots from hard disk. The pre-loaded Debian distribution of Linux is booted and eventually the “login:” prompt appears. 2. At the login prompt, log in as root, using the factory default password, which is password.
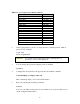
Table 1-1: Pre-configured Server Blade IP Addresses Blade location in bh7800 chassis Rear slot 2 Front slot 3 Rear slot 4 Front slot 5 Rear slot 6 Front slot 7 Rear slot 8 Front slot 10 Rear slot 11 Front slot 14 Rear slot 15 Front slot 16 Rear slot 17 Front slot 18 Rear slot 19 Front slot 1 (Reconfigured last) b. IP Address 192.168.1.2 192.168.1.3 192.168.1.4 192.168.1.5 192.168.1.6 192.168.1.7 192.168.1.8 192.168.1.10 192.168.1.11 192.168.1.14 192.168.1.15 192.168.1.16 192.168.1.17 192.168.1.18 192.
f. You return to the Linux prompt for the server blade located in front slot 1. g. Repeat steps 4a. through step 4f. for the remaining server blades, except the blade in front slot 1. h. After you have re-configured all blades except the blade in front slot 1, you reconfigure it without using Telnet – you are already logged on to the blade in front slot 1. CAUTION i Root access to Telnet has been enabled to make it easy to configure the server blades.
Manuals for the bh7800 are available online at http://docs.hp.com/hpux/hw/ For information on the Toptools agents for bh7800, see the Web site at http://docs.hp.com/hpux/onlinedocs/diag/st/st_pbar.htm For general information on Toptools, see the Toptools CD-ROM that accompanies the bh7800. Also see the Web site at http://www.hp.com/toptools/ Linux source code is available at: RedHat: ftp://ftp.redhat.com/ SuSE: ftp://ftp.suse.com/ (Also at various mirror sites). Debian: http://http.us.debian.
2 Using Windows-Based Server Blades Before You Begin Make sure you have the following items before you begin the installation process: • Microsoft Windows 2000 Advanced Server CD-ROM • Microsoft Windows 2000 Advanced Server Service Pack (latest edition) • Computer with network access • Driver diskettes • Microsoft Windows 2000 product license number Overview Microsoft Windows 2000 will be loaded on a server blade using a Remote Install Server (RIS).
Procedure Create a Stand-alone Microsoft Windows 2000 Remote Install Server Requirements • • • • A stand-alone server connected to the blade LAN. The selected system must have two (2) unallocated physical drives. One drive will be used for the operating system and the second drive will be used for the RIS.
A. Install the Microsoft Windows 2000 Advanced Server to Create a RIS and DHCP Server Booting the System Boot the system using the Microsoft Windows 2000 Advanced Server CD. You will see a message that reads, "Setup is inspecting your hardware configuration." Then the setup screen will be displayed. Installing Drivers 1. If you do not have additional drivers to add, skip to Continue the Installation below. Otherwise: press F6 to add OEM SCSI, DAC when the message appears at the bottom of the screen. 2.
2. The Installing Devices screen will be shown with a progress bar on the display. This may take 10 to 15 minutes. Note: If you see a dialog box titled "Digital Signature Not Found,” disregard and click "Yes" to continue the installation. 3. Click Next at the regional Settings screen. 4. At the Personalize Your Software screen, enter a name and organization. Then click Next. Enter the Product Licensing Key 1. Enter the product license key. 2.
Install the Service Pack 7. REQUIRED - Apply Service Pack 2 (or later). Failure to perform this step, may cause RIS to fail later in this procedure.
B. Initialize Storage Drive (This is the drive being used to store the RIS image) To start the disk administrator use the following procedure. 1. Click Start | Programs | Administrative Tools | Computer Management. 2. Expand the Storage folder if necessary. 3. Double click Disk Management. 4. The "Write signature and Upgrade" wizard will start if you have new hard drives with no signatures on them. Follow the instructions provided by the wizard to create the new hard drive signature. 5.
C. Setup NIC to use a Static IP Address 1. Right-click on My Network Places | Properties. 2. Right-click on Local Area Connection | Properties. 3. Select Internet Protocol (TCP/IP) and click Properties.
4. Select the “Use the following IP Address” radio button. Enter appropriate IP address and subnet mask (e.g. IP: 100.1.1.l, Subnet: 255.255.255.0) 5. Click OK to close the Local Area Connection Properties window.
D. Promote System to Domain Controller. 1. Click Start | Run and enter the command: dcpromo. 2. Click Next at the "Active Directory Installation Wizard".
3. Domain Controller Type: accept default "Domain Controller for a new Domain". Next.
4. Create Tree or Child Domain: accept default "Create a new domain tree. Select Next.
5. Create or Join Forest: accept default "Create a new forest of domain trees" and click Next.
6. New Domain Name: "Full DNS na me for new domain:" type in the assigned DNS name for your server (For example, win2kris.com). 7. Click Next. (default) NOTE The system will take a few minutes and show the hour clock on the display before moving to next screen (This is normal behavior).
8. NetBIOS Domain Name: accept default "Domain NetBIOS name”. Click Next.
9. Database and Log Locations: accept default values: Database Location: C:\WINNT\NTDS Log Location: C:\WINNT\NTDS. Click Next.
10. Shared System Volume: accept default values: Folder Location: C:\WINNT\SYSVOL. Click Next. (default) 11. The system will display a dialog box that reads, "The Wizard can not contact the DNS Server… Confirm yo ur DNS configuration, or install and configure a DNS server on this computer.” Click OK.
Configure DNS Server 12. Configure DNS: Select the “Yes, Install and configure DNS on this computer” radio button. Click Next to continue. (default) 13. At the Permissions: window Select the “Permissions compatible with preWindows 2000 Server” radio button. Click Next to continue.
14. Enter the Administrator password and click Next to continue. NOTE: If you get an error message stating that system cannot connect to domain, temporarily connect the NIC to a network hub, return to this screen, and then click Next. Once active directory begins configuring, you can disconnect NIC cable.
15. Review the Summary display and click Next to continue (default) 16. The system will start configuring the active directory display. This will take a few minutes to complete.
17. If prompted, insert Microsoft Windows 2000 CD-ROM and click OK to continue. 18. Configuring the active directory display shows again. Click Finish to close the Wizard utility. This completes the active directory installation. 19. Click Restart Now to reboot the system. Remove CD-ROM if present.
E. Install DHCP and Remote Installation Services Components. 1. Click Start | Settings | Control Panel. 2. Double-click on Add/Remove Programs icon in the control panel folder. 3. Click on Add/Remove Windows Components icon (located on left panel). This displays the “Windows Components Wizard”. 4. Deselect Networking Services and Re-select Networking Services. Next, select Remote Installation Services. Click Next.
Download and Install the Microsoft Patch for RIS NOTE Step 6 and step 7 are required with the installation of Service Pack 2. These two steps allow for the creation of an Advanced Server image on the secondary hard drive. Microsoft tends to incorporate patches in their next Service Pack release. It is anticipated (based on the file name shown in step 7) that these two steps will not be necessary when Service Pack 3 is available.
NOTE: The three Windows screens on this page will be seen only if you did not previously configure the NIC with a static IP address.
F. Configure DHCP. 1. Click Start | Programs | Administrative Tools | DHCP. 2. Click on your server name. Click on Action | New Scope . This displays the “New Scope Wizard”. Click Next.
3. For the Scope Name window, enter a name and description. Click Next. 4. IP Address Range: Specify a Start IP Address and End IP Address. Click Next.
5. Add Exclusions: Click Next.
6. Lease Duration: Click Next. (default) 7. Configure DHCP Options: Select No (default is yes). Click Next.
8. Click Finish 9. Click on your server name. Click on Action | Authorize . 10. Click on your Scope. Click on Action | Activate. 11. Click on your Server name. NOTE It will take a few moments to complete activation. Select F5 to refresh. 12. Close the DHCP config screen when the server becomes “active”.
G. Configure Remote Installation Services NOTE Read entire section before proceeding. OVERVIEW Remote Installation Services is designed to install Microsoft Windows 2000 products onto clients using a network install method. PROCEDURE 1. Click Start | Settings | Control Panel. 2. Double-click on Add/Remove Programs . 3. Click Add/Remove Windows Components. 4. Click Configure button in Configure Remote Installation Services window.
5. Remote Installation Services Setup Wizard: Click Next. (default) NOTE The remote installation services must reside on a different physical drive than the operating system. For example, assume the first physical disk is called the C: drive and only has one partition. The second physical drive is called the D: drive and has only one partition. With these assumptions follow the next step below.
6. For the remote installation folder location, do not place the path on the root drive (i.e. C: drive). that has the OS already on it. The best place to put the image is on the second physical disk. For example, storagedrive:\RemoteInstall. In our example, this would be the D: drive. Thus the folder location would be D:\RemoteInstall. Click Next.
7. Initial Settings: Check “Respond to client computers requesting service”. Click Next. 8. Installation Source Files Location: Assuming the CD-ROM is device E:, set the path to E:\I386 and place the Win2K Advanced media in the CD-ROM device. Click Next.
9. Optional - For the Microsoft Windows Installation Image Folder name, if another Microsoft Windows product is desired, suggested names are: • win2000.adv for Microsoft Windows 2000 Advanced Server • win2000.srv for Microsoft Windows 2000 Server • win2000.pro for Microsoft Windows 2000 Professional Then, click Next.
10. For the “Friendly description:” and for the “Help Text:” areas, verify the description and the text. After the patch is installed, the default message in the “Help text:” window below will contain the words “Windows Professional Server”. Please correct the statement to the name shown in the “Friendly description:” window that follows. Click Next.
11. At the “Review Settings” window, click Finish. 12. Click Done . 13. Close Add/Remove Programs window.
H. Use RIS to install Microsoft Windows 2K Adv Server to the Blade Server 1. Connect stand-alone RIS server to same network as the bc1100 is on. If possible, disconnect all other systems from network. This will ensure that there are no possible network conflicts. Connect a USB keyboard and mouse to the bh7800. Also connect a VGA monitor to the bh7800. 2. Remove all mass storage devices from the blade server including the USB floppy drive, the USB CD-ROM drive and any storage blades currently installed.
Verify the bc1100 will start-up using the Intel Boot Agents Version 3.0.03 3. Press the F2 key at start- up.
4. The window below is the “System Configuration Summary” after selecting the F2 key. Select F4-BOOT OPTIONS to continue.
5. Change the boot order so “Intel ® Boot Agent Version 3.0.03” is at the top of the list as shown below in the “Boot Options Configuration Utility” screen.
6. Press the ESC key to return to the left hand menu. Select F10-EXIT. Press ENTER This action displays the following dialog box. Press ENTER to save and exit. NOTE This causes the system to reboot. NOTE As the new boot starts, watch for the assignment of a DHCP IP address. Subsequently, the bc1100 PXE code will broadcast for a RIS server. 7. Press the F12 key when you see "Press F12 for network boot" on the screen. You only have a few seconds to do this.
8. When the bc1100 server blade connects to the RIS, you will see the following Microsoft Windows RIS installation screen, “Client Installation Wizard”. Press Enter to continue.
9. Next, log into the RIS server. Change fields using the Tab key. NOTE: The username discussed on this screen is the username that you use to login to the RIS server. By default, that is Administrator. Since the RIS server is on the same subnet as the bc1100, it is not necessary to supply a domain name. The user name and password are not case sensitive on this display. NOTE Select Windows 2000 Advanced Server, if prompted.
10. Below is the first of several screens to appear during the RIS Windows 2000 Advanced Server install. Press Enter to continue.
11. At the screen below, press Enter to continue. Soon the installation will start formatting the bc1100 disk. You will see the standard Microsoft Windows screen progress during the installation process. 12. Click Finish at the final Microsoft Windows screen. When you click the Finish button, the bc1100 server blade will automatically reboot. This completes the download of the OS from the RIS server.
System Administration Configuration Checklist 13. During the reboot, use the F2 key to enter the bc1100 BIOS setup screens to change the boot order to the hard drive setting. 14. Press the F4-BOOT OPTIONS key to change the BOOT ORDER to put “+Hard Drive” at the top of the list. NOTE If this is not done, the bc1100 server blade will connect again to the RIS server using the PXE process, which leads to a new download. 15. After making the boot order changes, use the F10 key to exit.
16. Install the latest Service Pack and the latest upgrades pertinent to your environment. 17. Insert the storage blade into the chassis. Microsoft Windows 2000 should automatically detect the new hardware, prompting the user for the appropriate driver. 18. There are there are a number of other system administration tasks that must be considered.
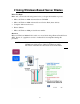
I. Establishing a Remote GUI Session The Microsoft Windows 2000 operating system is loaded. Next, set up a remote Graphical User Interface (GUI) so the blade server can be controlled remotely. Two methods are discussed here. The first method is using Terminal Services and the second method is using Symantec’s pcAnywhere software. Terminal Services Installation Overview Terminal Services provides access to Windows-based applications for a variety of client hardware devices.
7. Login as "Administrator" after the system has rebooted. 8. You must create installation disks for the Terminal Services client. 9. Click Start | Programs | Administrative Tools | Terminal Services Client Creator 10. Select "Terminal Services for 32-bit x86 Windows". Do not click OK. Go to the next step. 11. Connect the USB Floppy Drive. Insert a 3.5" floppy disk. Select destination drive "B:" Go to next step. 12. Click on "B:" (not the scroll up-scroll down buttons) to highlight it. 13.
10. Follow the on-screen instruction, insert Disk2 when prompted to do so. 11. Click OK when done. Establishing Terminal Services Connection 1. On the client machine select Start | Programs | Terminal Services Client -> Terminal Services Client 2. Select the "Server" and the "Screen Area". 3. Click Connect to connect. 4. Login to the target server. 5. Within the Terminal Services Client window, you should see the target server's desktop shown below.
Symantec pcAnywhere Installation Overview pcAnywhere uses a server-client relationship. It supports several connection types such as network, modem, and direct connections. The software is also separated into server (host) and client (remote) packages. The user may choose to install either one or both parts of the software. The software requires initialization configuration on both the server and client.
J. Disable Hibernation Mode After the Microsoft Windows 2000 operating system is installed, the hibernation mode must be turned off. 1. Select Start | Settings | Control Panel. 2. Right double click the Power Options icon.
3. Select the Hibernate tab as shown below. 4. Ensure that the check box under Hibernate is blank as shown in the screen capture shown above. 5. Click OK and close the Control Panel window.
K. Microsoft Windows 2000 RMC Driver Installation 1. Go to Start | Setting | Control Panel 2.
3. Select Hardware tab 4.
5. Double click on the Unknown PCI Device 6.
7. Click on Update Driver 8.
9. Do not let Microsoft Windows search for the driver. Select “Display a list of known drivers for this device so that I can choose a specific driver”, click Next 10. In the Hardware Type menu, scroll down to "Other devices".
11. In the “Select a Device Driver Wizard”, scroll down the Manufacturers list until you find Hewlett-Packard. There will be 2 entries for HP, select the second one. 12. In the Models menu, scroll down to the end of the list, and find "HP TopTools Remote Control". Select it and click Next (see above picture). 13. Microsoft Windows will prompt a warning screen about it does not recommend this driver because it cannot verify the hardware compatibility. Ignore it and click Yes to continue. 14.
15. Click Finish. 16. Click Close to close the device property menu. 17. Notice that the unknown PCI Device is now named "HP TopTools Remote Control." You will have to do the same for all 3 unknown PCI Devices.
General Notes Multi Step Process for Individual Server Blade Shutdown 1. Shutdown the Microsoft Windows 2000 operating system. Select Start | Shutdown. 2. Ensure Shut down is selected from the drop down window menu that appears. See below. Click OK. 3. Connect to the management blade menu via a Telnet session to the management blade or using a local serial cable connection to the management blade port on the bulkhead of the card. 4.
3 Using HP-UX-Based Server Blades OVERVIEW HP-UX information for blade servers is contained in documentation released prior to this book. This chapter will primarily consist of pointers to the HP-UX information already written. NOTE: At this time, HP-UX 11i is shipping only on the bh37xx series blade servers. Information in this chapter applies exclusively to the bh37xx series blade servers. HP-UX will be introduced on the bh7800 blade server in the future.