
Brocade Web Tools Administrator's Guide - Supporting Fabric OS v5.3.0 (53-1000435-01, June 2007)


Web Tools Administrator’s Guide 55
Publication Number: 53-1000435-01
Physically locating a switch using beaconing
3
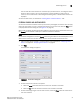
3. On the Page Setup dialog box, make the changes specific to your printing preferences and click
OK.
The Print dialog box appears.
4. Select a printer and click OK in the Print dialog box.
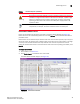
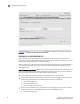
To display detailed Name Server information for a particular device
1. Click Name Server in the Monitor section of the Tasks menu.
The Name Server window appears.
2. Click a device from the Domain column.
3. Click Detail View.
The Name Server Information dialog box displays information specific to that device.
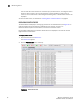
To display the zone members of a particular device
1. Click Name Server in the Monitor section of the Tasks menu.
The Name Server window appears.
2. Click a device from the Domain column.
3. Click Accessible Devices.
The Zone Accessible Devices window displays accessible zone member information specific to
that device.
Physically locating a switch using beaconing
Use the Beacon button to physically locate a switch in a fabric. The beaconing function helps to
physically locate a switch by sending a signal to the specified switch, resulting in an LED light
pattern that cycles through all ports for each switch (from left to right).
NOTE
Switch beaconing is enabled when the switch is owned by the current Admin Domain you are logged
in to or if the account you are logged in with is associated with an administrator role; otherwise,
switch beaconing is disabled.
To enable beaconing
1. Select a switch from the Fabric Tree.
The selected switch appears in the Switch View.
2. Click the Beacon button on the Switch View.
The LED lights on the actual switch (selected in the GUI) light up on the physical switch in a
pattern running back and forth across the switch itself. The beaconing is not shown in the GUI.
3. Look at the physical switches in your installation location to identify the switch.