
Brocade Web Tools Administrator's Guide v6.0.0 (53-1000606-01, April 2008)


Web Tools Administrator’s Guide 223
53-1000606-01
Configuring SNMP
18
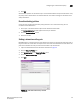
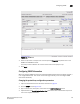
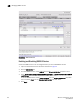
FIGURE 104 SNMP tab
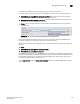
3. Select a trap level for a recipient from the corresponding Trap Level drop-down menu in the
SNMPv1 and SNMPv3 sections.
The level you select identifies the minimum event level that will prompt a trap.
4. Click Apply.
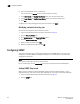
Configuring SNMP Information
When you configure SNMP information for a Brocade 48000 configured with two logical switches, it
is on a logical-switch basis. This means that for each logical switch, you must configure SNMP
information individually.
Changing the systemGroup configuration parameters
1. Open the Switch Administration window as described on page 29.
2. Click the SNMP tab (see Figure 104).
3. Type a contact name, description, and location in the SNMP Information section.
4. Optional: Select the Enable Authentication Trap check box to allow authentication traps to be
sent to the reception IP address.