
Brocade Web Tools Administrator's Guide v6.0.0 (53-1000606-01, April 2008)


Web Tools Administrator’s Guide 33
53-1000606-01
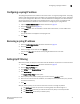
Managing blades
3
4. Click Apply.
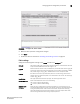
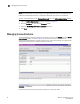
Setting a slot-level IP address
1. Open the Switch Administration window as described on page 29.
2. Click the Blade tab.
3. Click the Set IP address button.
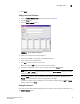
FIGURE 19 Set IP Address dialog box
4. Select a slot number from the drop-down list.
5. Enter the IP address, subnet mask, and Gateway IP address.
6. Select a type from the drop-down list.
7. Cli ck Add to add the new entry to the table.
When you click the Add button, the values remain in the fields.
8. To delete a configuration, select a row in the table and click the Delete button.
NOTE
Clicking the Add or Delete buttons update the table in the Set IP Address dialog box, but does
not send values to the switch.
9. Click the Apply button to save the values currently shown in the table to the switch or click
Cancel to close the dialog box without saving any of your changes.
To update the switch with your changes, you must update the table using the Add and Delete
buttons, and then click Apply.
Viewing IP addresses
If you want to view the IP addresses configured on the switch for the currently populated slots, use
the Show IP Address button.