
HP StorageWorks Fabric OS 5.0.0 Advanced Web Tools User Guide (AA-RW1RA-TE, May 2005)


72 Managing your fabrics, switches, and ports
To set trap levels:
1. Launch the Switch Admin module as described on page 43.
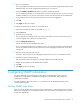
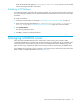
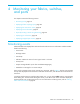
2. Click the SNMP tab (see Figure 18).
Figure 18 SNMP tab
3. Select a trap level for a recipient from the corresponding Trap Level list in the SNMPv1 and SNMPv3
sections.
The level you select identifies the minimum event level that will prompt a trap.
4. Click Apply.
Configuring SNMP information
When you configure SNMP information for the Core Switch2/64 or SAN Director 2/128 configured with
two logical switches, the configuration is on a logical-switch basis. This means that for each logical switch,
you must configure SNMP information individually.
To change the systemGroup configuration parameters:
1. Launch the Switch Admin module as described on page 43.
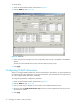
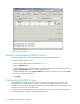
2. Click the SNMP tab (see Figure 18).
3. Enter a contact name, a description, and a location in the SNMP Information section.
4. Optional: select the Enable Authentication Trap check box to allow authentication traps to be sent to
the reception IP address.
5. Click Apply.