
AHCI and RAID on HP Elite 8100 Business PCs

29
Migration to RAID 0 from three non-RAID hard drives using Intel Rapid Stor-
age Console
NOTE: Back up all data before proceeding.
NOTE: HP Elite 8100 Business PC products only support RAID based on three identical SATA hard drives
RAID in either RAID 0 or RAID 5 or Matrix RAID Mode of RAID 0 and RAID 5.
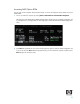
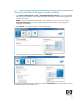
1. Open the Intel Rapid Storage Console and select Create in the top pane and select the Volume Type
in the right pane. Select Optimized disk performance (RAID 0).
2. Click Next to configure the volume.
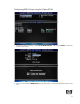
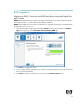
3. In the Configure window, name the volume, select the three disks and specify if you want to keep
data from one of the selected disks.
4. Click Next to begin the confirmation process and start the Create Volume action.
NOTE: HP currently supports only the default Strip Size (in this case 128KB). There is a performance
relation between the type of data and the strip sizes.
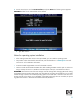
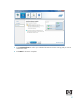
5. Click Create Volume to confirm you understand the Volume Creation warning and you want to
continue the action.
6. Click OK after the action completes.
Migration to RAID 5 from three non-RAID hard drives using Intel Rapid Stor-
age Console
NOTE: Back up all data before proceeding.
NOTE: HP Elite 8100 Business PC products only support RAID based on three identical SATA hard drives
in either RAID 5 or RAID 0 or Matrix RAID Mode of RAID 0 and RAID 5.
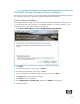
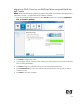
1. Open the Intel Rapid Storage Console and select Create in the top pane and select the Volume Type
in the right pane. Select Efficient data hosting and protection (RAID 5).
2. Click Next to configure the volume.
3. In the Configure window, name the volume, select the three disks and specify if you want to keep
data from one of the selected disks.
4. Specify if you want to keep data from one of the selected disks?
5. Click Next to begin the confirmation process, review the selected configuration and click Create
Volume to start the Create Volume action.
NOTE: HP currently supports only the default Strip Size (in this case 128KB). There is a performance
relation between the type of data and the strip sizes.
6. Click Create Volume to confirm you understand the Volume Creation warning and you want to
continue the action.
7. Click OK after the action completes.