
AHCI and RAID on HP Elite 8100 Business PCs

30
NOTE: If users consume all available storage for this RAID volume, there will be no space to create
another RAID volume for this hard drive, thereby not allowing for Matrix RAID Mode RAID.
Note the size if you want to create a second RAID volume in this set of hard drives.
8. Reboot the system after the migration finishes.
Migration to Matrix RAID 5 and RAID 0 from three non-RAID hard drives
using Intel Rapid Storage Console
NOTE: Back up all data before proceeding.
NOTE: HP Elite 8100 Business PC products only support RAID based on three identical SATA hard drives
in either RAID 5 or RAID 0 or Matrix RAID Mode of RAID 0 and RAID 5.
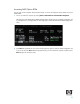
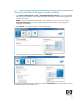
1. Open the Intel Rapid Storage Console and select View > Advanced Mode.
2. Click Actions/Create RAID Volume from Existing Hard Drive to open a verification win-
dow.
3. Click Next.
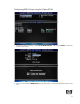
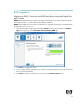
4. Type the RAID Volume Name, select the RAID Level (for three hard drive RAID 0 or RAID 5 only),
and select the Strip Size.
NOTE: HP currently supports only the default Strip Size (in this case 128KB).
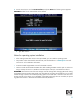
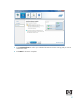
5. Click Next to see the selection of hard drives that will be part of this RAID volume.
6. Select the source hard drive (Port 0), and then click on the arrow to move them to the Selected box.
7. Click Next.
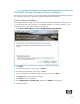
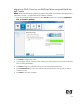
8. Select all hard drive members of the RAID volume, and then click the right arrow to place the (port 2
and port 3) hard drives in the Selected box.
NOTE: If users consume all available storage for this RAID volume, there will be no space to create
another RAID volume for this hard drive, thereby not allowing for Matrix RAID Mode RAID.
Note the size if you want to create a second RAID volume in this set of hard drives.
9. To create two volumes based on your space, reliability and performance needs, select the size of the
first RAID volume by sliding the bar or entering the desired volume size. For example, divide in half
the available hard drive storage in two RAID volumes by setting the Percentage of Available
Space to 50%, so that 50% of drive capacity is used for RAID 0.
10. Click Next.
11. Click Finish to start the migration process, which can take a few hours.
12. Reboot the system after the migration finishes.
NOTE: Back up all data before proceeding.