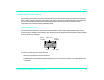
Chapter 3 -Taking Photos This chapter describes the process of taking photos with your HP PhotoSmart C500 Digital Camera, including how to take Still, Burst, and Timelapse photos, and detailed descriptions of adjusting the camera settings. If you want a quick overview, see the Basics guide that you received with your camera. There are three settings you can use to take photos: Still, Burst, and Timelapse. Still Use this setting for taking a single color or black and white photo.
Overview To take a photo: Shutter button 1. Remove the lens cover. 2. Turn the camera on and turn the camera mode dial to Rec. The camera is automatically ready to take a Still photo. 3. Frame your subject in the viewfinder. 4. Press and hold the Shutter button 1/2 way down to allow the camera to adjust the focus and exposure. Camera mode dial On/off button 5. When you see the green light to the left of the viewfinder, press the Shutter button all the way down to take the photo.
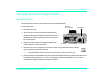
Overview Checking the Camera Status Use the status LCD and the color LCD to check the status of the camera. Basic camera information such as battery level, number of photos remaining, photo quality, flash status, and memory card status display on the status LCD. The color LCD shows information such as the number of photos stored on the memory card, the current compression level, resolution setting, and battery status.
Overview Using the Color LCD Use the color LCD on the back of the camera to check current camera settings and status, including the number of photos stored on the memory card, and the compression and resolution settings. To view the camera status on the color LCD: 1. Turn the camera on and turn the camera mode dial to Rec. 2. Press the color LCD on/off button to turn the color LCD on. Color LCD 3. Press the Status button (right soft key). The color LCD displays the current camera settings and status.
Overview Memory card inserted Battery status Images taken The number of photos stored on the memory card. Compression The current compression level. Resolution The current resolution setting. White Bal The current white balance setting. Digita The camera firmware version number. Color LCD Status 4. When you have finished viewing the camera status, press the Exit button (right soft key).
Taking Still, Burst and Timelapse Photos Taking Still, Burst and Timelapse Photos Taking Still Photos Use the Still setting to take one photo each time you press the Shutter button. To take a Still photo: 1. Number of photos available Shutter button Remove the lens cover. 2. Turn the camera on and turn the camera mode dial to Rec. The status LCD displays the approximate number of photos available on the memory card. The camera is not ready until this number appears. 3.
Taking Still, Burst and Timelapse Photos 6. When you see the green light to the left of the viewfinder, press the Shutter button all the way down to take the photo. Wait for the beeps, indicating the photo has been taken, before releasing the Shutter button. 7. If Instant Review is on, your photo appears briefly on the color LCD. If you are happy with the photo, press the Save button (right soft key) to save it on the memory card.
Taking Still, Burst and Timelapse Photos 4. Press the left soft key until the Burst icon appears on the lower overlay bar. Tip: To conserve battery power, turn the color LCD off after you choose the photo type. Burst icon If there is not enough space on the memory card for the number of photos specified, the red light to the left of the viewfinder flashes and the upper overlay bar displays “Not enough memory.” To solve this problem, insert a new memory card, or try a lower photo quality setting. 5.
Taking Still, Burst and Timelapse Photos To change the Burst rate: 1. Turn the camera on and turn the camera mode dial to Rec. 2. Press the Menu button. The color LCD displays the Media Settings menu. 3. Use the 4-way arrow button to scroll to Burst. 4. Press the Edit button (left soft key), and then scroll down to Burst Rate. 5. Use the 4-way arrow button to choose the desired setting, from 1 to 3 frames per second. 6. Press the Exit button (right soft key) twice to save your settings and exit the menus.
Taking Still, Burst and Timelapse Photos To take Timelapse photos: 1. Number of photos available Shutter button Turn the camera on and turn the camera mode dial to Rec. The status LCD displays the approximate number of photos available on the memory card. The camera is not ready until this number appears. 2. Adjust your camera settings as needed. See “Adjusting the Camera Settings” on page 42 for details. Status LCD Camera mode dial On/off button 3.
Taking Still, Burst and Timelapse Photos 6. When you see a green light to the left of the viewfinder, press the Shutter button all the way down to take the first photo. Wait for the beeps, indicating the photo has been taken, before releasing the Shutter button. The camera automatically takes the number of photos at the time interval specified in the Timelapse settings.
Taking Still, Burst and Timelapse Photos 5. Use the 4-way arrow button to select a setting to change. Setting Description Default Interval This is the amount of time you want the camera to wait before taking the next photo. Select from 1 minute to 24 hours. 1 min # Images This is the number of photos you want the camera to take. Select from 2 to 1000 photos. 10 6. Use the 4-way arrow button to select the desired setting. 7.
Adjusting the Camera Settings Adjusting the Camera Settings Taking Black and White Photos You can take either color or black and white photos using the Still, Burst, or Timelapse settings. The default is color. This setting remains until you change it, even if you turn the camera off. To change to color or black and white photos: 1. Turn the camera on and turn the camera mode dial to Rec. 2. Press the Menu button. 3. Select the photo type. 4.
Adjusting the Camera Settings Changing the Flash Setting To change the flash setting: 1. Turn the camera on and turn the camera mode dial to Rec. 2. Press the Flash button repeatedly until the flash setting you want displays on the status LCD. The flash setting is effective for Still and Timelapse photos, and remains until you change it, even if you turn the camera off. Note: Flash button You cannot use the flash for Burst photos; the flash button is inactive.
Adjusting the Camera Settings You can also change the flash settings using the camera menus. To select a flash setting using the camera menus: 1. Turn the camera on and turn the camera mode dial to Rec. 2. Press the Menu button. 3. Use the 4-way arrow button to scroll to the Preferences menu, then scroll down to Capture. 4. Press the Edit button (left soft key). 5. Scroll to Flash. 6. Use the 4-way arrow button to select a flash setting.
Adjusting the Camera Settings Adjusting the Photo Quality The photo quality setting determines the photo’s resolution and compression. Because of this, it also affects how many photos can be stored on the memory card. The photo quality setting remains the same for each photo of the same type (Still, Burst, and Timelapse) until you change it, even if you turn the camera off and on again. When selecting the photo quality, keep in mind: • How you plan to use the photo (on screen, printed, enlarged, etc.).
Adjusting the Camera Settings To adjust the photo quality: 1. Turn the camera on and turn the camera mode dial to Rec. 2. Press the Photo Quality button repeatedly until the desired photo quality setting displays on the status LCD.
Adjusting the Camera Settings Each of the photo quality settings corresponds to a combination of resolution and compression settings. The diamond icons on the status LCD indicate photo quality as follows: Photo quality Description Resolution Compression E-mail Is the most memory-efficient. Use this setting for photos that you plan to send via e-mail, place on the Internet, use for screen savers or wallpaper, or print up to 3x5 inch prints.
Adjusting the Camera Settings You can also adjust the photo quality by adjusting the individual resolution and compression settings for each of the three types of photos: Still, Burst and Timelapse. To adjust the photo quality using the menus: 1. Turn the camera on and turn the camera mode dial to Rec. 2. Press the Menu button. 3. Select the photo type. 4. Press the Edit button (left soft key). 5. Use the 4-way arrow button to select a resolution or compression setting to change.
Adjusting the Camera Settings 6. Use the 4-way arrow button to select the desired setting. As you decide which settings to use, remember that there is a trade-off between resolution and compression. Higher resolution photos provide better quality, but if you use high resolution and high compression, some of the photo’s detail will be lost. Some combinations of settings correspond to the camera’s standard settings indicated by the photo quality diamonds on the status LCD.
Adjusting the Camera Settings Using the Zoom The HP PhotoSmart C500 Digital Camera has optical zoom and digital zoom. Optical zoom uses the lens to focus in on a distant object. Use it to increase the size of a subject that is distant from you. Digital zoom selects pixels from the center of the photo and enlarges the image further. Use digital zoom once you have reached the maximum optical zoom, to increase the size of your subject even further.
Adjusting the Camera Settings To use optical zoom: 1. Turn the camera on and turn the camera mode dial to Rec. 2. As you frame your subject in the viewfinder, move the Zoom control to the right to zoom in on your subject, or to the left to zoom out. Zoom control 3. Take your photo. To use digital zoom: 1. Turn the camera on and turn the camera mode dial to Rec. 2. Press the color LCD on/off button to turn the color LCD on. Note: The color LCD must be on for digital zoom. 3.
Adjusting the Camera Settings Using Macro Mode Use macro mode to take close-up photos of small objects. For example, use macro mode to take a close-up photo of a flower. To turn on macro mode: 1. Turn the camera on and turn the camera mode dial to Rec. 2. Press the color LCD on/off button to turn the color LCD on. Note: The color LCD must be on for macro mode. 3. If you do not see the overlay bars on the color LCD, press the Overlay button to turn the overlay bars on. 4.
Adjusting the Camera Settings Using the Self-Timer Use the self-timer to take a photo of yourself or a posed group photo. Ten seconds (:10) is the default amount of time the camera waits before taking the photo. You can change this delay time to 3, 5, 10, 20, or 30 seconds. Note: The self-timer is only available for Still photos. To use the self-timer: 1. Tripod mount Attach the camera to a tripod, or place it on a firm surface at an appropriate distance and height from the subject. 2.
Adjusting the Camera Settings 5. Press the center soft key until you see :10 (or the number of seconds you have set) appear on the upper overlay bar, and the self-timer icon appear in color on the lower overlay bar. Note: The center soft key toggles between the selftimer and macro modes so that you can take photos using just one of the modes, or both at the same time. The icons appear in color if they are on.
Adjusting the Camera Settings To change the self-timer delay: 1. Turn the camera on and turn the camera mode dial to Rec. 2. Press the color LCD on/off button to turn the color LCD on. 3. Press the Menu button. 4. Use the 4-way arrow button to scroll to the Preferences menu, then scroll down to Capture. 5. Press the Edit button (left soft key). 6. Scroll to Self-Timer. 7. Use the 4-way arrow button to decrease or increase the number of seconds the camera waits before taking the photo.
Adjusting the Camera Settings Setting the Exposure The HP PhotoSmart C500 Digital Camera automatically adjusts the amount of light in your photo for different lighting conditions. It includes two automatic methods (Matrix and Spot) which calculate the exposure setting differently. To make the final photo lighter or darker than the automatic exposure would produce, you can also manually adjust the exposure. Exposure can be adjusted as much as +/-1.5 EVs (Exposure Values) in 0.3 EV increments.
Adjusting the Camera Settings Option Description Default EV Select EV (Exposure Value) to manually adjust the exposure from -1.5 EV to +1.5 EV, in 0.3 EV increments, + values for lighter photos, - values for darker photos. 0 AE Method Select AE (Automatic Exposure) Method to have the camera automatically adjust the exposure for different lighting conditions. There are two AE methods, Matrix and Spot. Matrix calculates the exposure by taking the average of several points of light in the photo.
Adjusting the Camera Settings To adjust the AE method’s meter setting: 1. Turn the camera on and turn the camera mode dial to Rec. 2. Press the Menu button. 3. Use the 4-way arrow button to scroll to the Preferences menu, then scroll down to Meter. 4. Press the Edit button (left soft key). 5. Use the 4-way arrow button to select an exposure option. • Continuous AE calculates the automatic exposure continuously when you press the Shutter button.
Adjusting the Camera Settings To manually adjust the white balance setting: 1. Turn the camera on and turn the camera mode dial to Rec. 2. Press the Menu button. 3. Use the 4-way arrow button to scroll to the Photo Assist menu, then scroll down to White Balance. 4. Press the Edit button (left soft key). 5. Use the 4-way arrow button to select a white balance option.
Adjusting the Camera Settings Using Instant Review After you take a photo, Instant Review briefly displays the photo on the color LCD, even if you have not turned the color LCD on. If you are happy with the photo, you can then save it on the memory card. If not, you can discard the photo and try again. If you do not use Instant Review, the camera automatically saves the photo. Instant Review defaults to off, so if you want to use this feature, you need to turn it on first.
Adjusting the Camera Settings To use Instant Review: 1. Take your photo. After a few seconds, your photo appears briefly on the color LCD. Note: If your photo does not appear on the color LCD, you need to turn Instant Review on. 2. Press the Save button (right soft key) to save your photo, or press the Delete button (center soft key) to discard the photo. Note: The camera automatically saves the photo if you do not specify that you want to save or delete it.
Adjusting the Camera Settings Setting the Eye Start Eye Start brings the camera out of sleep mode and starts adjusting the exposure when your eye is close to the viewfinder. Eye Start works by using sensors located next to the viewfinder. It is on by default. To turn Eye Start on or off: Eye Start sensors 1. Turn the camera on and turn the camera mode dial to Rec. 2. Press the Menu button. 3. Use the 4-way arrow button to scroll to the Preferences menu, then scroll down to Capture. 4.
Adjusting the Camera Settings To turn Hand Held on or off: 1. Turn the camera on and turn the camera mode dial to Rec. 2. Press the Menu button. 3. Use the 4-way arrow button to scroll to the Preferences menu, then scroll down to Capture. 4. Press the Edit button (left soft key). 5. Scroll down to Hand Held. 6. Use the 4-way arrow button to turn Hand Held on or off. 7. Press the Exit button (right soft key) twice to save the settings and exit the menus.
Adjusting the Camera Settings 4. Press the Edit button (left soft key). 5. Scroll down to Counter Reset. 6. Use the 4-way arrow button to turn Counter Reset on or off. 7. Press the Exit button (right soft key) twice to save the settings and exit the menus. Setting Auto Shutoff Your HP PhotoSmart C500 Digital Camera has an automatic shutoff, which is designed to help conserve battery life during periods of inactivity. Auto Shutoff is on by default.
Adjusting the Camera Settings To turn Auto Shutoff on or off: 1. Turn the camera on and turn the camera mode dial to Rec. 2. Press the Menu button. 3. Use the 4-way arrow button to scroll to the Preferences menu, then scroll down to General. 4. Press the Edit button (left soft key). 5. Scroll down to Auto Shutoff. 6. Use the 4-way arrow button to turn Auto Shutoff on or off. 7. Press the Exit button (right soft key) to save the settings and exit the menus.
Adjusting the Camera Settings • When you turn the camera on, if the memory card is damaged or unformatted. • When you press the Shutter button, if the memory card is full. • If the camera is on and you insert a full memory card. To turn the Beep on or off: 1. Turn the camera on and turn the camera mode dial to Rec. 2. Press the Menu button. 3. Use the 4-way arrow button to scroll to the Preferences menu, then scroll down to General. 4. Press the Edit button (left soft key). 5.