
HP CM8060/CM8050 Color MFP - LAN Fax Setup

LAN Fax service
When you signed up for LAN Fax service the service provider should have given you all the
information needed to set up the service. Use that information to configure the service, and then
follow these instructions to use the service with the device. Depending on the service provider, some
of these settings might not be available.
LAN Fax setup
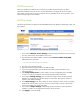
The following information is taken from the Embedded Web Server (EWS) Fax Send Setup “Help” link
shown below.
1. In the area for LAN Fax Service Settings, select the name of the LAN Fax service that you
are using. Select the file format that the service uses.
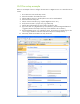
2. Type the path to the LAN Fax folder in the box below Common Folder Path (UNC) .
UNC paths follow this format:
\\servername\sharename\foldername
3. Type the correct Windows domain.
4. Type the username and password for the LAN Fax folder.
5. If you are using Novell NDS, type the NDS tree and NDS context information in the
appropriate boxes.
6. Click Verify Folder Access to check whether you have configured access to the folder
correctly. You will be prompted for the username and password for the folder.
7. In the area for Dialing Settings, type the maximum number of times the device should
attempt to try sending the fax if the first attempt is unsuccessful. Also type the number of
minutes to wait between attempts.
8. In the Input Settings area, select whether to receive notification if there are errors sending
the file to the network folder. If you turn on error correction mode, portions of the fax that
were not successfully sent will be sent again.
9. In the area for Output Settings, select the appropriate transmission speed, and select
whether to include a cover page that the LAN fax service provides.
10. Click Apply to save the settings.