Technical white paper Advanced Host Controller Interface (AHCI), RapidDrive, and Redundant Array of Independent Disks (RAID) on the HP Compaq Pro 6305 Business PC Using AMD Array Management Software (RAIDXpert) Table of contents Introduction 3 Basics of AHCI and RAID Technology Definitions Important RAID Configuration information 3 3 Introduction to RapidDrive Technology Basics of RapidDrive Technology RapidDrive Performance HP RapidDrive comparison against HDD and SDD.
Configuring RAID Volume using the Option ROM Select boot order Notes for operating system installation 14 17 17 AMD Array Management Software (RAIDXpert) Java Runtime Environment Recommended Initial Settings Degradation 19 19 19 22 For More Information 22 2
Introduction A Redundant Array of Independent Disks (RAID) is a data storage scheme that uses two or more drives accessed in combination to improve fault tolerance. Initially used with servers, desktop PCs are increasingly using RAID controllers and extra ATA or SCSI disks. Newer system boards often have RAID controllers. The HP Compaq Pro 6305 Business PC takes advantage of Serial Advanced Technology Attachment (SATA) and the integration of RAID into Fusion Controller HUB A75 chipsets.
single logical unit. Described in more detail in this document. ROM Read Only Memory, non-volatile memory that is resistant to modification. SATA Serial ATA, an interface standard (replacing ATA) that connects SATA devices to the system . Strip Set of data on a single hard drive in a RAID 0 volume. Striping Group of all strips going horizontally across all the hard drive members of a RAID 0 volume.
Basics of RapidDrive Technology Rapid Drive from HP takes advantage of RAID/JBOD technology where various sizes of storage media are concatenated to create a large disk volume. Rapid Drive is a combination of a solid state device (SSD) with a traditional HDD. The SSD can be either single-level (SLC) or multi-level (MLC) cell based technology.
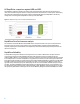
HP RapidDrive comparison against HDD and SDD. The RapidDrive configuration speeds up the random reads providing the faster seek times reducing the latency for reads, which translates into greater speed in accessing data and more responsiveness for overall system. The following figure show the PC-Mark 05 benchmark results comparing traditional HDD, SSD only and RapidDrive. The SSD only configuration scores the highest but RapidDrive comes very close (within 80%).
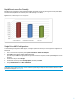
RapidDrive is more Eco Friendly RapidDrive is the combination of SSD and traditional HDD. The SSD do not have any moving parts such as platter (Disk) and head media, RapidDrive uses ~9% less power at Idle (Savings of ~4+ Watts). Figure 5: Power (in Watts) usage for each configuration Single Drive AHCI Configuration To take advantage of single drive AHCI support, a change is required in F10 setup. To run a single drive configuration in AHCI mode: 1.
Basic RAID Types This section provides a brief explanation of the supported RAID configurations for HP Compaq Pro 6305 Business PCs. RAID 0 with two hard drives (Striped) Even though HP supports RAID 0, it is not the recommended configuration for business PC users. Lack of redundancy causes less than half the reliability of a single hard drive system since the Mean Time Between Failure (MTBF) of RAID 0 is equal to the MTBF of an individual drive, divided by the number of drives.
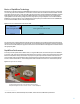
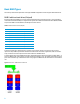
The HP Compaq Pro 6305 Microtower also allows for RAID 0 with three hard drives. However, reliability is less than a RAID 0 configuration with two hard drives. RAID 0 with three hard drives is shown in the following figure.
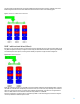
Table 4: RAID 1 with two hard drives (Mirror) First disk Second disk Data Segment 5 Data Segment 5 Data Segment 6 Data Segment 6 Data Segment 7 Data Segment 7 Data Segment 8 Data Segment 8 In the previous table, each “Data Segment n” represents a group of data, known as a strip. In this case, each row represents a stripe. This table shows how information is duplicated in both hard drives. The size of the strips is mostly irrelevant and not a configurable option.
Other supported configurations HP Compaq Pro 6305 Business PC products support two other RAID configurations: • Two hard drive configuration. – Two equal size/type SATA hard drive RAID configurations in RAID 0 or RAID 1. – Maximum of two SATA optical drives. • Three hard drive configuration (only on HP Compaq Pro 6305 Microtower). – Three equal size/type SATA hard drive RAID configurations in RAID 0. – Maximum of one SATA optical drive.
Table 6: Non-RAID drive detection scheme Operation RAID 1 or 0, Working RAID 1 Degraded, No RAID Configured Add blank HDD (hard disk drive) Add HDD as RAID Ready, Add HDD as Raid Ready (RAID 1 auto-rebuild when hot plug blank HDD only) [1], Add HDD as RAID Ready Add HDD with MBR and MDD Add HDD as whatever RAID mode defined in the MDD of the HDD, Add HDD as JBOD, Add HDD as RAID Ready Add HDD with MBR and no MDD Add HDD as whatever RAID mode defined in the MDD of the HDD, Add HDD as JBOD, Add HDD as
3. Use the arrow keys to select the Storage menu. 4. 5. 6. Use the down arrow key to select Storage Options, and then press Enter. On the Storage Options menu, use the down arrow key to select SATA Emulation. Press the right arrow key until RAID displays, and then press F10 to accept. 7. To apply and save changes, select File > Save Changes and Exit – If you do not want to apply your changes, select Ignore Changes and Exit. – To reset to factory settings, select Apply Defaults and Exit.
The screen below displays briefly during boot up. The RAID configuration utility is English only. To configure RAID in other languages, use the Web-based RAID configuration utility. Configuring RAID Volume using the Option ROM Once you are in the Option ROM you can access the Utility Main Menu by pressing Ctrl + F. WARNING: Before configuring RAID, be sure to back up all data. Once a RAID configuration is executed and saved, data on the selected disks will no longer be retrievable. 1. 2.
3. From the Main Menu, press 2 to access the Define LD screen. This screen allows you to configure RAID settings and assignments. 4. Use the arrow keys to scroll to the desired LD number and press enter. The following screen appears. For RAID 1 configurations, accept the HP default settings.
For all other configurations: a. b. c. d. e. 5. 16 Use up and down arrow keys to toggle and the space bar to view and change options. Under Assignment, select Y to enable the drive(s). Press Ctrl + Y to save your settings. At the prompt, press Ctrl + Y to Modify Array Capacity or press any other key to use maximum capacity. Press Esc to exit and return to the main menu. Press Esc to exit. At system prompt, press Y to reboot or any other key to go back.
Select boot order To set up your system to boot from the OS media, you may need to change the boot order in the F10 setup menu. 1. 2. 3. 4. 5. 6. Turn on or restart the computer by clicking Start > Shut Down > Restart the Computer. Press F10 as soon as the monitor light turns green. If you do not press F10 at the appropriate time, you must restart the computer, and then press F10 again to access the utility. Use the arrow keys to select Storage.
4. Navigate to the directory where the .inf file is located, select it, and click Next. 5. 6. At the license screen check the “I accept…” box and click Next. Select the partition for the OS to be installed and click Next. The OS will install. Failure to install and enumerate the RAID driver after enabling the RAID controller (with or without creating a volume) will result in a Windows boot failure (blue screen) for inaccessible boot device.
AMD Array Management Software (RAIDXpert) This section of the paper focuses on how to configure RAID using AMD Array Management Software (RAIDXpert). Java Runtime Environment RAIDXpert will install JRE 1.4 on your system unless you already have JRE versions 1.3.0 or 1.4. Console Software Installation The RAIDdriver softpaq also provides the AMD RAIDXpert utility, which you can install by running the setup.exe program provided. Log-in to RAIDXpert 1. Double-click on the RAIDXpert icon on your desktop. 2.
To change the default password: 1. 2. Type the new password into the Password field. Use up to 8 letters and numbers but no spaces or other characters. Type the same password into the Retype Password field. To set up the Recipient email for Event Notification: 1. 2. 20 Type the Administrator’s email address in the Email field. Click on the Submit button. If the action was successful, the Management Window will display the message “Update Success.
To set up Event Notification: 1. Click on the Events tab. 2. Check the notification events that you want reported to you via email and popup messages. To select events by their severity, check one of the four “Select All” event boxes at the top of the window. 3. Click the Submit button, Utility Configuration. To set up Sender’s email for Event Notification: 1. In Tree View, under Administrative Tools, click on Utility Configuration. 2. 3. 4. 5. Enter the Sender’s address in the Email Server field.
Degradation In the unlikely event that one of your hard drives malfunctions, RAIDXpert reports the condition with popup messages. If Event Notification is set up, RAIDXpert also reports the conditions with email messages. For More Information An HP online support document further describing setting up RAID using AMD RAIDXpert is available at the following web page: http://h20000.www2.hp.com/bizsupport/TechSupport/Document.jsp?objectID=c01827420 Get connected hp.