
HP PCL/PJL reference (PCL 5 Printer Language) - Technical Reference Manual Part II


EN Drawing Wedges 21-9
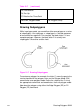
PA2300,2500;FT3, 75,45; Specify absolute plotting and move to
(2300,2500). Select fill type number 3
(hatching--parallel lines), with 75 plu
between hatching lines, and hatching
lines tilted at 45°.
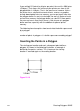
WG600,90,180; Fill a wedge with the current fill type;
use a radius of 600 plu, a start angle
of 90°, and a sweep angle of 180°.
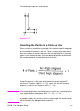
FT1,0,0;WG600, 270,60; Specify a fill type of solid black and fill
a wedge using the same center and
radius as the previous wedge. Start
the wedge at 270° with a sweep of
60°.
FT4,60,45;WG600,
330,120;
Specify fill type number 4
(cross-hatching) with 60 plu between
lines and the lines tilted at 45°. Fill a
wedge using the same center and
radius as the previous two wedges.
Start the wedge at 330° with a sweep
of 120°.
PA3500,2500;
WG400,0,360;
Select absolute plotting and move
to (3500,2500). Create a filled circle
using the current fill type (cross-
hatching), specifying a start angle
of 0° and a 360° sweep.
PA4500,2500;FT;
WG400,0,360;
Move to (4500,2500), select a solid
fill, and fill a 360° wedge (circle).
?%0A Enter the PCL mode.
?E Send a reset to end the job and eject
the page.
Table 21-6 Example: Filling Wedges and Circles (continued)