
HP PCL/PJL reference (PCL 5 Printer Language) - Technical Reference Manual Part II


21-44 The Polygon Group EN
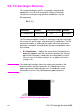
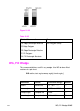
PR0,800;FT3,50;
RR400,400;
Enter the relative plotting mode and move
800 plu in the Y direction and select fill type 3
(parallel lines). Draw a rectangle using the
current pen location as the lower left corner;
the upper right corner is 400 plu to the right
and 400 plu up from the lower left corner.
PR0,400;FT4;
RR400,400;
Move 400 plu up and select fill type 4 (cross-
hatching). Draw a rectangle using the current
pen position as the lower left corner and a point
400 plu to the right and 400 plu up as the upper
right corner.
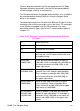
PA1200,400;FT;
RR400,800;
ER400,800;
Move to absolute location (1200,400) and
select the default fill type (solid black). Draw
and edge a rectangle that begins at the current
pen position and extends 400 plu to the right,
then 800 plu up from there.
PR0,800;FT3,50;
RR400,400;
ER400,400;
Move 800 plu up from the current position
and select fill type 3 (parallel lines), with 50 plu
between each line. Draw a rectangle using the
current pen location as the lower left corner and
a point 400 plu up and 400 plu to the right as
the upper right corner. Edge the rectangle.
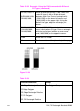
PR0,400;FT4;
RR400,400;
ER400,400;
Move 400 plu up from the current pen position.
Select fill type 4 (cross-hatching). Draw a
rectangle using the current pen location as
the lower left corner, the right corner being
(400,400) relative plotter units away.
?%0A Enter the PCL mode.
?E Send a reset to end the job and eject the page.
Table 21-24 Example: Using the RR Command with Different
Fill Types (continued)