printed on at least 50% total recycled fiber with at least 10% post-consumer paper imprimé sur un papier composé d’au moins 50 % de fibres recyclées et 10 % de papier post-consommation copyright © 2002 Hewlett-Packard Company hp color LaserJet 2500 series printed in USA imprimé aux Etats-Unis www.hp.
Copyright and License © Copyright Hewlett-Packard Company 2002 All Rights Reserved. Reproduction, adaptation, or translation without prior written permission is prohibited, except as allowed under the copyright laws. Part number: C9706-90950 First Edition: July 2002 FCC Regulations This equipment has been tested and found to comply with the limits for a Class B digital device, pursuant to Part 15 of the FCC rules.
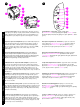
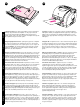
HP Color LaserJet 2500L HP Color LaserJet 2500n Das Druckermodell 2500 verfügt darüber hinaus über ein Fach für 250 Blatt (Fach 2). Das Druckermodell 2500N wird mit Fach 2 und einer HP Jetdirect 615N-Druckserverkarte geliefert. Der Color LaserJet 2500TN-Drucker verfügt über Fach 2, eine HP Jetdirect 615N-Druckserverkarte und ein Fach für 500 Blatt (Fach 3). Configurazioni della stampante.
3 504 mm (19.84 in) 366 mm (14.41 in) 318 mm (12.53 in) 2 Português Nederlands Español Italiano Deutsch Français English 742.9 mm (29.25 in) Prepare the location. Place the printer on a sturdy, level surface in a well-ventilated area. Make sure there is enough space around the printer so that the air vents on the left side and rear of the printer are not blocked. Regulate the environment. Do not place the printer in direct sunlight or an area that has abrupt temperature and humidity changes.
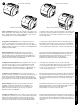
4 2 1 3 4 5 6 Minimum system requirements. See the outside of the box in which the printer shipped, or see the Readme on the CD-ROM. Check the package contents. 1) the printer; 2) a power cable; 3) a CD-ROM (includes the user guide and printer software); 4) this getting started guide 5) an imaging drum; and 6) four print cartridges: yellow (Y), magenta (M), cyan (C), and black (K). Note: Parallel and USB cables are not included. Configuration minimale.
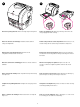
2 7 3 1 4 1 5 2 6 3 7 4 8 10 5 9 6 11 Português Nederlands Español Italiano Deutsch Français English 7 Locate the printer parts. 1) power switch; 2) top output bin; 3) control panel; 4) top cover; 5) tray 1; 6) tray 2 (2500, 2500n, and 2500tn models); 7) tray 3 (2500tn model); 8) dual inline memory module (DIMM) access door; 9) interface ports, 10) rear output door; and 11) power connector. Understand the control panel.
9 8 Remove the packing materials. Remove all orange tape from the printer. Remove the shipping locks. Open tray 2 and tray 3 and remove the orange shipping lock inside each tray. Retirez les éléments de l'emballage. Retrait des rubans adhésifs oranges de l'imprimante. Retirez les dispositifs de sécurité d'expédition. Ouvrez les bacs 2 et 3, et retirez le dispositif de sécurité orange à l'intérieur de chaque bac. Entfernen des Verpackungsmaterials.
11 Português Nederlands Español Italiano Deutsch Français English 10 Install tray 3. Place tray 3 in the location you want. Lift the printer, align it with the pegs on tray 3, and lower the printer onto the tray. Note: Only one 500-sheet tray (tray 3) can be installed. Adjust the guides on tray 3. Letter-size paper: 1) Pull the tray out of the printer. 2) Raise the blue rear stop and move the blue width guides outward until they click. A4-size paper: Lower the blue rear stop.
13 12 2 3 Load paper in tray 3. 1) Load the paper with the side to be printed face down, top edge toward the front. 2) Make sure the paper is flat at all corners and below the height marks. Note: Never fan paper before loading. 3) Slide the tray back into the printer. Adjust the guides on tray 2. 1) Pull the tray out of the printer. 2) Move the blue width guides to match the paper size being loaded. 3) Extend the rear of the tray until the arrow points to the paper size being loaded.
Português Nederlands Español Italiano Deutsch Français English 14 15 Load paper in tray 2. 1) Load the paper with the side to be printed face down, top edge toward the front. 2) Make sure the paper is flat at all corners and below the height marks. Note: Never fan paper before loading. 3) Push down on the paper to lock the metal plate in the tray into place. 4) Slide the tray back into the printer. Load tray 1. 1) Open tray 1 and slide out the tray extender.
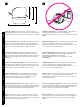
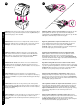
17 16 1 2 3 4 2 Connect the power cable and turn on the printer. 1) Connect the power cable between the power connector on the back of the printer and an ac outlet. 2) Press the power switch on the left side of the printer. Install the imaging drum. 1) Remove the imaging drum from its packaging. 2) Place the imaging drum on a firm surface and pull the orange rings to remove the shipping pins. 3) Remove the orange shipping lock on each end of the imaging drum. 4) Remove the two orange shipping spacers.
5 Português Nederlands Español Italiano Deutsch Français English 6 5) Remove the orange cover from the imaging drum. CAUTION: Do not touch the surface of the white roller or print-quality issues can occur. 6) Open the top cover of the printer. 7) Align the white roller on the imaging drum with the green arrows inside the printer. 5) Enlevez l'emballage orange du tambour d'imagerie.
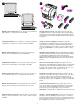
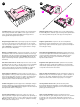
18 8) Lower the imaging drum into the printer and press it firmly into place. Install the print cartridges. 1) Look inside the printer on the right to see which print-cartridge slot is in the access position. 2) Locate the color of print cartridge that matches the color of the slot and remove the print cartridge from its packaging. 8) Abaissez le tambour d'imagerie dans l'imprimante et appuyez fermement dessus pour l'enclencher. Installez les cartouches d'impression.
5) Squeeze the blue release levers on the print cartridge, holding it with the roller facing you. Lower the cartridge straight down into the carousel until it is firmly in place. 3) Enlevez l'emballage orange de la cartouche d'encre. 4) Placez la cartouche sur une surface plane et tirez la languette orange afin de retirer la bande adhésive de scellage. AVERTISSEMENT : Ne touchez pas la surface du rouleau afin d'éviter tout problème lié à la qualité d'impression.
19 6) Close the top cover. When the green Go light begins blinking, press ROTATE CAROUSEL. Repeat this process (step 18) to install the other three print cartridges. Bring the printer to the Ready state. Close the top cover. After 60 seconds, the green Ready light turns on. 6) Fermez le capot. Lorsque le voyant Reprise vert clignote, appuyez sur FAIRE PIVOTER LE CARROUSEL. Répétez cette opération (étape 18) pour installer les trois autres cartouches d'encre. Rétablissez l'état Prêt de l'imprimante.
Choose ONE of these installations. To connect directly for Windows®, go to step 22. To install for a network, go to step 23. If the “New Hardware Found” message is on your computer screen, go to step 24. To install only the printer driver for Windows 95, go to step 25. To connect directly for Macintosh, go to step 26. Français Imprimez une page de démonstration. Lorsque le voyant Prêt est allumé, appuyez sur REPRISE pour imprimer une page de démonstration et vérifier que l'imprimante fonctionne.
22 To connect directly for Windows. 1) Place the CD-ROM in the CD-ROM drive. 2) When prompted, click Install Printer and follow the instructions. (If the welcome screen does not open, click Start and then Run. Type X:SETUP, replacing “X” with the CD-ROM drive letter, and click OK.) 3) Click Finish. 4) Before you restart the computer, connect the cable between the printer and the computer. You cannot connect parallel and USB cables at the same time. Note: Parallel and USB cables are not included.
Print an HP Jetdirect page. Make sure the Ready light is on. Press GO and CANCEL JOB simultaneously to print a Configuration page, an HP Jetdirect page, and a Supplies Status page. On the HP Jetdirect page, locate the printer’s IP address. Français Installez le périphérique en réseau. (Remarque : Les modèles 2500n et 2500tn disposent d'une carte de serveur d'imprimante HP Jetdirect pour une connexion réseau.
Install the network software. 1) Place the CD-ROM in the CD-ROM drive and follow the instructions. 2) Click Finish and restart the computer. 3) To set up a Macintosh computer to use the network printer, see the next frame. Otherwise, go to step 27. Macintosh on the network. 1) Run the Installer and restart the computer. OS 8.6 to 9.2x: From HD/Applications/Utilities, use the Apple Desktop Printer Utility to select this printer.
Windows 2000 and XP: 1) Click Search. 2) On the Locate Driver Files screen, select the Specify a Location check box, clear all other check boxes, and click Next. 3) Type X:\2000XP, replacing X with the CD-drive letter, and click Next. 4) Follow the instructions and click Finish. 5) Select a language and follow the instructions. 6) Go to step 27. Plug and Play.
25 Install the printer driver only (Windows 95). If the printer is connected to the network, have the network administrator add a port. 1) Click Start, point to Settings, and click Printers. Double-click Add Printer and follow the instructions. When prompted for a manufacturer, click Have Disk. (Go to the next frame.) 2) Double-click the folder for your language and double-click Drivers. 3) Double-click Win95, and then double-click the folder for the driver you want (PCL 6, PCL 5e, or PS).
26 OS 8.6 to 9.2x: 1) Run the Installer and restart. Run the Apple Desktop Printer Utility from HD/Applications/Utilities. 2) Double-click Printer (USB). Next to USB Printer Selection, click Change. 3) Select the printer, click Auto Setup, and then click Create. On the Printing menu, click Set Default Printer. 4) Go to step 27. Connectez directement l'imprimante à un Macintosh. Branchez un câble USB entre le port USB de l'imprimante et celui de l'ordinateur.
27 Mac OS X OS X: From HD/Applications/Utilities/Print Center, start the Print Center. The printer sets up automatically. Test the software installation. Print a page from any program to make sure the software is correctly installed. Note: If installation fails, reinstall the software. If reinstallation fails, see the Readme, see the flyer that came in the printer box, or go to http://www.hp.com/support/clj2500 for help or more information.
Português Nederlands Español Italiano Deutsch Français English 28 Congratulations! Your printer is ready to use. See the HP Color LaserJet 2500 Toolbox (Windows 98 and later), where you can open the user guide and use tools to solve problems. Note: You must have performed a complete software installation to use the Toolbox. Félicitations ! Vous pouvez maintenant utiliser votre imprimante.
27 Mac OS X 28 24
25 26 Mac OS 8.6 - 9.
24 26
22 23 27
19 21 20 28
18 3 4 29
17 16 1 2 3 4 2 5 6 30
13 12 15 14 2 3 31
9 8 11 10 32
5 4 2 1 3 4 5 6 7 2 6 3 1 4 2 5 1 3 6 7 4 8 5 10 9 6 11 7 33
1 HP Color LaserJet 2500L HP Color LaserJet 2500n HP Color LaserJet 2500tn HP Color LaserJet 2500 742.9 mm (29.25 in) 34 504 mm (19.84 in) 366 mm (14.41 in) 2 318 mm (12.
copyright © 2002 Hewlett-Packard Company hp color LaserJet 2500 series www.hp.