printed on recycled paper copyright © 2002 Hewlett-Packard Company printed in Germany hp color LaserJet 2500 series www.hp.
Copyright and License © Copyright Hewlett-Packard Company 2002 All Rights Reserved. Reproduction, adaptation, or translation without prior written permission is prohibited, except as allowed under the copyright laws. Part number: C9706-90954 First Edition: July 2002 FCC Regulations This equipment has been tested and found to comply with the limits for a Class B digital device, pursuant to Part 15 of the FCC rules.
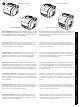
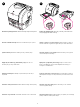
HP Color LaserJet 2500L HP Color LaserJet 2500n Model 2500 obsahuje také zásobník na 250 listů (zásobník 2). Model 2500n obsahuje zásobník 2 a kartu tiskového serveru HP Jetdirect 615n. Model 2500tn obsahuje zásobník 2, kartu tiskového serveru HP Jetdirect 615n a zásobník na 500 listů (zásobník 3). ∆ιαµορφώσεις εκτυπωτή.
504 mm (19.84 in) 366 mm (14.41 in) 3 318 mm (12.53 in) 2 Slovenščina Slovensky Română Ελληνικά Češky Hrvatski English 742.9 mm (29.25 in) Prepare the location. Place the printer on a sturdy, level surface in a well-ventilated area. Make sure there is enough space around the printer so that the air vents on the left side and rear of the printer are not blocked. Regulate the environment. Do not place the printer in direct sunlight or an area that has abrupt temperature and humidity changes.
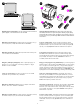
4 2 1 3 4 5 6 Minimum system requirements. See the outside of the box in which the printer shipped, or see the Readme on the CD-ROM. Check the package contents. 1) the printer; 2) a power cable; 3) a CD-ROM (includes the user guide and printer software); 4) this getting started guide 5) an imaging drum; and 6) four print cartridges: yellow (Y), magenta (M), cyan (C), and black (K). Note: Parallel and USB cables are not included. Minimalni sistemski zahtjevi.
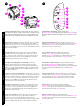
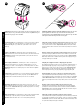
2 7 3 1 4 1 5 2 6 3 7 4 8 10 5 9 6 11 Understand the control panel. 1) print-cartridge lights, 2) ROTATE CAROUSEL button 3) imaging drum light 4) CANCEL JOB button 5) Attention light (amber) 6) Ready light (green) 7) Go light and GO button (green). Hrvatski Odredite dijelove pisača.
9 8 Remove the packing materials. Remove all orange tape from the printer. Remove the shipping locks. Open tray 2 and tray 3 and remove the orange shipping lock inside each tray. Uklonite ambalažni materijal. Uklonite svu narančastu vrpcu s pisača. Uklonite osigurače za siguran transport. Otvorite ladicu 2 i ladicu 3 i uklonite narančaste osigurače za siguran transport unutar svake ladice. Vybalení tiskárny. Odstraňte z tiskárny všechny oranžové pásky. Odstraňte zabezpečovací zámky.
11 Slovenščina Slovensky Română Ελληνικά Češky Hrvatski English 10 Install tray 3. Place tray 3 in the location you want. Lift the printer, align it with the pegs on tray 3, and lower the printer onto the tray. Note: Only one 500-sheet tray (tray 3) can be installed. Adjust the guides on tray 3. Letter-size paper: 1) Pull the tray out of the printer. 2) Raise the blue rear stop and move the blue width guides outward until they click. A4-size paper: Lower the blue rear stop.
13 12 2 3 Load paper in tray 3. 1) Load the paper with the side to be printed face down, top edge toward the front. 2) Make sure the paper is flat at all corners and below the height marks. Note: Never fan paper before loading. 3) Slide the tray back into the printer. Adjust the guides on tray 2. 1) Pull the tray out of the printer. 2) Move the blue width guides to match the paper size being loaded. 3) Extend the rear of the tray until the arrow points to the paper size being loaded.
English Load tray 1. 1) Open tray 1 and slide out the tray extender. 2) Slide the width guides until they are slightly wider than the paper. 3) Load the paper with the side to be printed face up. 4) Slide the width guides in so they lightly touch the paper. 5) Make sure the paper fits under the tabs on the width guides. Umetanje papira u ladicu 2. 1) Umetnite papir stranom za ispis prema dolje, a gornji vrh prema naprijed. 2) Papir mora biti ravan na svim rubovima i ispod oznake za visinu.
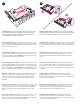
17 16 1 2 3 4 2 Connect the power cable and turn on the printer. 1) Connect the power cable between the power connector on the back of the printer and an ac outlet. 2) Press the power switch on the left side of the printer. Install the imaging drum. 1) Remove the imaging drum from its packaging. 2) Place the imaging drum on a firm surface and pull the orange rings to remove the shipping pins. 3) Remove the orange shipping lock on each end of the imaging drum. 4) Remove the two orange shipping spacers.
5 Slovenščina Slovensky Română Ελληνικά Češky Hrvatski English 6 5) Remove the orange cover from the imaging drum. CAUTION: Do not touch the surface of the white roller or print-quality issues can occur. 6) Open the top cover of the printer. 7) Align the white roller on the imaging drum with the green arrows inside the printer. 5) Uklonite narančasti poklopac s valjka za tiskanje. OPREZ: Ne dirajte površinu bijelog valjka, jer bi se mogli pojaviti problemi s kvalitetom ispisa.
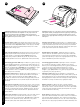
18 8) Lower the imaging drum into the printer and press it firmly into place. Install the print cartridges. 1) Look inside the printer on the right to see which print-cartridge slot is in the access position. 2) Locate the color of print cartridge that matches the color of the slot and remove the print cartridge from its packaging. 8) Spustite valjak za tiskanje u pisač i čvrsto ga pritisnite. Postavljanje spremnika s tintom.
English Hrvatski Češky Ελληνικά Română Slovensky Slovenščina 3) Remove the orange cover from the print cartridge. 4) Place the print cartridge on a flat surface and pull the orange tab straight out to remove the sealing tape. CAUTION: Do not touch the surface of the roller or print-quality issues can occur. 5) Squeeze the blue release levers on the print cartridge, holding it with the roller facing you. Lower the cartridge straight down into the carousel until it is firmly in place.
19 6) Close the top cover. When the green Go light begins blinking, press ROTATE CAROUSEL. Repeat this process (step 18) to install the other three print cartridges. Bring the printer to the Ready state. Close the top cover. After 60 seconds, the green Ready light turns on. 6) Zatvorite gornji poklopac. Kada zeleno svjetlo Kreni počne treptati, pritisnite ROTIRANJE VRTULJKA. Ponovite ovaj postupak (korak 18) za instaliranje ostalih triju spremnika. Postavite pisač u stanje Spreman za ispis.
Print a Demo page. With the Ready light on, press GO to print a Demo page, which verifies that the printer works. Note: If the page does not print, reconnect the power cable. Make sure the Ready light is on and no other lights are on or blinking. Make sure paper is loaded and supplies are installed correctly. Choose ONE of these installations. To connect directly for Windows®, go to step 22. To install for a network, go to step 23.
22 To connect directly for Windows. 1) Place the CD-ROM in the CD-ROM drive. 2) When prompted, click Install Printer and follow the instructions. (If the welcome screen does not open, click Start and then Run. Type X:SETUP, replacing “X” with the CD-ROM drive letter, and click OK.) 3) Click Finish. 4) Before you restart the computer, connect the cable between the printer and the computer. You cannot connect parallel and USB cables at the same time. Note: Parallel and USB cables are not included.
Print an HP Jetdirect page. Make sure the Ready light is on. Press GO and CANCEL JOB simultaneously to print a Configuration page, an HP Jetdirect page, and a Supplies Status page. On the HP Jetdirect page, locate the printer’s IP address. Instaliranje za mrežu. (Napomena: 2500n i 2500tn imaju HP Jetdirect karticu za poslužitelj pisača za spajanje u mrežu.) Za 10/100 Base-T mrežu priključite mrežni kabel s dvožilnim vodičima između porta pisača i porta aktivne mreže. Ispis HP Jetdirect stranice.
Install the network software. 1) Place the CD-ROM in the CD-ROM drive and follow the instructions. 2) Click Finish and restart the computer. 3) To set up a Macintosh computer to use the network printer, see the next frame. Otherwise, go to step 27. Macintosh on the network. 1) Run the Installer and restart the computer. OS 8.6 to 9.2x: From HD/Applications/Utilities, use the Apple Desktop Printer Utility to select this printer.
English Windows 2000 and XP: 1) Click Search. 2) On the Locate Driver Files screen, select the Specify a Location check box, clear all other check boxes, and click Next. 3) Type X:\2000XP, replacing X with the CD-drive letter, and click Next. 4) Follow the instructions and click Finish. 5) Select a language and follow the instructions. 6) Go to step 27. Plug and Play.
25 Install the printer driver only (Windows 95). If the printer is connected to the network, have the network administrator add a port. 1) Click Start, point to Settings, and click Printers. Double-click Add Printer and follow the instructions. When prompted for a manufacturer, click Have Disk. (Go to the next frame.) 2) Double-click the folder for your language and double-click Drivers. 3) Double-click Win95, and then double-click the folder for the driver you want (PCL 6, PCL 5e, or PS).
26 Slovenščina Slovensky Română Ελληνικά Češky Hrvatski English Mac OS 8.6 - 9.x Connect the printer directly to a Macintosh. Connect a USB cable between the USB port on the printer and the USB port on the computer. You cannot connect parallel and USB cables at the same time. Note: A USB cable is not included. Use a 2-meter standard USB cable. OS 8.6 to 9.2x: 1) Run the Installer and restart. Run the Apple Desktop Printer Utility from HD/Applications/Utilities. 2) Double-click Printer (USB).
27 Mac OS X OS X: From HD/Applications/Utilities/Print Center, start the Print Center. The printer sets up automatically. Test the software installation. Print a page from any program to make sure the software is correctly installed. Note: If installation fails, reinstall the software. If reinstallation fails, see the Readme, see the flyer that came in the printer box, or go to http://www.hp.com/support/clj2500 for help or more information.
Slovenščina Slovensky Română Ελληνικά Češky Hrvatski English 28 Congratulations! Your printer is ready to use. See the HP Color LaserJet 2500 Toolbox (Windows 98 and later), where you can open the user guide and use tools to solve problems. Note: You must have performed a complete software installation to use the Toolbox. Čestitamo! Vaš pisač je spreman za korištenje.
24
1 HP Color LaserJet 2500L HP Color LaserJet 2500n HP Color LaserJet 2500tn Magyar A 2500-as modell rendelkezik egy 250 lapos tálcával is (2. tálca). A 2500n modell rendelkezik a 2. tálcával és a HP Jetdirect 615n nyomtatószerver-kártyával. A 2500tn modell rendelkezik a 2. tálcával, a HP Jetdirect 615n nyomtatószerver-kártyával és egy 500 lapos tálcával (3. tálca). Konfiguracje drukarki.
504 mm (19.84 in) 366 mm (14.41 in) 3 318 mm (12.53 in) 2 742.9 mm (29.25 in) Készítse elő a helyet. Helyezze a nyomtatót egy vízszintes, stabil és megfelelően szellőző helyre. Ügyeljen arra, hogy megfelelő távolságot hagyjon a nyomtató körül, hogy a készülék bal oldalán és hátulján található szellőzőnyílások szabadon maradhassanak. Környezeti követelmények. Ne tegye ki a nyomtatót közvetlen napsugárzásnak, és ne tegye szélsőségesen változó hőmérsékletű és páratartalmú területre.
5 4 2 1 3 4 6 Minimális rendszerkonfiguráció. Nézze meg annak a doboznak a külsejét, amelyben a nyomtatót szállították, vagy nézze meg a Readme fájlt a CD-ROM-on. A csomag tartalmának ellenőrzése 1) nyomtató; 2) egy tápkábel; 3) egy CD-ROM (amely tartalmazza a felhasználói kézikönyvet és a nyomtatószoftvert); 4) a jelen alapvető tudnivalók kézikönyve 5) egy nyomtatódob és 6) négy nyomtatópatron: sárga (Y), bíbor (M), cián (C) és fekete (K). Megjegyzés: A párhuzamos és az USB kábelek nem tartozékok.
6 2 7 3 1 4 1 5 2 6 3 7 4 8 10 5 9 6 11 7 A nyomtató részeinek azonosítása. 1) tápkapcsoló; 2) felső kimeneti tálca; 3) kezelőpanel; 4) felső fedél; 5) 1. tálca; 6) 2. tálca (2500, 2500n, és 2500tn modellek); 7) 3. tálca (2500tn modell); 8) kettős in-line memória modul (DIMM) ajtó; 9) illesztőportok, 10) hátsó kimeneti ajtó és 11) tápcsatlakozó. A kezelőpanel értelmezése.
9 8 Távolítsa el a szállítás alatti rögzítőket. Nyissa ki a 2. tálcát és a 3. tálcát, és távolítsa el a tálcákból a narancssárga rögzítőket. Wyjmij drukarkę z opakowania. Usuń wszystkie pomarańczowe taśmy ochronne z drukarki. Zdejmij blokady transportowe. Otwórz podajnik 2 i podajnik 3, a następnie usuń z każdego z nich pomarańczową blokadę transportową. Fjern emballagen. Fjern den orange tape fra printeren. Fjern transportlåsene. Åbn bakke 2 og bakke 3, og fjern den orange transportlås i hver bakke.
11 10 Telepítse a 3. tálcát. Tegye a 3. tálcát a kívánt helyzetbe. Emelje meg a nyomtatót, igazítsa a 3. tálca peckeihez, majd eressze vissza a tálcára. Megjegyzés: Csak egy 500 lapos tálca (3. tálca) telepíthető. Igazítsa a beállítókat a 3. tálcára. Letter méretű papír: 1) Húzza ki a tálcát a nyomtatóból. 2) Emelje fel a hátsó kék ütközőket és mozgassa a kék szélesség-beállítókat kifelé, kattanásig. A4 méretű papír: Engedje le a kék ütközőt.
13 12 2 Svenska Norsk Suomi Dansk Polski Magyar 3 Töltsön be papírt a 3. tálcába 1) A papírt a nyomtatandó oldalával lefelé, és a felső élével a nyomtató eleje felé helyezze a tálcára. 2) Győződjön meg arról, hogy a papír minden sarkánál belesimul a tálcába, és a magasságjelző alatt marad. Megjegyzés: Betöltés előtt sose pörgesse át a papírköteget. 3) Csúsztassa vissza a tálcát a nyomtatóba. Igazítsa a beállítókat a 2. tálcára. 1) Húzza ki a tálcát a nyomtatóból.
14 15 Töltsön be papírt a 2. tálcába 1) A papírt a nyomtatandó oldalával lefelé, és a felső élével a nyomtató eleje felé helyezze a tálcára. 2) Győződjön meg arról, hogy a papír minden sarkánál belesimul a tálcába, és a magasságjelző alatt marad. Megjegyzés: Betöltés előtt sose pörgesse át a papírköteget. 3) Nyomja le a papírt, hogy a fém lap a tálcában a helyére kerüljön. 4) Csúsztassa vissza a tálcát a nyomtatóba. Töltse meg az 1. tálcát. 1) Nyissa ki az 1. tálcát és húzza ki a tálcahosszabbítót.
17 16 1 2 3 4 Kösse be a tápkábelt, és kapcsolja be a nyomtatót. 1) Csatlakoztassa a tápkábelt a nyomtató hátuljába és a váltóáramú dugaszoló aljzatba. 2) Nyomja meg a nyomtató bal oldalán található tápkapcsolót. Telepítse a nyomtatódobot. 1) Vegye ki a nyomtatódobot a csomagolásából. 2) Helyezze a nyomtatódobot egy stabil felületre, és húzza le narancssárga gyűrűket a szállítási rögzítők eltávolításához. 3) Távolítsa el a narancssárga szállítási rögzítőket a nyomtatódob mindkét végéről.
5 6 5) Távolítsa el a narancssárga borítót a nyomtatódobról. VIGYÁZAT: Ne érintse meg a fehér henger felületét, mert az ronthatja a nyomtatási minőséget. 6) Nyissa ki a nyomtató felső fedelét. 7) Igazítsa a nyomtatódobon található fehér hengert a nyomtató belsejében található zöld nyilakhoz. 5) Usuń pomarańczową osłonę z bębna obrazowego. UWAGA! Dotykanie powierzchni białej rolki może spowodować pogorszenie jakości wydruków. 6) Otwórz górną pokrywę drukarki.
18 Telepítse a nyomtatópatronokat. 1) Nézze meg, hogy a nyomtató belsejében a jobb oldalon melyik nyomtatópatron nyílás van hozzáférhető pozícióban. 2) Keresse meg a nyílásnak megfelelő színű nyomtatópatront, és távolítsa el azt a csomagolásából. 8) Umieść bęben obrazowy w drukarce, aż znajdzie się na swoim miejscu. Instalowanie kaset drukujących. 1) Zajrzyj do wnętrza drukarki z prawej strony, aby sprawdzić, które gniazdo kasety drukującej znajduje się w położeniu dostępu.
3) Távolítsa el a narancssárga borítót a nyomtatópatronról. 4) Helyezze a nyomtatópatront egy sík felületre, és a szigetelőszalag eltávolításához húzza ki a narancssárga fület. VIGYÁZAT: Ne érintse meg a henger felületét, mert az ronthatja a nyomtatási minőséget. 5) Nyomja össze a kék kioldókarokat a nyomtatópatronon, úgy, hogy a hengert maga felé tartja. Engedje le a patront a forgóhengerbe, hogy teljesen a helyére kerüljön. 3) Usuń pomarańczową osłonę z kasety drukującej.
6) Zárja be a felső fedelet. Amikor a zöld Folytatás jelzőfény elkezd villogni, nyomja meg a FORGÓHENGER GOMBOT. Ismételje meg ezt a műveletet (18. lépés) a másik három nyomtatópatron telepítéséhez. Állítsa a nyomtatót Kész állapotba. Zárja be a felső fedelet. 60 másodperc múlva bekapcsol a zöld Üzemkész jelzőfény. 6) Zamknij górną pokrywę. Gdy zielona kontrolka Start zacznie migać, naciśnij przycisk OBRÓĆ KARUZELĘ. Powtarzając powyższe czynności (punkt 18), zainstaluj trzy pozostałe kasety drukujące.
20 21 Nyomtasson ki egy demóoldalt. Míg az Üzemkész jelzőfény világít, nyomja meg a FOLYTATÁS gombot a demóoldal nyomtatásához. Megjegyzés: Ha az oldal nem nyomtatódik ki, csatlakoztassa újra a tápkábelt. Ellenőrizze, hogy világít-e az Üzemkész jelzőfény, és hogy más jelzőfény nem villog vagy világít-e, illetve hogy van-e betöltve papír, és hogy a kellékek jól vannak-e telepítve. Válasszon EGYET a telepítők közül. Ha közvetlenül akar csatlakozni a Windows®-hoz, menjen a 22.lépéshez.
3) Kattintson a Befejezés opcióra. 4) Mielőtt újraindítja a számítógépet, csatlakoztassa a kábelt a nyomtatóba és a számítógépbe. Egyszerre nem lehet párhuzamos és USB kábelt is csatlakoztatni. Megjegyzés: A párhuzamos és az USB kábelek nem tartozékok. IEEE 1284-kompatibilis párhuzamos kábelt, vagy standard 2 méteres USB kábelt használjon. 5) Indítsa újra a számítógépet. 6) Menjen a 27. lépéshez. Instalowanie drukarki bezpośrednio w systemie Windows. 1) Włóż dysk CD-ROM do napędu.
23 Hálózati telepítés. (Megjegyzés: A 2500n és a 2500tn modell rendelkezik egy HP Jetdirect nyomtatószerver-kártyával a hálózati kapcsolathoz.) A 10/100 Base-T hálózathoz csatlakoztasson egy sodrott érpárú hálózati kábelt a nyomtató port és az aktív hálózati port között. HP Jetdirect oldal nyomtatása. Ellenőrizze, hogy világít-e az Üzemkész jelzőfény.
Magyar Macintosh a hálózatban. 1) Futtassa a Telepítőt és indítsa újra a számítógépet. OS 8.6 – 9.2x: A HD/Applications/Utilities alatt használja az Apple Desktop Printer Utility opciót a nyomtató kiválasztásához. OS X: A HD/Applications/Utilities/Print Center alatt nyissa meg a Print Center opciót és jelölje ki ezt a nyomtatót. 2) Menjen a 27. lépéshez. Polski Instalowanie oprogramowania sieciowego. 1) Włóż dysk CD-ROM do napędu i postępuj zgodnie z instrukcjami.
24 Plug and Play. Ha a szoftver telepítése előtt csatlakoztatott egy párhuzamos vagy egy USB kábelt a Windows számítógéphez, akkor bekapcsolás után megjelenik az “Új hardver” üzenet. 1) Windows 98 és Millennium Edition (Me): Kattintson a CD-ROM meghajtó kereséseopcióra, kattintson a Következő opcióra, és kövesse az utasításokat. 2) Menjen a 27. lépéshez. Windows 2000 és XP: 1) Kattintson a Keresés opcióra.
2) Kattintson duplán a saját nyelvének megfelelő mappára, majd kattintson duplán a Meghajtók opcióra. 3) Kattintson duplán a Win95 opcióra, majd kattintson duplán a kívánt meghajtó mappájára (PCL 6, PCL 5e vagy PS). (A HP a PCL 6 meghajtót ajánlja.) 4) Fejezze be a telepítést és menjen a 27. lépéshez. Instalowanie tylko sterownika drukarki (Windows 95). Jeśli drukarka jest podłączona do sieci, jej administrator musi dodać port. 1) Kliknij przycisk Start wskaż Ustawienia, a następnie kliknij Drukarki.
26 Mac OS 8.6 - 9.x Csatlakoztassa a nyomtatót közvetlenül egy Macintosh géphez. Csatlakoztasson egy USB kábelt a nyomtató USB portja és a számítógép USB portja között. Egyszerre nem lehet párhuzamos és USB kábelt is csatlakoztatni. Megjegyzés: Az USB kábel nem tartozék. 2 méteres standard USB kábelt használjon. OS 8.6 – 9.2x: 1) Futtassa a Telepítőt és indítsa újra a gépet. Futtassa a HD/Applications/Utilities/Print Center-ből az Apple Desktop Printer Utility-t. 2) Kattintson duplán a Nyomtató (USB)-re.
27 Mac OS X Tesztelje a szoftver telepítését. A szoftver megfelelő telepítését úgy ellenőrizheti, hogy kinyomtat egy oldalt valamelyik programmal. Megjegyzés: Ha a telepítés sikertelen, telepítse újra a szoftvert, vagy nézze meg a Readme fájlt, a nyomtató dobozában található füzetet vagy keressen további segítséget, illetve információt a következő címen: http://www.hp.com/support/clj2500. System OS X: Z lokalizacji HD/Applications/Utilities/Print Center uruchom aplikację Print Center.
28 Gratulálunk! A nyomtató készen áll a használatra. Nézze meg a HP Color LaserJet 2500 Eszközkészletet (Windows 98 és későbbi verzió), ahol megnyithatja a felhasználói kézikönyvet, és az ott található eszközökkel megoldhatja a problémákat. Megjegyzés: Az eszközkészlet használatához teljes szoftvertelepítést kell végrehajtania. Gratulujemy! Drukarka jest gotowa do pracy.
copyright © 2002 Hewlett-Packard Company hp color LaserJet 2500 series www.hp.