HP LaserJet M4345 MFP Getting Started Guide Guide de mise en route ﺩﻟﻴﻞ ﺑﺪﺀ ﺍﻻﺳﺘﺨﺪﺍﻡ
Copyright and License © 2006 Copyright Hewlett-Packard Development Company, L.P. Copyright et licence © 2006 Copyright Hewlett-Packard Development Company, L.P. Reproduction, adaptation or translation without prior written permission is prohibited, except as allowed under the copyright laws. La reproduction, l’adaptation ou la traduction de ce document sans autorisation écrite préalable est interdite, sauf dans les cas autorisés par les lois sur le copyright.
•Overview •Généralités •ﻧﻈﺮﺓ ﻋﺎﻣﺔ •Prepare the site. •Préparation du site. .•ﲡﻬﻴﺰ ﻣﻜﺎﻥ ﻭﺿﻊ ﺍﳉﻬﺎﺯ •Unpack the device. •Déballage du périphérique. •Prepare the hardware. •Préparation du matériel. •Set up the control panel. •Configuration du panneau de commande. •Install the software. •Installation du logiciel. •Install the send fax driver. •Installation du pilote d'envoi du télécopieur. •Set up digital send. •Configuration de l'envoi numérique. .•ﺇﺧﺮﺍﺝ ﺍﳉﻬﺎﺯ ﻣﻦ ﺍﻟﺼﻨﺪﻭﻕ .
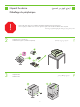
•Prepare the site •ﲡﻬﻴﺰ ﻣﻜﺎﻥ ﻭﺿﻊ ﺍﳉﻬﺎﺯ •Préparation du site. 1 •Select a well-ventilated, dust-free area to position the device. •Choisissez une zone correctement ventilée et exempte de poussière pour installer le périphérique. .
•Unpack the device. .•ﺇﺧﺮﺍﺝ ﺍﳉﻬﺎﺯ ﻣﻦ ﺍﻟﺼﻨﺪﻭﻕ •Déballage du périphérique. ! •Use this guide for the full accessory installation. Disregard the individual guides in the product boxes. •Suivez ce guide pour installer tous les accessoires. Ignorez les guides se trouvant dans les différents cartons du produit. . ﲡﺎﻫﻞ ﺍﻟﺪﻻﺋﻞ ﺍﳌﺴﺘﻘﻠﺔ ﺍﳌﻮﺟﻮﺩﺓ ﻓﻲ ﻋﻠﺐ ﺍﳌﻨﺘﺠﺎﺕ.•ﺍﺳﺘﺨﺪﻡ ﻫﺬﺍ ﺍﻟﺪﻟﻴﻞ ﻟﺘﺮﻛﻴﺐ ﺟﻤﻴﻊ ﺍﳌﻠﺤﻘﺎﺕ 2 •Install paper tray 3 (+ bundle only). 3 •Unpack the MFP. .
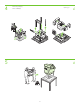
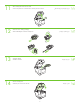
4 •Remove the packaging. .•ﻗﻢ ﺑﺈﺯﺍﻟﺔ ﺍﻟﺘﻐﻠﻴﻒ •Retirez l'emballage.
6 7 ! •Remove the shipping tape. .•ﻗﻢ ﺑﺈﺯﺍﻟﺔ ﺷﺮﻳﻂ ﺍﻟﺸﺤﻦ •Retirez le ruban adhésif utilisé pour l'expédition. •Install the output bin. .•ﻗﻢ ﺑﺘﺮﻛﻴﺐ ﺣﺎﻭﻳﺔ ﺍﻹﺧﺮﺍﺝ •Installez le bac de sortie. ٦ ٧ •You are done unpacking the device. Now proceed to the next step: Preparing the hardware. •Le déballage du périphérique est terminé. Passez maintenant à l'étape suivante : Préparation du matériel. . ﲢﻀﻴﺮ ﺍﳉﻬﺎﺯ: ﺍﻧﺘﻘﻞ ﺍﻵﻥ ﺇﻟﻰ ﺍﳋﻄﻮﺓ ﺍﻟﺘﺎﻟﻴﺔ.
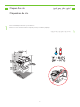
•Prepare the hardware. .•ﲢﻀﻴﺮ ﺍﳉﻬﺎﺯ •Préparation du matériel. 8 •Attach the control panel overlay (if necessary). 9 •Lift the scanner lid and remove the foam. 10 •Unlock the scanner. .(•ﻗﻢ ﺑﺘﺮﻛﻴﺐ ﻏﻄﺎﺀ ﻟﻮﺣﺔ ﺍﻟﺘﺤﻜﻢ )ﺇﺫﺍ ﻛﺎﻥ ﺫﻟﻚ ﺿﺮﻭﺭﻳ ﹰﺎ •Installez le cache du panneau de commande (si nécessaire). •Soulevez le panneau du scanner et retirez la protection en mousse. .•ﺍﺭﻓﻊ ﻏﻄﺎﺀ ﺍﳌﺎﺳﺤﺔ ﺍﻟﻀﻮﺋﻴﺔ ﺛﻢ ﻗﻢ ﺑﺈﺯﺍﻟﺔ ﺍﳌﻄﺎﻁ ﺍﻟﻮﺍﻗﻲ .•ﺍﻓﺘﺢ ﻗﻔﻞ ﺍﳌﺎﺳﺤﺔ ﺍﻟﻀﻮﺋﻴﺔ •Déverrouillez le scanner.
11 •Lift the cartridge door and remove the foam. 12 •Remove the toner cartridge packaging. 13 •Install the cartridge. 14 •Close the cartridge door. •Soulevez la porte d'accès à la cartouche et retirez la protection en mousse. •Retirez l'emballage de la cartouche d'impression. .•ﺍﺭﻓﻊ ﺑﺎﺏ ﺍﳋﺮﻃﻮﺷﺔ ﺛﻢ ﻗﻢ ﺑﺈﺯﺍﻟﺔ ﺍﳌﻄﺎﻁ ﺍﻟﻮﺍﻗﻲ ١١ .•ﻗﻢ ﺑﺈﺯﺍﻟﺔ ﺗﻐﻠﻴﻒ ﺧﺮﻃﻮﺷﺔ ﺍﳊﺒﺮ ١٢ .•ﻗﻢ ﺑﺘﺮﻛﻴﺐ ﺍﳋﺮﻃﻮﺷﺔ •Installez la cartouche. .•ﺃﻏﻠﻖ ﺑﺎﺏ ﺍﳋﺮﻃﻮﺷﺔ •Fermez la porte d'accès à la cartouche.
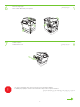
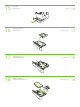
15 •Open tray 2. 16 •Remove the cardboard. 17 •Adjust the paper guides. 18 •Load the print media. .٢ •ﺍﻓﺘﺢ ﺍﻟﺪﺭﺝ •Ouvrez le bac 2. .•ﻗﻢ ﺑﺈﺯﺍﻟﺔ ﻓﺮﺥ ﺍﻟﻮﺭﻕ ﺍﳌﻘﻮﻯ •Retirez le carton. .•ﺍﺿﺒﻂ ﻣﻮﺟﻬﺎﺕ ﺍﻟﻮﺭﻕ •Réglez les guides du papier. .•ﻗﻢ ﺑﺘﺤﻤﻴﻞ ﻭﺳﺎﺋﻂ ﺍﻟﻄﺒﺎﻋﺔ •Chargez le support d'impression.
19 20 •Close tray 2. •Fermez le bac 2. .٢ •ﺃﻏﻠﻖ ﺍﻟﺪﺭﺝ ١٩ .•ﻗﻢ ﺑﺘﻮﺻﻴﻞ ﻛﺒﻞ ﺍﻟﺸﺒﻜﺔ ﺑﺎﳉﻬﺎﺯ ٢٠ •Connect the network cable to the device. •Connectez le câble réseau au périphérique. •Note: If connecting a USB cable, see step 27. •Remarque : Si vous connectez un câble USB, reportez-vous à l'étape 27. 21 •(Optional) Connect the fax cable to the device. 22 •Plug in the power cord and turn on the device .٢٧ ﺭﺍﺟﻊ ﺍﳋﻄﻮﺓ ﺭﻗﻢ،USB ﺇﺫﺍ ﻗﻤﺖ ﺑﺘﻮﺻﻴﻞ ﻛﺒﻞ:•ﻣﻼﺣﻈﺔ .
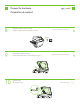
•Set up the control panel. .•ﺇﻋﺪﺍﺩ ﻟﻮﺣﺔ ﺍﻟﺘﺤﻜﻢ •Configuration du panneau de commande. 23 ٢٣ •Set language, date, time, and fax settings (if necessary). If prompted, select your language, the date, and the time. Follow the instructions on the control panel. •Paramétrage de la langue, de la date, de l'heure et des paramètres de télécopie (si nécessaire). Si un message vous le demande, sélectionnez votre langue, la date et l'heure. Suivez les instructions qui s’affichent sur le panneau de commande. .
25 •Find the IP address. On the control panel, touch Network Address, and then touch Print to print the Jetdirect configuration page. The IP address is on the Jetdirect page, under “TCP/IP”. Note: You might need to assign an IP address depending on the type of network that is installed. See “Configure an IP address (if necessary)” on the next page, for more information. ٢٥ •Recherche de l'adresse IP.
•Install the software. .•ﺗﺜﺒﻴﺖ ﺍﻟﺒﺮﻧﺎﻣﺞ •Installation du logiciel. •For Windows® software installation instructions, go to step 27. •Pour toute instruction d'installation du logiciel pour Windows®, reportez-vous à l'étape 27. .٢٧ ﺍﻧﺘﻘﻞ ﺇﻟﻰ ﺍﳋﻄﻮﺓ ﺭﻗﻢ،®Windows •ﻟﻠﺤﺼﻮﻝ ﻋﻠﻰ ﺇﺭﺷﺎﺩﺍﺕ ﺣﻮﻝ ﺗﺜﺒﻴﺖ ﺍﻟﺒﺮﻧﺎﻣﺞ ﻋﻠﻰ ﺃﻧﻈﻤﺔ ﺗﺸﻐﻴﻞ •For Macintosh software installation instructions, go to step 29. •Pour toute instruction d'installation du logiciel pour Macintosh, reportez-vous à l'étape 29. .
27 •Install software. 1) Insert the CD that came with the printer. 2) On the welcome screen, click Install Printer. The Setup Wizard appears. 3) Follow the on screen instructions. Note: If the welcome screen does not appear, click Start and then click Run. Type X:SETUP, where X corresponds to the CD-ROM drive letter, and then click OK. •Installation du logiciel. 1) Insérez le CD fourni avec l'imprimante. 2) Sur l'écran d'accueil, cliquez sur Installer une imprimante. L'assistant de configuration s'affiche.
29 •2) Place the CD in the CD-ROM drive and run the installer. Complete an easy install. •2) Placez le CD dans le lecteur de CD-ROM et lancez le programme d'installation. Exécutez une installation standard. ٢٩ . ﺃﻛﻤﻞ ﺗﺜﺒﻴﺘﹰﺎ ﺳﻬﻼﹰ.( ﺿﻊ ﺍﻟﻘﺮﺹ ﺍﳌﻀﻐﻮﻁ ﻓﻲ ﻣﺤﺮﻙ ﺍﻷﻗﺮﺍﺹ ﺍﳌﻀﻐﻮﻃﺔ ﺛﻢ ﻗﻢ ﺑﺘﺸﻐﻴﻞ ﺍﳌﺜﺒﺖ٢• 30 •Connect to a Macintosh computer. 1) Connect a USB cable between the device and the computer. Note: HP does not recommend using USB hubs. Use a USB cable that is no longer than 2 meters (6.5 feet).
33 •Test the software installation. Print a page from any program to make sure that the software is correctly installed. Note: If the installation failed, reinstall the software or see Troubleshooting at the end of this guide. •Test de l'installation du logiciel. Imprimez une page à partir de n'importe quel programme pour vous assurer que le logiciel est correctement installé. Remarque : Si l'installation a échoué, réinstallez le logiciel ou reportez-vous à la section Dépannage à la fin de ce guide. ٣٣ .
•Install the send fax driver. •Installation du pilote d'envoi du télécopieur. 36 •ﺗﺜﺒﻴﺖ ﺑﺮﻧﺎﻣﺞ ﺗﺸﻐﻴﻞ ﺍﻟﻔﺎﻛﺲ .send fax •Install send fax driver. If the fax driver was not installed in step 28, it can be installed now. 1) Insert the CD that came with the device. 2) On the welcome screen, click Install Printer. The setup wizard appears. 3) Choose the “custom” install option, and select the Send Fax Driver in the installation options. 4) Follow the onscreen instructions.
•Set up the digital send features. •Configuration des fonctions d'envoi numérique. .•ﺇﻋﺪﺍﺩ ﻣﻴﺰﺍﺕ ﺍﻹﺭﺳﺎﻝ ﺍﻟﺮﻗﻤﻲ 37 •1) Open the web browser. 2) Input device IP address (found on configuration page). 38 •3) Select the Digital Sending tab. 4) Complete the information under General Settings: name, address, and other information. 39 •1) Ouvrez le navigateur Web. 2) Entrez l'adresse IP du périphérique (se trouvant sur la page de configuration). .( ﺍﳋﺎﺹ ﺑﺎﳉﻬﺎﺯ )ﻣﻮﺟﻮﺩ ﻋﻠﻰ ﺻﻔﺤﺔ ﺍﻟﺘﻜﻮﻳﻦIP ( ﺃﺩﺧﻞ ﻋﻨﻮﺍﻥ٢ .
40 •6) On the left navigation menu, select E-mail Address Book, to enter frequently-used e-mail addresses and e-mail distribution lists. Note: The Fax Address Book and Fax Speed Dials is also located in the left navigation area. These two features allow you to manage frequently-used fax numbers and speed dial lists. •6) Dans le menu de navigation de gauche, sélectionnez Carnet d’adresses électroniques pour saisir les adresses électroniques et les listes de diffusion les plus utilisées.
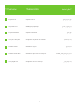
•Troubleshooting. •Area. •Zone. .•ﺍﳌﻨﻄﻘﺔ •Control-panel display. •Symptom. •Dépannage. .•ﺍﺳﺘﻜﺸﺎﻑ ﺍﻷﺧﻄﺎﺀ ﻭﺇﺻﻼﺣﻬﺎ .•ﺍﻷﻋﺮﺍﺽ •Symptôme. •Blank. •Make sure that the power cable is connected to a working power outlet. See page 9 for more information. •Make sure that the device is turned on. See page 9 for more information. •Turn off the device, reset the formatter, and then turn on the device. •Pas d'affichage.
•Print. •Not printing. •Check the network or USB cable. •If you are printing over a network, print a configuration page and make sure that the IP address is correct. •Reinstall the print driver. •Aucune impression. •Vérifiez le réseau ou le câble USB. •Si vous imprimez par l'intermédiaire d'un réseau, imprimez une page de configuration et assurez-vous que l'adresse IP est correcte. •Réinstallez le pilote de l'imprimante. •Impression. .•ﺍﻟﻄﺒﺎﻋﺔ .•ﻻ ﺗﺘﻢ ﺍﻟﻄﺒﺎﻋﺔ .USB •ﲢﻘﻖ ﻣﻦ ﺍﻟﺸﺒﻜﺔ ﺃﻭ ﻣﻦ ﻛﺒﻞ .
•Copy. •Buttons appear grey. •Make sure that the scanner lock is in the unlock position. •Turn off the device, and then turn it on again. •Les boutons s'affichent en gris. •Assurez-vous que le verrou du scanner est déverrouillé. •Mettez le périphérique hors tension, puis à nouveau sous tension. •Copie. .•ﺍﻟﻨﺴﺦ .•ﺗﻈﻬﺮ ﺍﻷﺯﺭﺍﺭ ﺭﻣﺎﺩﻳﺔ •Fax. •Buttons appear grey or fax is not available. •Enter the fax number, locale, and date/time to make sure that the fax is configured correctly.
•Fax configured but not sending fax (phone line not connected). •Make sure to use the phone cord that came with the device. •Make sure that the phone cord is connected securely to the device and to an active telephone port. Note: Use a telephone to verify that the port is active. •Télécopieur configuré mais n'envoyant pas les télécopies (ligne téléphonique non connectée). •Vérifiez que vous utilisez le cordon téléphonique fourni avec le périphérique.
•E-mail. •Courrier électronique. .•ﺍﻟﺒﺮﻳﺪ ﺍﻹﻟﻜﺘﺮﻭﻧﻲ •Digital sending tab in the embedded Web server (EWS) does not appear. •An administrative password might be configured. Select Log On in the upper right corner of the EWS. •L'onglet Envoi numérique du serveur Web intégré ne s'affiche pas. •Vous devez peut-être configurer un mot de passe d'administration. Sélectionnez Log On (Connexion) en haut à droite du serveur Web intégré. .
•You want to scan and send-to-email in black and white TIFF format. •Use the EWS to change the default image file format by selecting Digital •Vous voulez numériser et envoyer par courrier électronique un document en format TIFF en noir et blanc. •Utilisez le serveur Web intégré pour modifier le format de fichier image par défaut en sélectionnant Digital Sending (Envoi numérique), Send to E-mail (Envoyer par courrier électronique) et Advanced (Avancé).
25
© 2006 Hewlett-Packard Development Company, L.P. www.hp.