HP LaserJet M4345 MFP Getting Started Guide מדריך תחילת העבודה
Copyright and License © 2006 Copyright Hewlett-Packard Development Company, L.P. Reproduction, adaptation or translation without prior written permission is prohibited, except as allowed under the copyright laws. The information contained herein is subject to change without notice. The only warranties for HP products and services are set forth in the express warranty statements accompanying such products and services. Nothing herein should be construed as constituting an additional warranty.
•סקירה •Overview .•הכן את האתר •Prepare the site. .•הוצא את ההתקן מאריזתו •Unpack the device. .•הכן את החומרה •Prepare the hardware. .•הגדר את לוח הבקרה •Set up the control panel. .•התקן את התוכנה •Install the software. .•התקן את מנהל ההתקן לשיגור פקסים •Install the send fax driver. .•הגדר שיגור דיגיטלי •Set up digital send.
•הכן את מקום העבודה •Prepare the site 1 . כדי למקם בו את ההתקן,•בחר אזור מאוורר היטב ונקי מאבק •Select a well-ventilated, dust-free area to position the device.
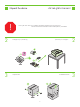
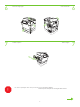
.•הוצא את ההתקן מאריזתו •Unpack the device. ! •Use this guide for the full accessory installation. Disregard the individual guides in the product boxes. . התעלם מהמדריכים הנפרדים בתיבות המוצר.•השתמש במדריך זה להתקנה המלאה של האביזר 2 •Install paper tray 3 (+ bundle only). 3 •Unpack the MFP. .( ערימה בלבד+) 3 •התקן מגש נייר .
4 .•הסר את האריזה •Remove the packaging.
6 7 ! .•הסר את סרטי האריזה •Remove the shipping tape. .•התקן את סל הפלט •Install the output bin. •You are done unpacking the device. Now proceed to the next step: Preparing the hardware. . הכן את החומרה: כעת המשך לשלב הבא.
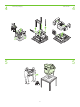
.•הכן את החומרה •Prepare the hardware. 8 •Attach the control panel overlay (if necessary). 9 •Lift the scanner lid and remove the foam. 10 •Unlock the scanner. 6 .(•חבר את כיסוי לוח הבקרה )במידת הצורך 8 .•הרם את מכסה הסורק והסר את חומר האריזה 9 .
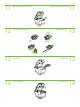
11 •Lift the cartridge door and remove the foam. 12 •Remove the toner cartridge packaging. 13 •Install the cartridge. 14 •Close the cartridge door. 7 .•הרם את דלת המחסנית והסר את חומר האריזה 11 .•הסר את אריזת מחסנית הטונר 12 .•התקן את המחסנית 13 .
15 •Open tray 2. .2 •פתח את מגש 15 16 •Remove the cardboard. .•הסר את הקרטון 16 17 •Adjust the paper guides. .•כוונן את מכווני הנייר 17 18 •Load the print media. .
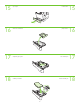
19 •Close tray 2. 20 •Connect the network cable to the device. .2 •סגור את מגש 19 .•חבר את כבל הרשת להתקן 20 .27 עיין בשלב,USB אם אתה מחבר כבל:•הערה •Note: If connecting a USB cable, see step 27. 21 •(Optional) Connect the fax cable to the device. .•)אופציונלי( חבר את כבל הפקס להתקן 21 22 •Plug in the power cord and turn on the device •חבר את כבל המתח והפעל את ההתקן 22 1 2 ! .•סיימת את הכנת החומרה . הגדר את לוח הבקרה:המשך אל •You are done preparing the hardware.
.•הגדר את לוח הבקרה •Set up the control panel. 23 23 •Set language, date, time, and fax settings (if necessary). If prompted, select your language, the date, and the time. Follow the instructions on the control panel. . את התאריך ואת השעה, בחר את השפה, אם תתבקש לכך.( שעה והגדרות פקס )במידת הצורך, תאריך,•הגדר שפה .פעל לפי ההוראות המופיעות בלוח הבקרה 24 24 •Set the media size and type for the input trays. At the control panel, touch Supplies Status, and then touch Trays.
25 •Find the IP address. On the control panel, touch Network Address, and then touch Print to print the Jetdirect configuration page. The IP address is on the Jetdirect page, under “TCP/IP”. Note: You might need to assign an IP address depending on the type of network that is installed. See “Configure an IP address (if necessary)” on the next page, for more information. 25 ( )הדפסהPrint )כתובת רשת( ולאחר מכן גע באפשרותNetwork Address גע באפשרות, בלוח הבקרה.
.•התקן את התוכנה •Install the software. •For Windows® software installation instructions, go to step 27. .27 עבור לשלב,Windows® •לקבלת הוראות להתקנה של תוכנת •For Macintosh software installation instructions, go to step 29. .
27 •Install software. 1) Insert the CD that came with the printer. 2) On the welcome screen, click Install Printer. The Setup Wizard appears. 3) Follow the on screen instructions. Note: If the welcome screen does not appear, click Start and then click Run. Type X:SETUP, where X corresponds to the CD-ROM drive letter, and then click OK. )התקנתInstall Printer לחץ על,( במסך ברוכים הבאים2 .( הכנס את התקליטור המצורף למדפסת1 .•התקן את התוכנה אם מסך ברוכים הבאים אינו: הערה.
29 30 ! 31 •2) Place the CD in the CD-ROM drive and run the installer. Complete an easy install. . השלם התקנה קלה.( מקם את התקליטור בכונן התקליטורים והפעל את תוכנית ההתקנה2• •Connect to a Macintosh computer. 1) Connect a USB cable between the device and the computer. Note: HP does not recommend using USB hubs. Use a USB cable that is no longer than 2 meters (6.5 feet). .USB אינה ממליצה על שימוש ברכזותHP : הערה. בין ההתקן למחשבUSB ( חבר כבל1 .Macintosh •חבר למחשב .
33 •Test the software installation. Print a page from any program to make sure that the software is correctly installed. Note: If the installation failed, reinstall the software or see Troubleshooting at the end of this guide. 34 •Congratulations!. The device is ready to use. The user guide is located on the CD and in the HP Easy Printer Care Software. Note: Save the boxes and the packing material in case you need to transport the device. 35 התקן, אם ההתקנה נכשלה: הערה.
•Install the send fax driver. 36 .•התקן את מנהל ההתקן לשיגור פקסים •Install send fax driver. If the fax driver was not installed in step 28, it can be installed now. 1) Insert the CD that came with the device. 2) On the welcome screen, click Install Printer. The setup wizard appears. 3) Choose the “custom” install option, and select the Send Fax Driver in the installation options. 4) Follow the onscreen instructions. .( הכנס את התקליטור המצורף להתקן1 .
•Set up the digital send features. .הגדר את מאפייני השיגור הדיגיטלי 37 •1) Open the web browser. 2) Input device IP address (found on configuration page). 38 •3) Select the Digital Sending tab. 4) Complete the information under General Settings: name, address, and other information. 39 •5) On the left navigation menu, select E-mail Settings. Input the SMTP server address, use the default From and Subject fields.
40 •6) On the left navigation menu, select E-mail Address Book, to enter frequently-used e-mail addresses and e-mail distribution lists. Note: The Fax Address Book and Fax Speed Dials is also located in the left navigation area. These two features allow you to manage frequently-used fax numbers and speed dial lists. 41 •7) To scan a document to your PC or network share folder, use the Send To Folder option (on the left navigation bar) to set up one or more folder destinations.
.פתרון בעיות •Troubleshooting. .•אזור •Area. •Control-panel display. .•תופעה •Symptom. •Blank. •Make sure that the power cable is connected to a working power outlet. See page 9 for more information. •Make sure that the device is turned on. See page 9 for more information. •Turn off the device, reset the formatter, and then turn on the device. .•תצוגת לוח הבקרה .•ריקה •Buttons appear grey. . 9 עיין בעמוד, לקבלת מידע נוסף.•ודא שכבל המתח מחובר לשקע חשמל פעיל .
•Print. •Not printing. •Check the network or USB cable. •If you are printing over a network, print a configuration page and make sure that the IP address is correct. •Reinstall the print driver. .•הדפסה .•לא מדפיס .USB-•בדוק את הרשת או את כבל ה . נכונהIP- הדפס דף תצורה וודא שכתובת ה,•אם אתה מדפיס ברשת .•התקן מחדש את מנהל התקן ההדפסה •Make sure that the orange packing tape, cardboard, and orange plastic shipping locks have been removed. •Make sure that you are using supported print media.
•Copy. •Buttons appear grey. •Make sure that the scanner lock is in the unlock position. •Turn off the device, and then turn it on again. .•העתקה .•הלחצנים מופיעים בצבע אפור •Fax. •Buttons appear grey or fax is not available. .•ודא שנעילת הסורק נמצאת במצב משוחרר .•כבה את ההתקן ולאחר מכן הפעל אותו שוב •Enter the fax number, locale, and date/time to make sure that the fax is configured correctly. .•פקס .
•Fax configured but not sending fax (phone line not connected). •הוגדרה תצורת הפקס אך הוא אינו משגר פקסים )קו הטלפון אינו .(מחובר •Fax configured but not sending fax (phone line incompatible). •הוגדרה תצורת הפקס אך הוא אינו משגר פקסים )קו הטלפון לא .(מתאים •Fax configured but not receiving fax. •Make sure to use the phone cord that came with the device. •Make sure that the phone cord is connected securely to the device and to an active telephone port.
•E-mail. .•דואר אלקטרוני •Digital sending tab in the embedded Web server (EWS) does not appear. )שיגור דיגיטלי( שבשרת האינטרנטDigital sending •הכרטיסייה .( אינה מופיעהEWS) המשובץ •E-mail Gateway Not Responding appears on the controlpanel display when attempting to send an e-mail. •An administrative password might be configured. Select Log On in the upper right corner of the EWS. )כניסה למערכת( בפינהLog On בחר באפשרות.•ייתכן שמוגדרת סיסמת מנהל .
•You want to scan and send-to-email in black and white TIFF format. .לבן- שחורTIFF •ברצונך לסרוק ולשגר לדואר אלקטרוני בתבנית •You want to change the file type or the color setting for e-mail attachments. •ברצונך לשנות את סוג הקובץ או את הגדרת הצבע של הקבצים .המצורפים להודעת הדואר האלקטרוני •A “job failed” message is received with a document is scanned and sent to e-mail. •Use the EWS to change the default image file format by selecting Digital Sending, Send to E-mail, and Advanced.
25
© 2006 Hewlett-Packard Development Company, L.P. www.hp.