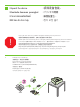
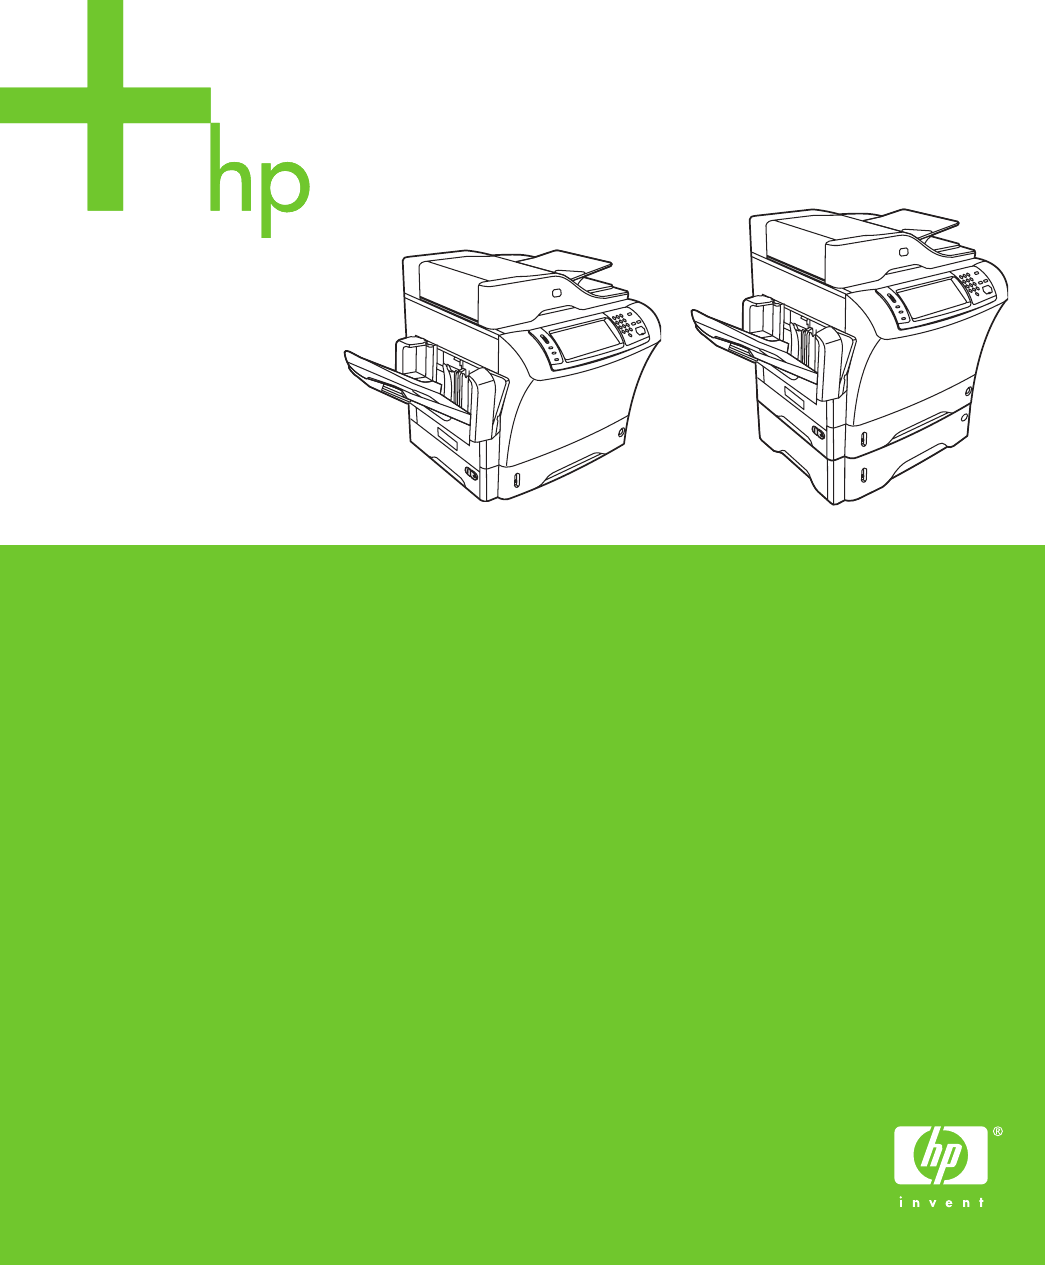
HP LaserJet M4345 MFP Getting Started Guide 入门指南 Panduan Persiapan Awal セットアップ ガイド คูมือเริ่มตนอยางรวดเร็ว 入門指南 Hướng dẫn Bắt đầu Sử dụng 시작 설명서 Terdaftar di Deperindag Provinsi DKI Jakarta No : 0089/1.824.
Copyright and License © 2006 Copyright Hewlett-Packard Development Company, L.P. 版权和许可证 © 2006 版权所有 Hewlett-Packard Development Company, L.P. Reproduction, adaptation or translation without prior written permission is prohibited, except as allowed under the copyright laws. 未经事先书面许可,严禁进行任何形式的复制、改编或翻译, 除非版权法另有规定。 The information contained herein is subject to change without notice.
•Overview •概览 •Tinjauan Umum •概要 •ภาพรวม •概述 •Tổng quan •개요 •Prepare the site. •准备放置位置。 •Mempersiapkan lokasi. •設置場所の用意 •การจัดเตรียมสถานที่ •準備放置㆞點。 •Chuẩn bị trang. •장소 준비 •Unpack the device. •拆除设备包装。 •Membuka kemasan perangkat. •プリンタの開梱 •การแกะกลองผลิตภัณฑ์ •解開裝置包。 •Mở bao bì cho máy. •장치 포장 풀기 •Prepare the hardware. •准备硬件。 •Mempersiapkan perangkat keras. •ハードウェアの準備 •การจัดเตรียมฮาร์ดแวร์ •準備硬體。 •Chuẩn bị phần cứng. •하드웨어 준비 •Set up the control panel.
1 •Prepare the site •准备放置位置 •Mempersiapkan lokasi •設置場所の用意 •การจัดเตรียมสถานที่ •準備放置㆞點。 •Chuẩn bị trang •장소 준비 •Select a well-ventilated, dust-free area to position the device. •选择一个通风良好的无尘区域来放置设备。 •Pilih tempat yang berventilasi cukup, bebas debu untuk menempatkan perangkat. •換気がよく、埃の少ない場所を選んで機器を設置します。 •เลือกวางอุปกรณ์ไวในบริเวณที่ปราศจากฝุน และอากาศถายเทสะดวก •選擇㆒個通風情況良好且沒㈲灰塵的區域來放置裝置。 •Chọn nơi thông thoáng, không có bụi để đặt máy. •환기가 잘 되고 먼지가 없는 지역을 선택하여 장치를 내려 놓습니다.
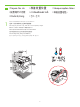
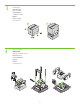
•Unpack the device. •拆除设备包装。 •Membuka kemasan perangkat. •プリンタの開梱 •การแกะกลองผลิตภัณฑ์ •解開裝置包。 •Mở bao bì cho máy. •장치 포장 풀기 •Use this guide for the full accessory installation. Disregard the individual guides in the product boxes. •使用本指南来安装所有的附件。忽略产品包装箱中的单个指南。 ! •Gunakan panduan ini untuk memasang aksesori secara lengkap. Abaikan panduan masing-masing aksesori di kotak kemasan.
3 •Unpack the MFP. •打开 MFP 包装。 •Buka kemasan MFP. •本体の箱を開けます。 •นํา MFP ออกมาจากกลอง •解開 MFP。 •Mở bao bì cho MFP. •MFP 포장을 풉니다. 4 •Remove the packaging. •拆除包装材料。 •Keluarkan perangkat dari kemasan. •梱包材を取り外します。 •แกะบรรจุภัณฑ์ทั้งหมดออก •拆開包裝。 •Gỡ bao bì. •포장재를 제거합니다.
5 6 •Remove the shipping tape. •撕下装运带。 •Lepaskan pita pengiriman. •搬送用テープを取り外します。 •แกะเทปทั้งหมดที่ติดมากับผลิตภัณฑ์ออก •撕㆘膠帶。 •Gỡ băng dán vận chuyển. •포장용 테이프를 제거합니다. 7 •Install the output bin. •安装出纸槽。 •Pasang nampan keluaran. •排紙ビンを取り付けます。 •ใสถาดรับกระดาษออก •安裝出紙槽。 •Lắp ngăn đựng giấy ra. •출력 용지함을 설치합니다.
•You are done unpacking the device. Now proceed to the next step: Preparing the hardware. •您已完成拆除设备包装的操作。现在请继续进行下一步:准备硬件。 ! •Anda telah selesai membuka kemasan perangkat. Lanjutkan ke langkah berikutnya: Mempersiapkan perangkat keras. •これで開梱が終わりました。次の手順「ハードウェアの準備」に進んでください。 •คุณนําผลิตภัณฑ์ออกจากกลองเรียบรอยแลว ตอนนี้ ใหทําตามขั้นตอนถัดไป: การจัดเตรียมฮาร์ดแวร์ •這樣便完成拆箱的步驟。現在,請繼續執行㆘㆒個步驟:準備硬體。 •Bạn đã hoàn tất việc mở bao bì cho máy. Bây giờ tiến hành bước tiếp theo: Chuẩn bị phần cứng.
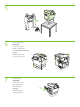
•Prepare the hardware. •准备硬件。 •Mempersiapkan perangkat keras. •ハードウェアの準備 •การจัดเตรียมฮาร์ดแวร์ •準備硬體。 •Chuẩn bị phần cứng. •하드웨어 준비 8 •Attach the control panel overlay (if necessary). •贴上控制面板贴面(如有必要)。 •Pasang pelat muka panel kontrol (bila perlu). •コントロール パネル オーバーレイを取り付けます (必要に応じて)。 •ติดแผนปะหนาแผงควบคุม (หากจําเปน) •貼㆖控制面板貼紙 (如㈲需要)。 •Gắn miếng đậy bảng điều khiển (nếu cần). •제어판 오버레이를 부착합니다(필요한 경우). 9 •Lift the scanner lid and remove the foam.
11 •Lift the cartridge door and remove the foam. •抬起碳粉盒盖并取出泡沫。 •Angkat pintu kartrid dan keluarkan gabusnya. •カートリッジのドアを開け、梱包材を取り除きます。 •ยกชองใสตลับหมึกพิมพ์ขึ้น และดึงโฟมออก •打開碳粉匣擋門,並取㆘泡棉。 •Nhấc cửa ngăn đựng mực và gỡ miếng bọt biển. •카트리지 도어를 올리고 스티로폼을 제거합니다. 12 •Remove the toner cartridge packaging. •拆除碳粉盒包装。 •Buka kemasan kartrid toner. •トナー カートリッジの梱包材を取り除きます。 •แกะบรรจุภัณฑ์ทั้งหมดของตลับผงหมึกออก •拆㆘碳粉匣包裝。 •Gỡ bao bì hộp mực. •토너 카트리지 포장재를 제거합니다. 13 •Install the cartridge.
15 •Open tray 2. •打开纸盘 2。 •Buka baki 2. •トレイ 2 を開けます。 •เปดถาดกระดาษ 2 •打開紙匣 2。 •Mở khay 2. •용지함 2를 엽니다. 16 •Remove the cardboard. •取出厚纸板。 •Keluarkan kardusnya. •ボール紙を取り除きます。 •ดึงกระดาษแข็งออก •拆㆘厚紙板。 •Gỡ miếng bìa cứng. •보드지를 제거합니다. 17 •Adjust the paper guides. •调整纸张导板。 •Atur pemandu kertas. •用紙ガイドを調整します。 •ปรับตัวกั้นกระดาษ •調整紙張導板。 •Điều chỉnh các thanh dẫn hướng giấy. •용지 조정대를 조정합니다. 18 •Load the print media. •装入打印介质。 •Isikan media cetak.
19 •Close tray 2. •关闭纸盘 2。 •Tutup baki 2. •トレイ 2 を閉じます。 •ปดถาดกระดาษ 2 •關閉紙匣 2。 •Đóng khay 2. •용지함 2를 닫습니다. 20 •Connect the network cable to the device. •将网络电缆连接至设备。 •Hubungkan kabel jaringan ke perangkat. •ネットワーク ケーブルを本体に接続します。 •ตอสายเคเบิลของระบบเครือขายเขากับตัวเครื่อง •將網路電纜線連接到裝置。 •Nối cáp mạng vào máy. •네트워크 케이블을 장치에 연결합니다. •Note: If connecting a USB cable, see step 27. •注:如果连接的是 USB 电缆,请参阅步骤 27。 •Catatan: Jika menghubungkan kabel USB, lihat langkah 27.
•You are done preparing the hardware. Proceed with: Set up the control panel. ! •您已完成准备硬件的工作。继续下一步:设置控制面板。 •Anda telah selesai mempersiapkan perangkat keras. Lanjutkan dengan: Mengatur panel kontrol. •これでハードウェアの準備ができました。 「コントロール パネルのセットアップ」に進んでください。 •คุณไดเตรียมฮาร์ดแวร์เสร็จเรียบรอยแลว โปรด: ตั้งคาแผงควบคุม •這樣便完成準備硬體的步驟。請繼續執行以㆘步驟:設定控制面板。 •Bạn đã hoàn tất việc chuẩn bị phần cứng. Tiến hành với: Cài đặt bảng điều khiển. •하드웨어 준비가 완료되었습니다. 제어판 설정을 계속하십시오.
•Set up the control panel. •设置控制面板。 •Mengatur panel kontrol. •コントロール パネルのセットアップ •การตั้งคาแผงควบคุม •設定控制面板。 •Cài đặt bảng điều khiển. •제어판 설정 23 •Set language, date, time, and fax settings (if necessary). If prompted, select your language, the date, and the time. Follow the instructions on the control panel. •设置语言、日期、时间和传真设置(如有必要)。提示时,请选择您的语言、日期和时间。请按照控制面板上的说明 进行操作。 •Atur bahasa, tanggal, waktu dan pengaturan faks (bila perlu). Jika diminta, pilih bahasa Anda, tanggal, dan waktu.
25 •Find the IP address. On the control panel, touch Network Address, and then touch Print to print the Jetdirect configuration page. The IP address is on the Jetdirect page, under “TCP/IP”. Note: You might need to assign an IP address depending on the type of network that is installed. See “Configure an IP address (if necessary)” on the next page, for more information.
26 •Configure the IP address (if necessary). On the control panel, touch Administration. Scroll to and touch Initial Setup, and then touch Networking and I/O. Touch Embedded Jetdirect, touch TCP/IP, and then touch IPV4 Settings. Touch Manual Settings, and then enter the IP Address, Subnet Mask, and Default Gateway. •配置 IP 地址(如有必要)。在控制面板中,轻触管理。滚动查看并轻触初始设置,然后轻触联网和 I/O。 依次轻触嵌入式 Jetdirect 和 TCP/IP,然后再轻触 IPV4 设置。轻触手动设置,然后输入 IP 地址、子网 掩码和默认网关。 •Mengkonfigurasi alamat IP (bila perlu).
•You are done with the setup of the control panel. Now move to your computer and proceed with: Install the software. ! •您已完成控制面板的设置。现在请转到您的计算机,然后继续下一步:安装软件。 •Anda telah selesai mengatur panel kontrol. Sekarang beralih ke komputer dan lanjutkan dengan: Menginstal perangkat lunak.
•Install the software. •安装软件。 •Menginstal perangkat lunak. •ソフトウェアのインストール •การติดตั้งซอฟต์แวร์ •安裝軟體。 •Cài đặt phần mềm. •소프트웨어 설치 •For Windows® software installation instructions, go to step 27. •有关 Windows® 的软件安装说明,请转至步骤 27。 •Untuk petunjuk instalasi perangkat lunak Windows®, ke langkah 27.
27 •Install software. 1) Insert the CD that came with the printer. 2) On the welcome screen, click Install Printer. The Setup Wizard appears. 3) Follow the on screen instructions. Note: If the welcome screen does not appear, click Start and then click Run. Type X:SETUP, where X corresponds to the CD-ROM drive letter, and then click OK. •安装软件。1) 插入随打印机随附的 CD。2) 在欢迎屏幕上,单击安装打印机。将出现安装向导。3) 按照屏 幕上的说明进行操作。注:如果未出现欢迎屏幕,则单击开始,然后单击运行。键入 X:SETUP,此处 X 代表 CD-ROM 驱动器盘符,然后单击确定。 •Instal perangkat lunak.
29 •2) Place the CD in the CD-ROM drive and run the installer. Complete an easy install. •2) 将 CD 放入 CD-ROM 驱动器并运行安装程序。完成简易安装。 •2) Masukkan CD ke dalam drive CD-ROM lalu jalankan installer. Selesaikan easy install [instalasi mudah]. •2) CD を CD-ROM ドライブに挿入し、インストーラを実行します。簡単なインストール手順を完了します。 •2) วางแผนซีดีลงในไดรฟซีดีรอม และเรียกใชโปรแกรมติดตั้ง ทําการติดตั้งอยางงายใหเสร็จสมบูรณ์ •2) 將光碟放入光碟機㆗,並執行安裝程式。完成簡易安裝。 •2) Đặt đĩa CD vào ổ đĩa CD-ROM và chạy trình cài đặt. Hoàn tất phần cài đặt dễ.
31 •3) From Apple System Preferences (available on the Apple pull-down menu or in the dock), click the Print & Fax icon and then click the Printing tab at the top of the window. 4) To add your new printer, click the ‘+’ icon to launch the Printer Browser. By default, the Printer Browser shows printers that are connected through USB, Bonjour, or Appletalk networking.
32 •5) From the Printer Browser window, select the HP printer. For Mac OS X V10.4: If HP software is installed, the printer software should be automatically configured. 6) Click Add to create a printer queue. You are prompted to configure the installable options manually. Note: Mac OS X V10.2 and V10.3 might require you to manually select the printer model from the Printer Model drop-down list. 7) Under Model Name, select your device and click Add. 在打印机浏览器窗口中,选择 HP 打印机。对于 Mac OS X V10.
34 •Congratulations! The device is ready to use. The user guide is located on the CD and in the HP Easy Printer Care Software. Note: Save the boxes and the packing material in case you need to transport the device. •恭喜! 设备准备就绪,可以使用。用户指南位于 CD 上和 HP Easy Printer Care 软件中。注:保存好包 装箱和包装材料,以便您在搬运设备的时候使用。 •Selamat! Perangkat siap untuk digunakan. Panduan pengguna terdapat pada CD dan pada Perangkat Lunak HP Easy Printer Care [Perawatan Mudah Printer HP].
•You are done installing your software. Congratulations! You are ready to use your HP printer. ! •您已完成软件安装。恭喜!您现在可以使用 HP 打印机了。 •Anda telah selesai menginstal perangkat lunak Anda. Selamat! Anda siap untuk menggunakan printer HP Anda. •これでソフトウェアのインストールが終わりました。 お疲れ様でした。これで HP プリンタをお使いいただけます。 •คุณติดตั้งซอฟต์แวร์ของคุณเสร็จแลว ขอแสดงความยินดี! คุณพรอมที่จะใชเครื่องพิมพ์ HP •您已經完成軟體的安裝。恭喜您!您已經準備好使用 HP ㊞表機。 •Bạn đã hoàn tất việc cài đặt phần mềm. Xin chúc mừng! Bạn đã sẵn sàng để dùng máy in HP của bạn.
•Install the send fax driver. •安装发送传真驱动程序。 •Menginstal driver pengiriman faks. •ファックス送信ドライバのインストール •การติดตั้งไดรเวอร์สงโทรสาร •安裝傳送傳真驅動程式。 •Cài đặt chương trình gửi fax. •팩스 전송 드라이버 설치 36 •Install send fax driver. If the fax driver was not installed in step 28, it can be installed now. 1) Insert the CD that came with the device. 2) On the welcome screen, click Install Printer. The setup wizard appears. 3) Choose the “custom” install option, and select the Send Fax Driver in the installation options.
•Set up the digital send features. •设置数字发送功能。 •Mengatur fitur pengiriman digital. •デジタル送信機能のセットアップ •ตั้งคาคุณสมบัติการสงแบบดิจิตอล •設定數位傳送功能。 •Cài đặt các tính năng gửi bằng kỹ thuật số. •디지털 전송 기능 설정 37 •1) Open the web browser. 2) Input device IP address (found on configuration page). •1) 打开 Web 浏览器。2) 输入设备的 IP 地址(可在配置页上找到)。 •1) Buka browser web. 2) Masukkan alamat IP perangkat (terdapat pada halaman konfigurasi).
39 •5) On the left navigation menu, select E-mail Settings. Input the SMTP server address, use the default From and Subject fields. Note: If you are using an ISP (Internet Service Provider) for internet access and e-mail, you may need to contact your ISP to obtain the SMTP server name, and to determine if you need to enter an account name and password for SMTP authentication.
41 •7) To scan a document to your PC or network share folder, use the Send To Folder option (on the left navigation bar) to set up one or more folder destinations. For more information on configuring Send to Folder, consult the Embedded Web Server (EWS) User Guide. Note: See www.hp.com/support for more information about the digital send features. •7) 要扫描文档至 PC 或网络共享文件夹,请使用发送到文件夹选项(位于左侧的导航栏)设置一个或多个目标文件 夹。有关配置“发送到文件夹”的详细信息,请参阅“嵌入式 Web 服务器 (EWS) 用户指南”。 注:关于数字发送 功能的详细信息,请访问 www.hp.
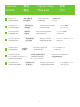
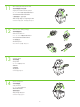
•故障排除。 •Mengatasi masalah. •Troubleshooting. •トラブルシューティング •Xử lý sự cố. •การแกปญหา •疑難排解。 •문제 해결 •Area •区域 •Area •機能 •สวนที่เกิดปญหา •區域 區域 •Vùng •구역 •Symptom •症状 •Gejala •症状/要求 •ลักษณะอาการ •問題 問題 •Triệu chứng •증상 •Control-panel display. •Blank. •Make sure that the power cable is connected to a working power outlet. See page 10 for more information. •Make sure that the device is turned on. See page 10 for more information.
•Print. •Buttons appear grey. •Make sure that the scanner lock is in the unlock position. •Turn off the device, and then turn it on again. •See page 7 for more information. •按钮呈灰色。 •确保扫描仪锁位于解锁位置。 •关闭设备的电源,然后再次打开。 •有关详细信息,请参阅第 7 页。 •Tombol terlihat abu-abu. •Pastikan kunci scanner dalam keadaan tidak terkunci. •Matikan perangkat, lalu hidupkan kembali. •Lihat halaman 7 untuk informasi lebih lanjut.
•不列㊞。 •檢查網路或 USB 纜線。 •如果您要在網路㆖列㊞,請列㊞組態頁並確定 IP 位址正確。 •重新安裝列㊞驅動程式。 •Không in. •Kiểm tra mạng hay cáp USB. •Nếu bạn đang in qua mạng, in một trang cấu hình và bảo đảm đúng địa chỉ IP . •Cài lại chương trình in. •인쇄되지 않습니다. •네트워크 또는 USB 케이블을 확인하십시오. •네트워크를 통해 인쇄하는 경우 구성 페이지를 인쇄하고 IP 주소가 올 바른지 확인하십시오. •인쇄 드라이버를 다시 설치하십시오. •Jams. •Make sure that the orange packing tape, cardboard, and orange plastic shipping locks have been removed. •Make sure that you are using supported print media.
•Blank pages. •Make sure that the pull tape is removed from the print cartridge. •空白页。 •确保已从打印碳粉盒取下拉拨带。 •Halaman kosong. •Pastikan pita tarik telah dilepaskan dari kartrid cetak. •ブランク ページが印刷される。 •引きつまみテープがプリント カートリッジから取り外されていることを確 認します。 •กระดาษออกมาเปนกระดาษเปลา •ดูใหแนใจวา ไดแกะเทปปดตลับหมึกพิมพ์ออกจากตลับหมึกพิมพ์แลว •空白頁。 •確定拉動膠帶已從碳粉匣㆖取㆘。 •Các trang trắng. •Bảo đảm miếng băng kéo được gỡ khỏi hộp mực in. •공백 페이지 •토너 카트리지에서 당김 탭을 제거했는지 확인하십시오. •Buttons appear grey.
•No fax icon on the control-panel display. •Make sure that the fax card is installed in the formatter correctly, and that none of the pins are bent. •Print a configuration page and check the modem status. If “Operational/ Enabled” is not listed, it might be disabled or there might be a problem with the fax hardware. See the analog fax user guide for more information.
•Fax configured but not sending fax (phone line not connected). •Make sure to use the phone cord that came with the device. •Make sure that the phone cord is connected securely to the device and to an active telephone port. Note: Use a telephone to verify that the port is active. •传真已配置,但不能发送传真(未连接电话 线)。 •确保使用设备随附的电话线。 •确保电话线牢固地连接至设备和活动电话端口。注:使 用电话来验证端口是否为活动状态。 •Faks dikonfigurasikan tetapi tidak mengirim faks (saluran telepon tidak terhubung).
•Fax configured but not receiving fax. •Make sure that a line splitter or surge-protection device is not being used. •Make sure that voice mail or an answering machine is not receiving the incoming fax before the device. Remove these, or set the device “rings-toanswer” to a lower number. •Make sure that a roll-over line is not being used, and that the fax is connected to a dedicated analog telephone line.
•E-mail. •电子邮件。 •E-mail. •電子メール •อีเมล •電子郵件。 •E-mail. •전자 우편 •Digital sending tab in the embedded Web server (EWS) does not appear. •An administrative password might be configured. Select Log On in the upper right corner of the EWS. •在嵌入式 Web 服务器 (EWS) 中未出现数字发 送标签。 •可能配置了管理密码。选择 EWS 右上角的登录。 •Tab pengiriman digital pada server Web terpadu (EWS) tidak terlihat. •Sandi administratif mungkin telah dikonfigurasikan. Pilih Log On di sudut kanan atas EWS.
•當嘗試傳送電子郵件時,控制面板顯示螢幕㆖出現電子郵件 閘道沒㈲反應。 •1) SMTP 閘道位址可能不正確。請聯絡您的 IT 管理員以取得正確位址。 2) 如果您使用的是電子郵件的網際網路服務提供者 (ISP),請聯絡您的 ISP 提供者以取得 SMTP 閘道 (要求完整網域㈴稱 (FQDN),而非 IP 位址) 的 主機㈴稱。 3) 請確認輸入的 SMTP 認證使用者㈴稱與密碼是否正確。註:並非所㈲的 SMTP 閘道都需要使用者㈴稱與密碼。 •Cổng vào E-mail không trả lời hiện trên màn hình bảng điều khiển khi bạn cố gắng gửi e-mail. •1) Địa chỉ cổng SMTP có thể không đúng. Liên lạc người quản lý IT để nhận một địa chỉ đúng.
•You want to scan and send-to-email in black and white TIFF format. •Use the EWS to change the default image file format by selecting Digital •您要以黑白的 TIFF 格式进行扫描并发送到电 子邮件。 •使用 EWS 选择数字发送、发送到电子邮件和高级,更改 默认的图像文件格式。 •Anda ingin memindai dan mengirim ke e-mail dalam format TIFF hitam putih. •Gunakan EWS untuk mengganti format file gambar standar dengan memilih Digital Sending [Pengiriman Digital], Send to E-mail [Kirim ke E-mail], dan Advanced [Lanjutan].
•Other.
© 2006 Hewlett-Packard Development Company, L.P. www.hp.