HP LaserJet M4345 MFP Getting Started Guide Introduktionsvejledning Alustusjuhend Aloitusopas Lietošanas pam c ba Pradedančiojo vadovas Komme i gang Starthandbok Алғашқы іске қосу жөніндегі нұсқаулық
Copyright and License © 2006 Copyright Hewlett-Packard Development Company, L.P. Reproduction, adaptation or translation without prior written permission is prohibited, except as allowed under the copyright laws. The information contained herein is subject to change without notice. The only warranties for HP products and services are set forth in the express warranty statements accompanying such products and services. Nothing herein should be construed as constituting an additional warranty.
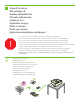
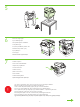
•Overview •Oversigt •Ülevaade •Yleiskatsaus •P rskats •Apžvalga •Oversikt •Översikt •Жалпы шолу •Seadme asukoha ettevalmistamine. •Valmistele sijoituspaikka. •Prepare the site. •Klargør stedet. •Parenkite darbo viet . •Unpack the device. •Seadme lahtipakkimine. •Pak enheden ud. •Išpakuokite rengin . •Pakke ut enheten •Prepare the hardware. •Packa upp enheten. •Ota laite pakkauksesta. •Parenkite technin rang . •Izpakojiet ier ci. •Құрылғыны қорабынан шығарыңыз.
•Prepare the site •Klargør stedet. •Seadme asukoha ettevalmistamine •Valmistele sijoituspaikka. •Sagatavojiet vietu. •Parenkite darbo viet . •Klargjøre installeringsstedet. •Förbered platsen. •Орнатылатын жерді дайындаңыз 1 •Select a well-ventilated, dust-free area to position the device. •Vælg et velventileret, støvfrit område til enheden. •Valige seadme paigutamiseks hea ventilatsiooniga ja tolmuvaba ruum. •Sijoita laite hyvin ilmastoituun, pölyttömään paikkaan.
•Unpack the device. •Pak enheden ud. •Seadme lahtipakkimine. •Ota laite pakkauksesta. •Izpakojiet ier ci. •Išpakuokite rengin . •Pakke ut enheten •Packa upp enheten. •Құрылғыны қорабынан шығарыңыз. •Use this guide for the full accessory installation. Disregard the individual guides in the product boxes. •Brug denne vejledning til installationen af alt udstyr. Se bort fra de individuelle vejledninger i kasserne med produkterne. ! •Käesolev juhend on abiks kõigi lisatarvikute paigaldamisel.
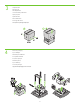
3 •Unpack the MFP. •Pak MFP'en ud. •MFP lahtipakkimine. •Ota monitoimilaite pakkauksesta. •Izpakojiet printeri. •Išpakuokite MFP. •Pakk ut MFP-enheten. •Packa upp MFP-enheten. •Көп қызметті принтерді шығарыңыз. 4 •Remove the packaging. •Fjern emballagen. •Pakkematerjali eemaldamine. •Poista pakkausmateriaali. •No emiet iepakojumu. •Pašalinkite pakuot . •Fjern emballasjen. •Ta bort förpackningen. •Орауыш материалдарды алып тастаңыз.
5 6 •Remove the shipping tape. •Fjern emballeringstapen. •Transpordi-kleeplintide eemaldamine. •Irrota pakkausteippi. •No emiet p rvad šanai paredz to lenti. •Pašalinkite transportavimo juost . •Fjern pakketeipen. •Ta bort tejpen. •Бекіткіш таспаны суырып алыңыз. 7 •Install the output bin. •Monter støtten til udskriftsbakken. •Väljastussalve paigaldamine. •Asenna tulostuslokero. •Uzst diet uztv r ju. • d kite išvesties d tuv . •Monter utskuffen. •Installera utmatningsfacket.
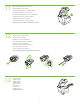
•Prepare the hardware. •Klargør hardwaren. •Riistvara ettevalmistamine. •Valmistele laitteisto. •Sagatavojiet aparat ru. •Parenkite technin rang . •Klargjøre maskinvaren •Förbered maskinvaran. •Аппараттық құралды дайындаңыз. 8 •Attach the control panel overlay (if necessary). •Sæt overlay'et på kontrolpanelet (hvis det er nødvendigt). •Kinnitage juhtpaneeli kate (vajadusel). •Kiinnitä ohjauspaneelin päällys (tarvittaessa). •Pievienojiet vad bas pane a p rkl ju (ja nepieciešams).
11 •Lift the cartridge door and remove the foam. •Løft patrondækslet, og fjern skummet. •Kergitage kassetihoidiku luuki ja eemaldage vahtplast. •Avaa värikasetin luukku ja poista vaahtomuovi. •Paceliet kaset u nodal juma durti as un iz emiet putuplastu. •Atidarykite kaset s dureles ir pašalinkite putplast . •Løft kassettdekselet, og fjern skumplasten. •Lyft på luckan till kassetten och ta bort skumplasten. •Картридж есігін ашып, көбікпластмассаны алып тастаңыз. 12 •Remove the toner cartridge packaging.
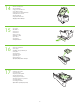
14 •Close the cartridge door. •Luk patrondækslet. •Sulgege kassetihoidiku luuk. •Sulje värikasetin luukku. •Aizveriet kaset u nodal juma durti as. •Uždarykite kaset s dureles. •Lukk kassettdekselet. •Stäng luckan till kassetten. •Картридж есігін жабыңыз. 15 •Open tray 2. •Åbn bakke 2. •Avage salv 2. •Avaa lokero 2. •Atveriet otro tekni. •Atidarykite 2 d kl . •Åpne skuff 2. •Öppna fack 2. •2-науаны ашыңыз. 16 •Remove the cardboard. •Fjern pappet. •Eemaldage papist pakkematerjal. •Poista pahvi.
18 •Load the print media. •Ilæg udskriftsmedierne. •Sisestage prindikandja. •Lisää tulostusmateriaali. •Ievietojiet apdruk jamos materi lus. • d kite spausdinimo medžiagas. •Legg inn utskriftsmedia. •Lägg i utskriftsmaterialet. •Баспа қағаздарын салыңыз. 19 •Close tray 2. •Luk bakke 2. •Sulgege salv 2. •Sulje lokero 2. •Atveriet otro tekni. •Uždarykite 2 d kl . •Lukk skuff 2. •Stäng fack 2. •2-науаны жабыңыз. 20 •Connect the network cable to the device. •Sæt netværkskablet i enheden.
21 •(Optional) Connect the fax cable to the device. •(Valgfrit) Sæt faxkablet i enheden. •(Fakultatiivne) Ühendage faksijuhe seadmega. •(Valinnainen) Yhdistä faksikaapeli laitteeseen. •(papildu) Pievienojiet ier cei faksa kabeli. •Prijunkite fakso kabel prie renginio (pasirinktinai). •(Valgfritt) Koble fakskabelen til enheten. •(Valfritt) Anslut faxkabeln till enheten. •(Барлық модельдерде емес) Факс кабелін құрылғыға жалғаңыз.
•Set up the control panel. •Installer kontrolpanelet. •Juhtpaneeli seadistamine. •Määritä ohjauspaneelin asetukset. •Uzst diet vad bas paneli. •Nustatykite valdymo pult . •Konfigurere kontrollpanelet •Konfigurera kontrollpanelen. •Басқару панелін баптаңыз. 23 •Set language, date, time, and fax settings (if necessary). If prompted, select your language, the date, and the time. Follow the instructions on the control panel. •Vælg indstillinger for sprog, dato, klokkeslæt og evt. fax.
25 •Find the IP address. On the control panel, touch Network Address, and then touch Print to print the Jetdirect configuration page. The IP address is on the Jetdirect page, under “TCP/IP”. Note: You might need to assign an IP address depending on the type of network that is installed. See “Configure an IP address (if necessary)” on the next page, for more information. •Find IP-adressen. Tryk på Netværksadresse på kontrolpanelet, og tryk derefter på Udskriv for at udskrive Jetdirect-konfigurationssiden.
26 •Configure the IP address (if necessary). On the control panel, touch Administration. Scroll to and touch Initial Setup, and then touch Networking and I/O. Touch Embedded Jetdirect, touch TCP/IP, and then touch IPV4 Settings. Touch Manual Settings, and then enter the IP Address, Subnet Mask, and Default Gateway. •Konfigurer IP adressen (om nødvendigt). Tryk på Administration på kontrolpanelet. Rul til Startopsætning, og tryk derefter på Netværk og I/O.
•Install the software. •Installer softwaren. •Tarkvara installimine. •Asenna ohjelmisto. •Instal jiet programmat ru. • diekite programin rang . •Installere programvaren •Installera programvaran. •Бағдарламалық құралды орнатыңыз. •For Windows® software installation instructions, go to step 27. •Gå til trin 27 for at få en vejledning i installation af Windows®-software. •Kui teil on arvutis Windows®, minge tarkvarainstalli juhiste saamiseks 27. juhise juurde.
27 •Install software. 1) Insert the CD that came with the printer. 2) On the welcome screen, click Install Printer. The Setup Wizard appears. 3) Follow the on screen instructions. Note: If the welcome screen does not appear, click Start and then click Run. Type X:SETUP, where X corresponds to the CD-ROM drive letter, and then click OK. •Installer software. 1) Isæt den cd, der fulgte med printeren. 2) Klik på Installer printer på velkomstskærmbilledet. Guiden Installation vises.
29 •2) Place the CD in the CD-ROM drive and run the installer. Complete an easy install. •2) Sæt cd'en i cd-rom-drevet, og kør installationsprogrammet. Foretag en nem installation. •2) Sisestage CD CD-seadmesse ja käivitage installer. Viige install lõpule. •2) Aseta CD-levy CD-ROM-asemaan ja käynnistä asennusohjelma. Käy läpi helppo asennus. •2) Ievietojiet kompaktdisku CD-ROM diskdzin un palaidiet instal šanas programmu. Veiciet vienk ršo instal šanu.
31 •3) From Apple System Preferences (available on the Apple pull-down menu or in the dock), click the Print & Fax icon and then click the Printing tab at the top of the window. 4) To add your new printer, click the ‘+’ icon to launch the Printer Browser. By default, the Printer Browser shows printers that are connected through USB, Bonjour, or Appletalk networking.
32 •5) From the Printer Browser window, select the HP printer. For Mac OS X V10.4: If HP software is installed, the printer software should be automatically configured. 6) Click Add to create a printer queue. You are prompted to configure the installable options manually. Note: Mac OS X V10.2 and V10.3 might require you to manually select the printer model from the Printer Model drop-down list. 7) Under Model Name, select your device and click Add. •5) Vælg HP-printeren i vinduet med printerbrowseren.
33 •Test the software installation. Print a page from any program to make sure that the software is correctly installed. Note: If the installation failed, reinstall the software or see Troubleshooting at the end of this guide. •Test softwareinstallationen. Udskriv en side fra et vilkårligt program for at kontrollere, at softwaren er installeret korrekt. Bemærk! Installer softwaren igen, hvis installationen mislykkedes, eller se Fejlfinding i slutningen af denne vejledning.
35 •Register your device. Register at www.register.hp.com. This is the quickest and easiest way for you to register to receive the following information: technical support updates, enhanced support options, ideas for and ways to use your new HP device, and news about emerging technologies. •Registrer enheden. Register på www.register.hp.com. Det er den hurtigste og nemmeste måde at registrere på.
•Install the send fax driver. •Installer driveren til faxsending. •Faksisaatmise draiveri installimine. •Asenna faksin lähetysajuri. •Instal jiet faksa s t šanas draiveri. • diekite siuntimo fakso tvarkykl . •Installere driveren for sending av faks •Installera drivrutinen för faxsändning. •Факс жіберу жетегін орнатыңыз. 36 •Install send fax driver. If the fax driver was not installed in step 28, it can be installed now. 1) Insert the CD that came with the device.
•Set up the digital send features. •Konfigurer funktioner til digital sending. •Seadistage digitaalse saatmise funktsioonid. •Määritä digitaalisen lähetyksen ominaisuudet. •Iestatiet ciparu s t šanas funkciju. •Nustatykite skaitmeninio siuntimo priemones. •Konfigurere funksjoner for digital sending •Konfigurera de digitala sändningsfunktionerna. •Цифрлы жіберу мүмкіндіктерін баптаңыз. 37 •1) Open the web browser. 2) Input device IP address (found on configuration page). •1) Åbn webbrowseren.
39 •5) On the left navigation menu, select E-mail Settings. Input the SMTP server address, use the default From and Subject fields. Note: If you are using an ISP (Internet Service Provider) for internet access and e-mail, you may need to contact your ISP to obtain the SMTP server name, and to determine if you need to enter an account name and password for SMTP authentication. •5) Vælg E-mail-indstillinger i venstre navigationsmenu. Angiv SMTP-serveradressen i felterne Fra og Emne.
40 •6) On the left navigation menu, select E-mail Address Book, to enter frequently-used e-mail addresses and e-mail distribution lists. Note: The Fax Address Book and Fax Speed Dials is also located in the left navigation area. These two features allow you to manage frequently-used fax numbers and speed dial lists. •6) Vælg E-mail Adressekartotek i navigationsmenuen for at angive ofte benyttede e-mail-adresser og e-mail-distributionslister.
25
•Troubleshooting. •Tõrkeotsing. •Probl mu nov ršana. •Vianmääritys. •Feilsøking •Fejlfinding. •Felsökning. •Trikči šalinimas. •Ақаулықтарды табу жəне жөндеу. •Area. •Område. •Piirkond. •Alue. •Apgabals. •Sritis. •Område •Område. •Аймақ. •Symptom. •Symptom. •Tunnus. •Simptoms. •Požymis. •Symptom •Белгі. •Control-panel display. •Display på kontrolpanel. •Juhtpaneeli ekraan. •Ohjauspaneelin näyttö. •Vad bas pane a displejs. •Valdymo pulto ekranas.
•Buttons appear grey. •Make sure that the scanner lock is in the unlock position. •Turn off the device, and then turn it on again. •See page 6 for more information. •Knapperne er grå. •Kontroller, at scannerens låg er låst op. •Sluk enheden, og tænd den igen. •Se side 6 for at få flere oplysninger. •Nupud on hallid. •Veenduge, et skanneri lukk oleks vabastatud asendis. •Lülitage seade välja ja siis uuesti sisse. •Lisateavet vt lk 6. •Painikkeet ovat harmaita.
•Print. •Udskriv. •Printimine. •Tulostus. •Druk jiet. •Spausdinimas. •Utskrift •Skriv ut. •Басып шығару. •Not printing. •Check the network or USB cable. •If you are printing over a network, print a configuration page and make sure that the IP address is correct. •Reinstall the print driver. •Udskriver ikke. •Kontroller netværks- eller USB-kablet. •Udskriv en konfigurationsside, og kontroller, at IP-adressen er korrekt, hvis du udskriver via netværket. •Installer printerdriveren igen. •Seade ei prindi.
•Tukos. •Varmista, että oranssi pakkausteippi, pahvi ja oranssit kuljetuslukot on poistettu. •Varmista, että käytät tuettua tulostusmateriaalia. Katso lisätietoa CD-ROMlevyllä olevasta käyttöoppaasta. •Varmista, että tulostusmateriaali on ladattu oikein. •Iestr dzis pap rs. •Oranžajai iepakojuma lentei, kartonam un oranžajiem plastmasas sl giem, ko uzst da p rvietojot, j b t no emtiem. •J lieto piem roti apdruk jamie materi li. Lai sa emtu plaš ku inform ciju, skatiet lietot ja rokasgr matu kompaktdisk .
•Copy. •Kopier. •Paljundamine. •Kopiointi. •Kop jiet. •Kopijavimas. •Kopiering •Kopiera. •Көшіру. •Fax. •Fax. •Faks. •Faksi. •Veiciet faksa oper cijas. •Faksas. •Faks •Fax. •Факс. •Buttons appear grey. •Make sure that the scanner lock is in the unlock position. •Turn off the device, and then turn it on again. •Knapperne er grå. •Kontroller, at scannerlåsen er låst op. •Sluk enheden, og tænd igen. •Nupud on hallid. •Veenduge, et skanneri lukk oleks vabastatud asendis.
•No fax icon on the control-panel display. •Make sure that the fax card is installed in the formatter correctly, and that none of the pins are bent. •Print a configuration page and check the modem status. If “Operational/ Enabled” is not listed, it might be disabled or there might be a problem with the fax hardware. See the analog fax user guide for more information. •Intet faxikon på kontrolpanelets display. •Kontroller, at faxkortet er installeret rigtigt i processoren, og at benene ikke er bøjet.
•Fax configured but not sending fax (phone line not connected). •Make sure to use the phone cord that came with the device. •Make sure that the phone cord is connected securely to the device and to an active telephone port. Note: Use a telephone to verify that the port is active. •Faxen er konfigureret, men sender ikke fax (telefonlinjen er ikke tilsluttet). •Sørg for at bruge den telefonledning, der fulgte med enheden. •Kontroller, at telefonledningen sidder fast i enheden og et aktivt telefonstik.
•Fax configured but not receiving fax. •Make sure that a line splitter or surge-protection device is not being used. •Make sure that voice mail or an answering machine is not receiving the incoming fax before the device. Remove these, or set the device “rings-toanswer” to a lower number. •Make sure that a roll-over line is not being used, and that the fax is connected to a dedicated analog telephone line. •Faxen er konfiguret, men modtager ikke fax.
•E-mail. •E-mail. •E-post. •Sähköposti •E-pasts. •Elektroninis paštas. •E-post •E-post. •Электрондық пошта . •Digital sending tab in the embedded Web server (EWS) does not appear. •An administrative password might be configured. Select Log On in the upper right corner of the EWS. •Fanen Digital sending vises ikke på den integrerede webserver (EWS). •Der er muligvis konfigureret en administrativ adgangskode. Vælg Log på i øverste højre hjørne af EWS'en.
•M inot s t t e-pastu, vad bas pane a displej redzams zi ojums E-mail Gateway Not Responding (E-pasta v rteja neatbild). •1) Iesp jams, nepareizi nor d ta SMTP v rtejas adrese. Sazinieties ar IT administratoru, lai uzzin tu pareizo adresi. 2) Ja izmantojat interneta pakalpojumu sniedz ja e-pasta kontu, sazinieties ar pakalpojumu sniedz ju, lai noskaidrotu SMTP v rtejas hostdatora rekviz tus (pieprasiet pilno dom na nosaukumu (FQDN), nevis IP adresi).
•Avsenderadressen kan ikke endres i Send E-mail (Send e-post). •Funksjonen "Prevent Device User from changing the e-mail address" (Hindre bruker i å endre e-postadresse) kan være valgt, eller "Device Authentication"(Enhetsgodkjenning) er aktivert. •”Från”-adressen kan inte ändras i Skicka e-post. •Funktionen för att förhindra enhetsanvändare från att ändra epostadressen i den inbäddade webbservern kan ha markerats eller så är enhetsverifiering aktiverat.
•Other. •Andet. •Muu. •Muu. •Citas. •Kita. •Annet •Annat. •Басқа •A “job failed” message is received with a document is scanned and sent to e-mail. •1) Send a test e-mail to make sure that the e-mail address is correct. 2) Make sure that the scanned document does not exceed your SMTP gateway’s maximum allowable attachment size. If it does, use the EWS to change the size by selecting Digital Sending and Send to E-mail.
© 2006 Hewlett-Packard Development Company, L.P. www.hp.