HP LaserJet M4345 MFP Getting Started Guide Guide de mise en route Guía de instalación inicial Guia de introdução Lea esto primero
Copyright and License © 2007 Copyright Hewlett-Packard Development Company, L.P. Copyright et licence © 2007 Copyright Hewlett-Packard Development Company, L.P. Reproduction, adaptation or translation without prior written permission is prohibited, except as allowed under the copyright laws. La reproduction, l’adaptation ou la traduction de ce document sans autorisation écrite préalable est interdite, sauf dans les cas autorisés par les lois sur le copyright.
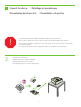
•Overview •Généralités •Generalidades •Visão geral •Prepare the site. •Préparation du site. •Unpack the device. •Déballage du périphérique. •Prepare the hardware. •Préparation du matériel. •Set up the control panel. •Desembalaje del dispositivo. •Preparación del hardware. •Desembalar o dispositivo. •Preparar o hardware. •Configurar o painel de controle. •Installation du logiciel. •Install the send fax driver. •Instalación del software. •Instalar o software.
•Prepare the site •Préparation du site •Preparación de la ubicación 1 •Preparar o site •Select a well-ventilated, dust-free area to position the device. •Choisissez une zone correctement ventilée et exempte de poussière pour installer le périphérique. •Elija una zona con buena ventilación y que no contenga polvo para colocar el dispositivo. •Selecione uma área bem ventilada e sem poeira para posicionar o dispositivo.
•Unpack the device. •Déballage du périphérique. •Desembalaje del dispositivo. ! 2 •Desembalar o dispositivo. •Use this guide for the full accessory installation. Disregard the individual guides in the product boxes. •Suivez ce guide pour installer tous les accessoires. Ignorez les guides se trouvant dans les différents cartons du produit. • Utilice esta guía para la instalación completa de los accesorios. No tenga en cuenta las guías específicas que se incluyen dentro de las cajas de los productos.
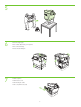
3 •Unpack the MFP. •Déballez le MFP. •Desembale el MFP. •Desembale a MFP. 4 •Remove the packaging. •Retirez l’emballage. •Retire el material de embalaje. •Remova a embalagem.
5 6 •Remove the shipping tape. •Retirez le ruban adhésif utilisé pour l’expédition. •Retire la cinta de embalaje. •Remova a fita da embalagem. 7 •Install the output bin. •Installez le bac de sortie. •Instale la bandeja de salida. •Instale o compartimento de saída.
•You are done unpacking the device. Now proceed to the next step: Preparing the hardware. ! •Le déballage du périphérique est terminé. Passez maintenant à l’étape suivante : Préparation du matériel. •Ya ha desembalado el dispositivo. Ahora, continúe en el paso siguiente: Preparación del hardware. •Você acabou de desembalar o dispositivo. Agora vá para a próxima etapa: Preparar o hardware.
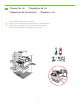
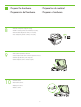
•Prepare the hardware. •Préparation du matériel. •Preparación del hardware. •Preparar o hardware. 8 •Attach the control panel overlay (if necessary). •Installez le cache du panneau de commande (si nécessaire). •Instale la cubierta del panel de control (si es necesario). •Cole o decalque do painel de controle (se necessário). 9 •Lift the scanner lid and remove the foam. •Soulevez le panneau du scanner et retirez la protection en mousse. •Levante la tapa del escáner y retire la espuma.
11 •Lift the cartridge door and remove the foam. •Soulevez la porte d’accès à la cartouche et retirez la protection en mousse. •Levante la tapa del cartucho y retire la espuma. •Levante a porta do cartucho e remova a espuma. 12 •Remove the toner cartridge packaging. •Retirez l’emballage de la cartouche d’impression. •Retire el material de embalaje del cartucho de tóner. •Remova a embalagem do cartucho de toner. 13 •Install the cartridge. •Installez la cartouche. •Instale el cartucho.
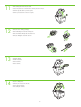
15 16 17 18 •Open tray 2. •Ouvrez le bac 2. •Abra la bandeja 2. •Abra a bandeja 2. •Remove the cardboard. •Retirez le carton. •Retire el cartón. •Remova a cartolina. •Adjust the paper guides. •Réglez les guides du papier. •Ajuste las guías de papel. •Ajuste as guias de papel. •Load the print media. •Chargez le support d’impression. •Cargue el soporte de impresión. •Carregue a mídia de impressão.
19 20 •Close tray 2. •Fermez le bac 2. •Cierre la bandeja 2. •Feche a bandeja 2. •Connect the network cable to the device. •Connectez le câble réseau au périphérique. •Conecte el cable de red al dispositivo. •Conecte o cabo da rede ao dispositivo. •Note: If connecting a USB cable, see step 27. •Remarque : Si vous connectez un câble USB, reportez-vous à l’étape 27. •Nota: Si va a conectar un cable USB, consulte el paso 27. •Nota: Para conectar um cabo USB, consulte a etapa 27.
! •You are done preparing the hardware. Proceed with: Set up the control panel. •La préparation du matériel est terminée. Etape suivante : Configuration du panneau de commande. •Ya ha preparado el hardware. Continúe en: Configuración del panel de control. •Você acabou de preparar o hardware. Continue com: Configurar o painel de controle.
•Set up the control panel. •Configuration du panneau de commande. •Configuración del panel de control. •Configurar o painel de controle. 23 • Set language, date, time, and fax settings (if necessary). If prompted, select your language, the date, and the time. Follow the instructions on the control panel. • Paramétrage de la langue, de la date, de l’heure et des paramètres de télécopie (si nécessaire). Si un message vous le demande, sélectionnez votre langue, la date et l’heure.
25 • Find the IP address. On the control panel, touch Network Address, and then touch Print to print the Jetdirect configuration page. The IP address is on the Jetdirect page, under “TCP/IP”. Note: You might need to assign an IP address depending on the type of network that is installed. See “Configure an IP address (if necessary)” on the next page, for more information. • Recherche de l’adresse IP.
! •You are done with the setup of the control panel. Now move to your computer and proceed with: Install the software. •La configuration du panneau de commande est terminée. Passez sur votre ordinateur et effectuez l’étape suivante : Installation du logiciel. •Ha finalizado la configuración del panel de control. Ahora, desplácese hasta su equipo y continúe en: Instalación del software. •Você acabou de configurar o painel de controle. Agora vá para o computador e continue com: Instalar o software.
•Install the software. •Installation du logiciel. •Instalación del software. •Instalar o software. •For Windows® software installation instructions, go to step 27. •Pour toute instruction d’installation du logiciel pour Windows®, reportez-vous à l’étape 27. •Para la instalación de software de Windows®, vaya al paso 27. •Para obter instruções sobre a instalação de software Windows®, vá para a etapa 27. •For Macintosh software installation instructions, go to step 29.
27 • Install software. 1) Insert the CD that came with the printer. 2) On the welcome screen, click Install Printer. The Setup Wizard appears. 3) Follow the on screen instructions. Note: If the welcome screen does not appear, click Start and then click Run. Type X:SETUP, where X corresponds to the CD-ROM drive letter, and then click OK. • Installation du logiciel. 1) Insérez le CD fourni avec l’imprimante. 2) Sur l’écran d’accueil, cliquez sur Installer une imprimante.
29 •2) Place the CD in the CD-ROM drive and run the installer. Complete an easy install. •2) Placez le CD dans le lecteur de CD-ROM et lancez le programme d’installation. Exécutez une installation standard. •2) Inserte el CD en la unidad de CD-ROM y ejecute el instalador. Realice una instalación sencilla. •2) Coloque o CD na unidade de CD-ROM e execute o instalador. Conclua uma instalação fácil. 30 • Connect to a Macintosh computer. 1) Connect a USB cable between the device and the computer.
31 • 3) From Apple System Preferences (available on the Apple pull-down menu or in the dock), click the Print & Fax icon and then click the Printing tab at the top of the window. 4) To add your new printer, click the ‘+’ icon to launch the Printer Browser. By default, the Printer Browser shows printers that are connected through USB, Bonjour, or Appletalk networking.
34 • Congratulations!. The device is ready to use. The user guide is located on the CD and in the HP Easy Printer Care Software. Note: Save the boxes and the packing material in case you need to transport the device. • Félicitations ! Le périphérique est prêt à être utilisé. Le Guide de l’utilisateur se trouve sur le CD et dans le logiciel HP Easy Printer Care. Remarque : Conservez les cartons et le matériel d’emballage dans le cas où vous devriez transporter votre périphérique. • ¡Enhorabuena!.
! •You are done installing your software. Congratulations! You are ready to use your HP printer. •L’installation du logiciel est terminée. Félicitations ! Vous pouvez maintenant utiliser votre imprimante HP. •El software está instalado. ¡Enhorabuena! Ya puede utilizar su impresora HP. •Você acabou de instalar o software. Parabéns! Você está pronto para usar a impressora HP.
•Install the send fax driver. •Installation du pilote d’envoi du télécopieur. •Instalación del controlador para envío de faxes. •Instalar o driver de envio de fax. 36 • Install send fax driver. If the fax driver was not installed in step 28, it can be installed now. 1) Insert the CD that came with the device. 2) On the welcome screen, click Install Printer. The setup wizard appears. 3) Choose the “custom” install option, and select the Send Fax Driver in the installation options.
•Set up the digital send features. •Configuration des fonctions d’envoi numérique. •Configuración de las funciones de envío digital. •Configure os recursos de envio digitais. 37 Before setting up the digital send features, you must have the following: • The host name or IP address of the simple mail transfer protocol (SMTP) e-mail server that will send e-mail from the product.
38 •1) Open the web browser. 2) Input device IP address (found on configuration page). •1) Ouvrez le navigateur Web. 2) Entrez l’adresse IP du périphérique (se trouvant sur la page de configuration). •1) Abra el explorador Web. 2) Especifique la dirección IP del dispositivo (se encuentra en la página de configuración). •1) Abra o navegador da Web. 2) Especifique o endereço IP do dispositivo (encontrado na página de configuração). 39 •3) Select the Digital Sending tab.
40 •5) On the left navigation menu, select E-mail Settings. Input the SMTP server address, use the default From and Subject fields. Note: If you are using an ISP (Internet Service Provider) for internet access and e-mail, you may need to contact your ISP to obtain the SMTP server name, and to determine if you need to enter an account name and password for SMTP authentication. •5) Dans le menu de navigation de gauche, sélectionnez Paramètres de courrier électronique.
42 •7) To scan a document to your PC or network share folder, use the Send To Folder option (on the left navigation bar) to set up one or more folder destinations. For more information on configuring Send to Folder, consult the Embedded Web Server (EWS) User Guide. Note: See www.hp.com/support for more information about the digital send features.
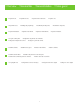
•Troubleshooting. •Dépannage. •Solución de problemas. •Solução de problemas. •Area. •Zone. •Área. •Área. •Control-panel display. •Symptom. •Symptôme. •Síntoma. •Sintoma. •Blank. • Make sure that the power cable is connected to a working power outlet. See page 10 for more information. • Make sure that the device is turned on. See page 10 for more information. •Turn off the device, reset the formatter, and then turn on the device. •Pas d’affichage.
•Load letter/A4 error message. • Make sure that the media is loaded long-edge leading (with the shortedge toward you. •Message d’erreur de chargement Lettre/A4. • Assurez-vous que le support est chargé dans le sens du bord le plus long (le bord le plus court étant orienté vers vous). •Mensaje de error de carga de papel tamaño carta/A4. • Asegúrese de que los soportes se cargan con el borde largo hacia delante (el borde corto orientado hacia usted). •Mensagem de erro Carregar carta/A4.
•Print. •Not printing. •Check the network or USB cable. • If you are printing over a network, print a configuration page and make sure that the IP address is correct. •Reinstall the print driver. •Aucune impression. •Vérifiez le réseau ou le câble USB. • Si vous imprimez par l’intermédiaire d’un réseau, imprimez une page de configuration et assurez-vous que l’adresse IP est correcte. •Réinstallez le pilote de l’imprimante. •No imprime. •Compruebe el cable USB o el cable de red.
•Blank pages. •Make sure that the pull tape is removed from the print cartridge. •Pages blanches. • Assurez-vous que la languette adhésive est retirée de la cartouche d’impression. •Páginas en blanco. •Compruebe que se ha retirado la cinta del cartucho de impresión. •Páginas em branco. •Verifique se a fita foi removida do cartucho de impressão. •Buttons appear grey. •Make sure that the scanner lock is in the unlock position. •Turn off the device, and then turn it on again.
•No fax icon on the control-panel display. • Make sure that the fax card is installed in the formatter correctly, and that none of the pins are bent. • Print a configuration page and check the modem status. If “Operational/ Enabled” is not listed, it might be disabled or there might be a problem with the fax hardware. See the analog fax user guide for more information. • Aucune icône de télécopieur ne s’affiche sur le panneau de commande.
• Fax configured, but having difficulty connecting or completing the fax call (fax line quality). •Try setting the baud rate to 9600 and retry the call. •Try turning JBIG off. • Fax configuré mais il rencontre des difficultés pour se connecter ou pour terminer l’appel (qualité de la ligne de télécopie). •Essayez de régler le débit en bauds sur 9 600 et relancez l’appel. •Essayez de désactiver JBIG.
•E-mail. •Courrier électronique. •Correo electrónico. •E-mail. • Digital sending tab in the embedded Web server (EWS) does not appear. • An administrative password might be configured. Select Log On in the upper right corner of the EWS. • L’onglet Envoi numérique du serveur Web intégré ne s’affiche pas. • Vous devez peut-être configurer un mot de passe d’administration. Sélectionnez Log On (Connexion) en haut à droite du serveur Web intégré.
•Other. • You want to scan and send-to-email in black and white TIFF format. • Use the EWS to change the default image file format by selecting Digital Sending, Send to E-mail, and Advanced. • Vous voulez numériser et envoyer par courrier électronique un document en format TIFF en noir et blanc. • Utilisez le serveur Web intégré pour modifier le format de fichier image par défaut en sélectionnant Digital Sending (Envoi numérique), Send to E-mail (Envoyer par courrier électronique) et Advanced (Avancé).
© 2007 Hewlett-Packard Development Company, L.P. www.hp.