HP LaserJet M4345 MFP Getting Started Guide Vodič za početak rada Úvodní p íručka Használati útmutató Podr czna instrukcja obsługi Ghid de pornire Úvodná príručka Priročnik »Prvi koraki«
Copyright and License © 2006 Copyright Hewlett-Packard Development Company, L.P. Reproduction, adaptation or translation without prior written permission is prohibited, except as allowed under the copyright laws. The information contained herein is subject to change without notice. The only warranties for HP products and services are set forth in the express warranty statements accompanying such products and services. Nothing herein should be construed as constituting an additional warranty.
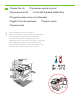
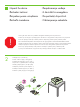
•Pregled •Overview •P ehled •Pripremanje mjesta za pisač. •Przygotowywanie miejsca u ytkowania •Rozpakowywanie urz dzenia •Rozbalení za ízení •Despacheta i dispozitivul. •Przygotowywanie urz dzenia •Pripravte miesto. •Preg ti i locul de amplasare. •Pripremanje uređaja. •Prepare the hardware. •A készülék helyének el készítése •P íprava pracovišt •Raspakiravanje uređaja. •Unpack the device. •P íprava hardwaru •Odstranjevanje embalaže. •A hardver el készítése •Pripravte hardvér.
•Prepare the site •P íprava pracovišt •Pripremanje mjesta za pisač. •A készülék helyének el készítése •Przygotowywanie miejsca u ytkowania •Preg ti i locul de amplasare •Pripravte miesto. •Priprava mesta 1 •Select a well-ventilated, dust-free area to position the device. •Izaberite dobro prozračan prostor u kojem nema prašine za postavljanje uređaja. •Pro umíst ní za ízení vyberte dob e odv trávanou a bezprašnou oblast. •A készülék elhelyezéséhez jól szell z , pormentes helyiséget válasszon.
•Unpack the device. •Raspakiravanje uređaja. •Rozbalení za ízení •A készülék kicsomagolása •Rozpakowywanie urz dzenia •Despacheta i dispozitivul. •Rozba te zariadenie. •Odstranjevanje embalaže. •Use this guide for the full accessory installation. Disregard the individual guides in the product boxes. •Koristite ovaj vodič za potpuno postavljanje pribora. Ne obazirući se na pojedinačne vodiče priložene u kutiji sa priborom. ! •Pomocí této p íručky prove te úplnou instalaci p íslušenství.
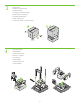
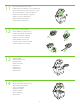
3 •Unpack the MFP. •Raspakirajte višenamjenski uređaj. •Rozbalte za ízení MFP. •Csomagolja ki a többfunkciós készüléket. •Rozpakuj urz dzenie wielofunkcyjne. •Despacheta i echipamentul MFP. •Rozba te zariadenie MFP. •Odstranjevanje embalaže z večnamenske naprave. 4 •Remove the packaging. •Uklonite ambalažu. •Odstra te obalový materiál. •Távolítsa el a csomagolást. •Usu opakowanie. •Înl tura i ambalajul. •Odstrá te baliaci materiál. •Odstranite embalažo.
5 6 •Remove the shipping tape. •Uklonite zaštitne trake. •Odstra te p epravní pásku. •Távolítsa el a rögzít szalagot. •Usu ta m zabezpieczaj c . •Înl tura i banda de protec ie la transport. •Odstrá te prepravnú pásku. •Odstranite zaščitne trakove. 7 •Install the output bin. •Postavite izlaznu ladicu. •Nainstalujte výstupní p ihrádku. •Helyezze be a kimeneti tálcát. •Zainstaluj pojemnik wyj ciowy. •Instala i tava de ieşire. •Nainštalujte výstupný zásobník. •Namestite izhodni pladenj.
•You are done unpacking the device. Now proceed to the next step: Preparing the hardware. •Završili ste sa raspakiravanjem uređaja. Nastavite sa sljedećim korakom: Pripremanje uređaja. ! •Práv jste dokončili rozbalení za ízení. Pokračujte dalším krokem: P íprava hardwaru •Befejezte a készülék kicsomagolását. Folytassa a következ lépéssel: A hardver el készítése. •Zako czono rozpakowywanie urz dzenia. Przejd teraz do nast pnego kroku: Przygotowywanie urz dzenia.
•Prepare the hardware. •Pripremanje uređaja. •P íprava hardwaru •A hardver el készítése •Przygotowywanie urz dzenia •Preg ti i hardware-ul. •Pripravte hardvér. •Priprava strojne opreme. 8 •Attach the control panel overlay (if necessary). •Zakačite masku upravljačke ploče (ako je potrebno). •P ipevn te p ekryvný segment ovládacího panelu (v p ípad pot eby). •Ha szükséges, helyezze fel a kezel panel borítását. •Zamocuj nakładk panelu sterowania (je li to konieczne).
11 •Lift the cartridge door and remove the foam. •Podignite vrata za pristup spremniku s tonerom i odstranite zaštitu. •Zvedn te dví ka pro p ístup ke kazet a vyjm te p novou výpl . •Nyissa fel a kazetta ajtaját, és távolítsa el a habszivacsot. •Podnie drzwiczki kasety drukuj cej i wyjmij piank . •Ridica i uşa cartuşului şi înl tura i buretele. •Zdvihnite dvierka kazety a vyberte penu. •Odprite tiskalnik in odstranite stiropor. 12 •Remove the toner cartridge packaging.
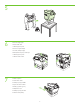
15 •Open tray 2. •Otvorite 2. ladicu. •Otev ete zásobník 2. •Nyissa ki a 2. tálcát. •Otwórz podajnik 2. •Deschide i tava 2. •Otvorte zásobník 2. •Odprite 2. pladenj. 16 •Remove the cardboard. •Uklonite karton. •Odstra te kartónovou výpl . •Távolítsa el a kartonpapírt. •Wyjmij tektur . •Scoate i cartonul. •Vyberte kartón. •Odstranite karton. 17 •Adjust the paper guides. •Podesite vodilice za papir. •Upravte polohu vodítek papíru. •Állítsa be a papírvezet ket. •Dostosuj prowadnice papieru.
19 •Close tray 2. •Zatvorite 2. ladicu. •Zav ete zásobník 2. •Csukja be a 2. tálcát. •Zamknij podajnik 2. •Închide i tava 2. •Zatvorte zásobník 2. •Zaprite 2. pladenj. 20 •Connect the network cable to the device. •Priključite mrežni kabel na uređaj. •P ipojte k za ízení sít'ový kabel. •Csatlakoztassa a hálózati kábelt a készülékhez. •Podł cz kabel sieciowy do urz dzenia. •Conecta i cablul de re ea la dispozitiv. •Pripojte k zariadeniu siet'ový kábel. •Priključite omrežni kabel v napravo.
•You are done preparing the hardware. Proceed with: Set up the control panel. ! •Završili ste sa pripremom uređaja. Nastavite na: Postavljanje upravljačke ploče. •Práv jste dokončili p ípravu hardwaru. Pokračujte akcí: Nastavení ovládacího panelu •Befejezte a hardver el készítését. Folytassa a következ vel: A kezel panel beállítása. •Zako czono przygotowywanie urz dzenia. Przejd do kroku: Ustawianie panelu sterowania. •A i terminat preg tirea hardware-ului. În continuare: Instala i panoul de control.
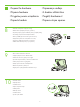
•Set up the control panel. •Postavljanje upravljačke ploče. •Nastavení ovládacího panelu •A kezel panel beállítása •Ustawianie panelu sterowania •Instala i panoul de control. •Nastavte ovládací panel. •Nastavljanje nadzorne plošče. 23 •Set language, date, time, and fax settings (if necessary). If prompted, select your language, the date, and the time. Follow the instructions on the control panel. •Postavite jezik, datum, vrijeme i postavke faksa (ako je potrebno).
25 •Find the IP address. On the control panel, touch Network Address, and then touch Print to print the Jetdirect configuration page. The IP address is on the Jetdirect page, under “TCP/IP”. Note: You might need to assign an IP address depending on the type of network that is installed. See “Configure an IP address (if necessary)” on the next page, for more information. •Traženje IP adresu.
26 •Configure the IP address (if necessary). On the control panel, touch Administration. Scroll to and touch Initial Setup, and then touch Networking and I/O. Touch Embedded Jetdirect, touch TCP/IP, and then touch IPV4 Settings. Touch Manual Settings, and then enter the IP Address, Subnet Mask, and Default Gateway. •Konfiguriranje IP adrese (ako je potrebno). Na upravljačkoj ploči dodirnite Administration (Administracija).
•You are done with the setup of the control panel. Now move to your computer and proceed with: Install the software. ! •Završili ste sa postavljanjem upravljačke ploče. Primaknite se vašem računalu i nastavite na: Instaliranje softvera. •Práv jste dokončili nastavení ovládacího panelu. P esu te se k počítači a pokračujte částí: Instalace softwaru •Befejezte a kezel panel beállítását. Ezután a számítógépen folytassa a következ lépéssel: A szoftver telepítése. •Zako czono ustawianie panelu sterowania.
•Install the software. •Instaliranje softvera. •Instalace softwaru •A szoftver telepítése •Instalowanie oprogramowania •Instala i software-ul. •Nainštalujte softvér. •Nameščanje programske opreme. •For Windows® software installation instructions, go to step 27. •Za upute za instaliranje softvera za Windows , idite na 27. korak. •Pokyny pro instalaci softwaru v systému Windows naleznete na stran 27. •Windows rendszer használata esetén a szoftvertelepítési utasításokat a 27. lépésnél találja.
27 •Install software. 1) Insert the CD that came with the printer. 2) On the welcome screen, click Install Printer. The Setup Wizard appears. 3) Follow the on screen instructions. Note: If the welcome screen does not appear, click Start and then click Run. Type X:SETUP, where X corresponds to the CD-ROM drive letter, and then click OK. •Instaliranje softvera. 1) Umetnite CD priložen uz pisač. 2) Na pozdravnom zaslonu, kliknite Install Printer (Instalacija pisača).
29 •2) Place the CD in the CD-ROM drive and run the installer. Complete an easy install. •2) Umetnite CD u CD-ROM pogon i pokrenite instalaciju. Dovršite jednostavnu instalaciju. •2) Vložte disk CD do jednotky CD-ROM a spust'te instalační program. Dokončete jednoduchou instalaci. •2. Helyezze a CD-lemezt a CD-meghajtóba, és futtassa a telepít t. Végezzen egyszer telepítést. •2) Włó dysk CD do nap du CD-ROM i uruchom instalatora. Wykonaj łatw instalacj .
31 •3) From Apple System Preferences (available on the Apple pull-down menu or in the dock), click the Print & Fax icon and then click the Printing tab at the top of the window. 4) To add your new printer, click the ‘+’ icon to launch the Printer Browser. By default, the Printer Browser shows printers that are connected through USB, Bonjour, or Appletalk networking.
32 •5) From the Printer Browser window, select the HP printer. For Mac OS X V10.4: If HP software is installed, the printer software should be automatically configured. 6) Click Add to create a printer queue. You are prompted to configure the installable options manually. Note: Mac OS X V10.2 and V10.3 might require you to manually select the printer model from the Printer Model drop-down list. 7) Under Model Name, select your device and click Add.
34 •Congratulations! The device is ready to use. The user guide is located on the CD and in the HP Easy Printer Care Software. Note: Save the boxes and the packing material in case you need to transport the device. •Čestitamo! Uređaj je spreman za korištenje. Korisnički priručnik se nalazi na CD-u, te u HP Easy Printer Care Software (HP softver za jednostavno održavanje pisača). Napomena: Sačuvajte kutije i ostalu ambalažu ako budete morali negdje prenositi uređaj. •Blahop ejeme.
•You are done installing your software. Congratulations! You are ready to use your HP printer. ! •Završili ste sa instaliranjem softvera. Čestitamo! Sada možete koristit vaš HP pisač. •Práv jste dokončili instalaci softwaru. Blahop ejeme. Tiskárna HP je p ipravena k použití. •Befejezte a szoftver telepítését. Gratulálunk! Készen áll a HP nyomtató használatára. •Zako czono instalowanie oprogramowania. Gratulacje! Drukarka firmy HP jest gotowa do u ycia. •A i terminat instalarea software-ului.
•Install the send fax driver. •Instaliranje upravljačkog programa za slanje faksa. •Instalace ovladače pro odesílání fax •A faxküld illeszt program telepítése •Instalowanie sterownika wysyłania faksów •Instala i driverul de trimitere a faxurilor. •Nainštalujte ovládač na odosielanie faxov. •Nameščanje gonilnika za pošiljanje faksov. 36 •Install send fax driver. If the fax driver was not installed in step 28, it can be installed now. 1) Insert the CD that came with the device.
•Set up the digital send features. •Postavljanje značajki digitalnog slanja. •Nastavení funkcí digitálního odesílání •A digitális küldési funkciók beállítása •Konfigurowanie funkcji dystrybucji cyfrowej •Instala i caracteristicile de trimitere digital . •Nastavte funkcie digitálneho odosielania. •Nameščanje funkcij digitalnega pošiljanja. 37 •1) Open the web browser. 2) Input device IP address (found on configuration page). •1) Otvorite web preglednik.
39 •5) On the left navigation menu, select E-mail Settings. Input the SMTP server address, use the default From and Subject fields. Note: If you are using an ISP (Internet Service Provider) for internet access and e-mail, you may need to contact your ISP to obtain the SMTP server name, and to determine if you need to enter an account name and password for SMTP authentication. •5) Na lijevom navigacijskom izborniku izaberite E-mail Settings (Postavke e-pošte).
41 •7) To scan a document to your PC or network share folder, use the Send To Folder option (on the left navigation bar) to set up one or more folder destinations. For more information on configuring Send to Folder, consult the Embedded Web Server (EWS) User Guide. Note: See www.hp.com/support for more information about the digital send features.
•Rješavanje problema. •Troubleshooting. •Hibaelhárítás •Rozwi zywanie problemów •Riešenie problémov. •Area. •Odstra ování potíží •Depanare. •Odpravljanje težav. •Obszar •Zon . •Oblast'. •Kje. •Symptom. •Simptom. •P íznaky •Jelenség •Symptom •Simptom. •Príznak. •Znak. •Control-panel display. •Blank. •Make sure that the power cable is connected to a working power outlet. See page 10 for more information. •Make sure that the device is turned on. See page 10 for more information.
•Print. •Buttons appear grey. •Make sure that the scanner lock is in the unlock position. •Turn off the device, and then turn it on again. •See page 7 for more information. •Gumbi su sivi. •Provjerite da li je blokada skenera u otključanoj poziciji. •Isključite uređaj, te ga ponovno uključite. •Za više informacija pogledajte stranicu 7. •Tlačítka se zobrazují šed . •Zkontrolujte, zda je zámek skeneru v odemčené poloze. •Vypn te za ízení a potom je znovu zapn te. •Další informace naleznete na stran 7.
•Nu se imprim . •Verifica i cablul de re ea sau cablul USB. •Dac imprima i în cadrul unei re ele, imprima i o pagin de configura ie şi asigura i-v c adresa IP este corect . •Reinstala i driverul de imprimant . •Netlačí sa. •Skontrolujte siet'ový kábel alebo kábel USB. •Ak tlačíte cez siet', vytlačte konfiguračnú stránku a skontrolujte, či je adresa IP správna. •Preinštalujte ovládač tlačiarne. •Ne tiska. •Preverite omrežni kabel ali kabel USB.
•Blank pages. •Make sure that the pull tape is removed from the print cartridge. •Prazne stranice. •Provjerite da li je zaštitna traka maknuta sa spremnika za ispis. •Prázdné stránky •Zkontrolujte, zda je z tiskové kazety odstran na odnímatelná páska. •Üres oldalak. •Ellen rizze, hogy eltávolította-e a lehúzható véd szalagot a festékkazettáról. •Puste strony •Sprawd , czy z kasety drukuj cej wyj to cał ta m zabezpieczaj c . •Pagini goale.
•No fax icon on the control-panel display. •Make sure that the fax card is installed in the formatter correctly, and that none of the pins are bent. •Print a configuration page and check the modem status. If “Operational/ Enabled” is not listed, it might be disabled or there might be a problem with the fax hardware. See the analog fax user guide for more information. •Na zaslonu upravljačke ploče nema ikone za faks.
•Fax configured but not sending fax (phone line not connected). •Make sure to use the phone cord that came with the device. •Make sure that the phone cord is connected securely to the device and to an active telephone port. Note: Use a telephone to verify that the port is active. •Faks je konfiguriran ali ne šalje fakse (telefonska linija nije priključena). Provjerite da li koristite telefonski kabel priložen uz uređaj.
•Fax configured but not receiving fax. •Make sure that a line splitter or surge-protection device is not being used. •Make sure that voice mail or an answering machine is not receiving the incoming fax before the device. Remove these, or set the device “rings-toanswer” to a lower number. •Make sure that a roll-over line is not being used, and that the fax is connected to a dedicated analog telephone line. •Faks je konfiguriran ali ne prima fakse.
•E-mail. •E-pošta. •E-mail •E-mail •Poczta elektroniczna •E-mail. •E-mail. •Pri pošiljanju e-pošte. •Digital sending tab in the embedded Web server (EWS) does not appear. •An administrative password might be configured. Select Log On in the upper right corner of the EWS. •Kartica za digitalno slanje u ugrađenom web poslužitelju (EWS) se ne prikaže. •Možda je administrativna lozinka konfigurirana. Izaberite u gornjem desnom kutu ugrađenog web poslužitelja Log On (Upis).
•E-mail Gateway Not Responding (Gateway-ul de e-mail nu r spunde) apare pe afişajul panoului de control la încercarea de a trimite un mesaj de e-mail. •1) Este posibil ca adresa de gateway SMTP s fie incorect . Contacta i administratorul IT pentru a ob ine adresa corect . 2) DAC utiliza i un furnizor de servicii internet (ISP) pentru e-mail, contacta i furnizorul ISP pentru numele de gazd al gateway-ului SMTP (cere i numele de domeniu complet (FQDN), nu adresa IP).
•You want to scan and send-to-email in black and white TIFF format. •Use the EWS to change the default image file format by selecting Digital •Želite skenirati i slati na e-poštu u crno-bijelom TIFF zapisu. •Pomoću ugrađenog web poslužitelja promijenite zadani zapis za slike izborom Digital Sending (Digitalno slanje), Send to E-mail (Slanje na epoštu), i Advanced (Napredno). •Chcete naskenovat černobílý obraz ve formátu TIFF a odeslat jej do e-mailu.
•Other. •A „Feladat sikertelen” üzenet jelenik meg a dokumentum beolvasásakor és e-mailben való küldésekor. •1. Az e-mail cím ellen rzéséhez küldjön egy e-mailt. 2. Ellen rizze, hogy a beolvasott dokumentum mérete nem haladja-e meg az SMTP-átjárón keresztül küldhet mellékletek maximális méretét. Ha igen, a beépített webszerver segítségével módosítsa a melléklet méretét: válassza a Digital Sending (Digitális küldés) és a Send to E-mail (Küldés e-mailben) lehet séget.
© 2006 Hewlett-Packard Development Company, L.P. www.hp.