HP LaserJet M4345 MFP Getting Started Guide µ Başlangıç Kılavuzu
Copyright and License © 2006 Copyright Hewlett-Packard Development Company, L.P. Reproduction, adaptation or translation without prior written permission is prohibited, except as allowed under the copyright laws. The information contained herein is subject to change without notice. The only warranties for HP products and services are set forth in the express warranty statements accompanying such products and services. Nothing herein should be construed as constituting an additional warranty.
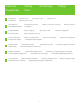
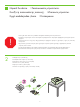
•Overview • •Genel bakış •'! • • µ . •Prepare the site. • ! . •Yeri hazırlayın. • ! " . • . •Aygıtı ambalajından çıkarın. • . •Prepare the hardware. • . •Donanımı hazırlayın. • & . •Set up the control panel. • . •Yazılımı yükleyin. •% • . •Set up digital send.
•Prepare the site • ! • µ • $ ! . •Yeri hazırlayın • ! " . 1 •Select a well-ventilated, dust-free area to position the device. • ( ! , . • µ " µ , # . •% $ ( ! ! $ ! ! # . •Aygıtı yerleştirmek için iyi havalandırılan, tozlanmayan bir alan seçin.
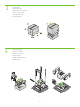
•Unpack the device. • . •$ . • . •Aygıtı ambalajından çıkarın. • . •Use this guide for the full accessory installation. Disregard the individual guides in the product boxes. ! • 1 . . •& µ # .
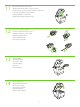
3 •Unpack the MFP. • MFP. • MFP . • MFP. •MFP'yi kutusundan çıkarın. • 4 . •Remove the packaging. • . •$ . •2 ! . •Ambalaj malzemelerini çıkarın. •) $ .
5 6 •Remove the shipping tape. • ! . •$ . •2 ! & . •Taşıma sırasında kullanılan bantları çıkarın. •) $ $ . 7 •Install the output bin. • # . • . •% ! . •Çıkış bölmesini takın. •% $ .
•You are done unpacking the device. Now proceed to the next step: Preparing the hardware. •) ! & . 2 1 # : . •' µ . * # µ - µ : µ %. • ( . 4 $ ! 1 &# ! ( : . •Aygıtın ambalaj malzemelerini çıkarmış oldunuz. Şimdi bir sonraki adıma geçin: Donanımı hazırlayın.
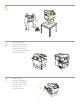
•Prepare the hardware. • . • µ . • $ . •Donanımı hazırlayın. • & . 8 •Attach the control panel overlay (if necessary). •' " ( • " ! ). # ( ). •% ( ! ). •Kontrol paneli kaplamasını takın (gerekliyse). •) $ ( # ).
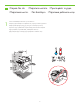
11 •Lift the cartridge door and remove the foam. • . •$ % . • " 1 . •Kartuş kapağını kaldırın ve köpüğü çıkarın. • ! $ ( 1 $ . 12 •Remove the toner cartridge packaging. • . •$ . • 1 . •Toner kartuş ambalajını çıkarın.
15 •Open tray 2. • 2. •$ 2. • 2. •Tepsi 2'yi açın. •) 2. 16 •Remove the cardboard. • . •$ . •% . •Kartonu çıkarın. •) $ . 17 •Adjust the paper guides. • . • µ % %. • &# ! . •Kağıt kılavuzlarını ayarlayın. • ( & . 18 •Load the print media. •' .
19 •Close tray 2. •' 2. •0 2. •' 2. •Tepsi 2'yi kapatın. •' 2. 20 •Connect the network cable to the device. •2 1 ! 1 ! . •1 % . • & $ . •Ağ kablosunu aygıta bağlayın. • ’8 & ! 1 $. •Note: If connecting a USB cable, see step 27. • : 6 USB , 1. 27.
•You are done preparing the hardware. Proceed with: Set up the control panel. ! •) & . 1 : . •' µ µ %. # : % µ . • ( . + ! $ $ . •Donanımı hazırlamış oldunuz. Bir sonraki adım: Kontrol panelini ayarlayın. •) ( & .
•Set up the control panel. • . • µ . • •Kontrol panelini ayarlayın. • ( . $ . 23 •Set language, date, time, and fax settings (if necessary). If prompted, select your language, the date, and the time. Follow the instructions on the control panel. • , , , ( " . ). # , ( , .
25 •Find the IP address. On the control panel, touch Network Address, and then touch Print to print the Jetdirect configuration page. The IP address is on the Jetdirect page, under “TCP/IP”. Note: You might need to assign an IP address depending on the type of network that is installed. See “Configure an IP address (if necessary)” on the next page, for more information. •% IP .
26 •Configure the IP address (if necessary). On the control panel, touch Administration. Scroll to and touch Initial Setup, and then touch Networking and I/O. Touch Embedded Jetdirect, touch TCP/IP, and then touch IPV4 Settings. Touch Manual Settings, and then enter the IP Address, Subnet Mask, and Default Gateway. •+ / IP ( ). ) Administration (6 ! ).
•You are done with the setup of the control panel. Now move to your computer and proceed with: Install the software. ! •) & . 2 ! ! & 1 : . •' µ % µ . * , µ # : µ . • ( . + ! ! $& $ !! .
•Install the software. • • µ . •Yazılımı yükleyin. . •% !! •) ! . . •For Windows® software installation instructions, go to step 27. •' " Windows® 27. •8 µ % # Windows®, # - µ 27. •+ " ( 27.
27 •Install software. 1) Insert the CD that came with the printer. 2) On the welcome screen, click Install Printer. The Setup Wizard appears. 3) Follow the on screen instructions. Note: If the welcome screen does not appear, click Start and then click Run. Type X:SETUP, where X corresponds to the CD-ROM drive letter, and then click OK. •" . 1) ! , . 2) ) # Install Printer ( ).
29 •2) Place the CD in the CD-ROM drive and run the installer. Complete an easy install. •2) ! ! " ! . ' ( . •2) * CD µ CD-ROM •2) ) $ ! - µµ . µ % . !! . ) $ . •2) CD'yi CD-ROM sürücüsüne yerleştirin ve yükleyiciyi çalıştırın. Kolay yüklemeyi tamamlayın.
31 •3) From Apple System Preferences (available on the Apple pull-down menu or in the dock), click the Print & Fax icon and then click the Printing tab at the top of the window. 4) To add your new printer, click the ‘+’ icon to launch the Printer Browser. By default, the Printer Browser shows printers that are connected through USB, Bonjour, or Appletalk networking.
32 •5) From the Printer Browser window, select the HP printer. For Mac OS X V10.4: If HP software is installed, the printer software should be automatically configured. 6) Click Add to create a printer queue. You are prompted to configure the installable options manually. Note: Mac OS X V10.2 and V10.3 might require you to manually select the printer model from the Printer Model drop-down list. 7) Under Model Name, select your device and click Add.
34 •Congratulations! The device is ready to use. The user guide is located on the CD and in the HP Easy Printer Care Software. Note: Save the boxes and the packing material in case you need to transport the device. • !. % . ! ! HP Easy Printer Care Software. : 2 ! , 1 . • # % ! 4 µ .
•You are done installing your software. Congratulations! You are ready to use your HP printer. ! •) & •' µ ( . ! 2 ( . µ %. 1 ! * µ µ •% !! ( . !! HP . •Yazılımınızı yükleme işlemini tamamladınız. Tebrikler! HP yazıcınızı kullanmaya hazırsınız. •) ! .
•Install the send fax driver. • # # . • µµ . •% . •Faks gönderme sürücüsünü yükleyin. •) . 36 •Install send fax driver. If the fax driver was not installed in step 28, it can be installed now. 1) Insert the CD that came with the device. 2) On the welcome screen, click Install Printer. The setup wizard appears.
•Set up the digital send features. • " " # . • % µ # # ! . • " & . •Sayısal gönderme özelliklerini ayarlayın. • & " * " * . 37 •1) Open the web browser. 2) Input device IP address (found on configuration page). •1) . 2) ) IP ( " " ). •1) $ µµ web.
39 •5) On the left navigation menu, select E-mail Settings. Input the SMTP server address, use the default From and Subject fields. Note: If you are using an ISP (Internet Service Provider) for internet access and e-mail, you may need to contact your ISP to obtain the SMTP server name, and to determine if you need to enter an account name and password for SMTP authentication. •5) ) " ! & E-mail Settings ( # ).
41 •7) To scan a document to your PC or network share folder, use the Send To Folder option (on the left navigation bar) to set up one or more folder destinations. For more information on configuring Send to Folder, consult the Embedded Web Server (EWS) User Guide. Note: See www.hp.com/support for more information about the digital send features.
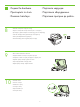
•Troubleshooting. •$ µ - µ # •Sorun giderme. •Area. •% #. •% . •- #%. •Alan. • . •Control-panel display. • . •% . •% . •Symptom. • . • µ µ . •% . • . •Belirti. •Blank. •Make sure that the power cable is connected to a working power outlet. See page 10 for more information. •Make sure that the device is turned on. See page 10 for more information.
•Buttons appear grey. •Make sure that the scanner lock is in the unlock position. •Turn off the device, and then turn it on again. •See page 7 for more information. •[ •% , # & & 1 . • & & . •)1. . 7 ! " . . •* µ µ " µ µ . • # #µ . •$ µ .
• 8. • ’8 & ! 1 USB. •9 # 8 ! 1 , " * $ $ * IP- . • $ . •Jams. •Make sure that the orange packing tape, cardboard, and orange plastic shipping locks have been removed. •Make sure that you are using supported print media. See the user reference guide on the CD-ROM for more information. •Make sure that the media is loaded correctly. •' .
•Copy. •Blank pages. •Make sure that the pull tape is removed from the print cartridge. • " . •% •0 . • %µ µ . • •% $, 1 " . # . # . •^ . • , 1 . •Buttons appear grey. •Make sure that the scanner lock is in the unlock position. •Turn off the device, and then turn it on again.
•No fax icon on the control-panel display. •Make sure that the fax card is installed in the formatter correctly, and that none of the pins are bent. •Print a configuration page and check the modem status. If “Operational/ Enabled” is not listed, it might be disabled or there might be a problem with the fax hardware. See the analog fax user guide for more information. •) ! .
•Fax configured but not sending fax (phone line not connected). •Make sure to use the phone cord that came with the device. •Make sure that the phone cord is connected securely to the device and to an active telephone port. Note: Use a telephone to verify that the port is active. •| , # - # ( ). •% •% ! •* µ µ ( # µµ µ ).
•Fax configured but not receiving fax. •Make sure that a line splitter or surge-protection device is not being used. •Make sure that voice mail or an answering machine is not receiving the incoming fax before the device. Remove these, or set the device “rings-toanswer” to a lower number. •Make sure that a roll-over line is not being used, and that the fax is connected to a dedicated analog telephone line. •| , - # .
•E-mail. •E-mail. •E-mail. •v . •E-posta •E-mail. •Digital sending tab in the embedded Web server (EWS) does not appear. •An administrative password might be configured. Select Log On in the upper right corner of the EWS. • " # (EWS) . •> 1 ! . Log On () ) (EWS). •∆ µ " ! #µ #µ Web server.
•E-mail Gateway Not Responding (D & * ( 8) ’ 8 $ ! . •1) > 1 , ( & SMTP. $ ( ! ! ! ! ! # * . 2) 9 # 8 ! x - * ( , ! !’ ( & SMTP ( & !’ ! — (FQDN), IP- ). 3) $ $ ! " * SMTP.
•You want to scan and send-to-email in black and white TIFF format. •Use the EWS to change the default image file format by selecting Digital Sending, Send to E-mail, and Advanced. • 1 TIFF ! . • (EWS), ! ! 1 Digital Sending (_ # ), Send to E-mail ( # ), and Advanced ( ( ).
•Other. • ! < # «2 ». •1) $ $! , $ $ < . 2) % $, ! ! ! ! ! $ ! 1 ! 1 ( & SMTP. @ < , $ EWS ! ! ! #$& ! Q % U .
© 2006 Hewlett-Packard Development Company, L.P. www.hp.