HP Color LaserJet CP3505 Series Printers Getting Started Guide Guide de mise en route دليل بدء االستخدام
Copyright and License © 2007 Copyright Hewlett-Packard Development Company, L.P. Copyright et licence © 2007 Copyright Hewlett-Packard Development Company, L.P. Reproduction, adaptation or translation without prior written permission is prohibited, except as allowed under the copyright laws. La reproduction, l’adaptation ou la traduction, sans autorisation écrite préalable, sont interdites sauf dans le cadre des lois sur le copyright. The information contained herein is subject to change without notice.
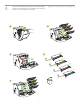
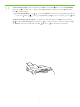
229 mm (9 in) 1 .• قم بإخراج الطابعة من العبوة • Unpack the printer. • Déballez l’imprimante. ) .5 in m (3 89 m ) .5 in m (3 89 m 178 mm (7 i n) 356 m m( 2 • Select a sturdy, well-ventilated, dust-free area to position the printer. 17° - 25°C (62.6° - 77°F) in) .• اختر مكان ًا ثابتًا جيد التهوية وخاليًا من األتربة لوضع الطابعة به • Choisissez un emplacement correctement ventilé et libre de poussière pour positionner l’imprimante sur une surface solide. 21.5 Kg. 47.4 lbs.
3 .• قم بنزع كل أشرطة الشحن • Remove all shipping tape. • Retirez toutes les bandes d’expédition.
4 • Remove print cartridge shipping locks and reinstall cartridges. • Retirez les dispositifs de sécurité d’expédition des cartouches d’impression, puis réinstallez les cartouches. 1 .
5 • Adjust paper guides, and load print media. • Réglez les guides de papier, puis chargez un support d’impression. 6 • Install the output bin. • Installez le bac de sortie. .• اضبط موجهّ ات الورق ثم قم بتحميل وسائط الطباعة .
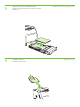
• Attach control panel overlay (if neccessary). • Fixez le cache du panneau de commande (si nécessaire). 8 • Connect the power cord and turn on the printer. • Branchez le cordon d’alimentation, puis mettez l’imprimmante sous tension. 1 .)• قم بتركيب غطاء لوحة التحكم (إذا كان ذلك ضروري ًا .• قم بتوصيل سلك التيار ثم قم بتشغيل الطابعة • Do not connect USB until the software prompts you. إال بعد أن تتمUSB • ال تقم بتوصيل كبل .
9 • Control-panel features. 1) Use the and buttons to select the menu options. 2) Press 3) Press Cancel to return to the Ready screen. Ready (إلغاء) للعودة إلى شاشةCancel ) اضغط٣ .لقبول التحديد ) اضغط٢ .لتحديد خيارات القائمة و to accept the selection. ) استخدم زري١ .• ميزات لوحة التحكم .)(جاهز • Fonctions du panneau de commande. 1) Utilisez les boutons et pour sélectionner les options de menu. 2) Appuyez sur pour accepter la sélection.
11 • Set the media size and type. At the control-panel, press Menu, use the and then press Press and buttons to scroll to Paper Handling, to select the tray to configure. Set the Type and Size for each tray by using the and buttons. to select the settings. ثم،) (معاجلة الورقPaper Handling (القائمة) واستخدم زري و للتمرير إلىMenu اضغط، من لوحة التحكم.• قم بتعيني حجم الوسائط ونوعها .لتحديد اإلعدادات اضغط. (احلجم) لكل درج باستخدام زري وSize (النوع) وType قم بتعيني.
12 • USB Installation. To install software for Windows by using a direct connection (USB), go to step 14. To install software for Macintosh by using a direct connection (USB), go to step 19. لتثبيت البرنامج.14 انتقل إلى اخلطوة،)USB( باستخدام اتصال مباشرWindows لتثبيت البرنامج ألحد أنظمة تشغيل.USB • التثبيت باستخدام اتصال .19 انتقل إلى اخلطوة،)USB( باستخدام اتصال مباشرMacintosh ألحد أنظمة تشغيل • Installation USB.
13 • Network Installation. To install software for Windows by using a network connection, go to step 23. To install software for Macintosh by using a network connection, go to step 29. لتثبيت البرنامج ألحد أنظمة.23 انتقل إلى اخلطوة، باستخدام اتصال شبكةWindows لتثبيت البرنامج ألحد أنظمة تشغيل.• التثبيت من خالل الشبكة .29 انتقل إلى اخلطوة، باستخدام اتصال شبكةMacintosh تشغيل • Installation réseau.
14 • Windows USB installation. Insert the CD, and follow the onscreen instructions. Do not plug in the USB cable until prompted by the software. Note: If New Hardware Found appears, insert the CD and follow the onscreen instructions. إال بعد أنUSB ال تقم بتوصيل كبل. أدخل القرص املضغوط ثم اتبع اإلرشادات التي تظهر على الشاشة.Windows ألحد أنظمة تشغيلUSB • تثبيت أدخل القرص املضغوط واتبع اإلرشادات،) (العثور على جهاز جديدNew Hardware Found في حالة ظهور: مالحظة.
15 • On the Welcome screen, click Install. If the welcome screen does not appear, click Start, click Run, type x:setup (where x represents the CD-ROM drive letter), and then click OK. x:setup واكتب،) (تشغيلRun ثم انقر فوق،) (ابدأStart انقر فوق، في حالة عدم ظهور شاشة الترحيب.) (تثبيتInstall انقر فوق،• من شاشة الترحيب .) (موافقOK ثم انقر فوق،) إلى حرف محرك األقراص املضغوطةx (حيث يشير احلرف • Sur l’écran de bienvenue, cliquez sur Installer.
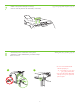
17 • When prompted, connect a USB cable that is no longer than 2 meters (6.5 feet) to the printer and the computer. Note: HP does not recommend using USB hubs with this printer. . مع هذه الطابعةUSB باستخدام لوحات وصلHP ال توصي: مالحظة. أقدام) بالطابعة وجهاز الكمبيوتر٦.٥( ال يتجاوز طوله مترينUSB • قم بتوصيل كبل • A l’invite, branchez un câble USB d’une longueur inférieure à 2 mètres entre l’imprimante et l’ordinateur.
19 • Macintosh USB installation. A) Insert the CD and run the installer. B) Complete an Easy Install. C) Click Quit when the installation is finished. Easy Install ب) استكمل إجراء. أ) أدخل القرص املضغوط وقم بتشغيل املثبِّت.Macintosh ألحد أنظمة تشغيلUSB • التثبيت باستخدام اتصال . (إنهاء) في حالة انتهاء عملية التثبيتQuit ج) انقر فوق.)(تثبيت سهل • Installation USB sous Macintosh. A) Introduisez le CD, puis exécutez le programme d’installation. B) Exécutez une installation standard.
20 • Connect the USB cable. A) Connect a USB cable that is no longer than 2 meters (6.5 feet) to the printer and the computer. B) Restart the computer. Note: HP does not recommend using USB hubs with this printer. . ب) أعد تشغيل جهاز الكمبيوتر. أقدام) بالطابعة وجهاز الكمبيوتر٦.٥( ال يتجاوز طوله مترينUSB أ) قم بتوصيل كبل.USB • توصيل كبل . مع هذه الطابعةUSB باستخدام لوحات وصلHP ال توصي:مالحظة • Branchez le câble USB.
21 • Go to the HD/Applications/Utilities/Printer Setup Utility or the Print Center. If the printer name appears in the Printer List, the installation is complete. If the printer name does not appear in the Printer List, go to the next step. Print األداة املساعدة إلعداد الطابعة) أو/أدوات مساعدة/تطبيقات/(قرص ثابتHD/Applications/Utilities/Printer Setup Utility • انتقل إلى في حالة عدم ظهور اسم. تعتبر عملية التثبيت مكتملة،) (قائمة الطابعاتPrinter List في حالة ظهور اسم الطابعة في.
22 • Add the printer. A) In the HD/Applications/Utilities/Printer Setup Utility or Print Center, click Add. Click the dropdown menu, and select USB. B) In the Printer Model drop-down list, select HP. C) Under Printer Name, select the printer, and then click Add. Go to step 35. )األداة املساعدة إلعداد الطابعة/أدوات مساعدة/تطبيقات/(قرص ثابتHD/Applications/Utilities/Printer Setup Utility أ) في.• إضافة الطابعة (طرازPrinter Model ب) في القائمة املنسدلة.
23 • Windows network installation. Connect a network cable to the printer. Note: Ensure that all cables are HP-compliant. .HP حتقق من أن جميع الكبالت متوافقة مع: مالحظة. قم بتوصيل كبل شبكة بالطابعة.Windows • التثبيت من خالل الشبكة في أنظمة تشغيل • Installation réseau sous Windows. Branchez un câble réseau à l’imprimante. Remarque : Assurez-vous que tous les câbles sont compatibles HP.
24 • Find the IP address by printing a Configuration Page. A) At the control-panel, press Menu, use the the buttons to scroll to Information, and then press to select. B) Use the and and buttons to scroll to Print Configuration and then press to select. C) On the printed Embedded JetDirect page (the second printed page) the IP address appears under HP Direct Configuration. Note: Depending on the type of network that is installed, you might need to assign at IP addres. See step 25.
25 • Configure an IP address, if necessary. A) At the control panel, press Menu, use the the Configure Device, and then press D) Scroll to TCP/IP, and press . B) Scroll to IO and press to select. Scroll to Config Method and press و . to select the number when it is إخراج) ثم اضغط/ (إدخالIO ب) قم بالتمرير إلى. (أسلوب التكوين) ثم اضغطConfig Method قم بالتمرير إلى.للتحديد قم.لتحديد الرقم عند الوصول إلى الرقم الصحيح . استخدم زري،) (القائمةMenu اضغط، أ) في لوحة التحكم.
26 • Prepare for the software installation. Quit all programs (including terminate-and-stay resident [TSR], antivirus, and firewall programs) on the print server or on each computer that will use the printer. ) وبرامج جدار احلماية، وبرامج مكافحة الفيروسات،)TSR( قم بإنهاء كل البرامج (مبا في ذلك البرامج اخملزنة دائمًا بالذاكرة.• قم باإلعداد لتثبيت البرامج .املوجودة على خادم الطباعة أو على كل جهاز كمبيوتر سيستخدم الطابعة • Préparez l’installation du logiciel.
27 • Install the software. A) Insert the CD. B) On the welcome screen, click Install. If the welcome screen does not appear, click Start, click Run, type x:setup (where x represents the CD-ROM drive letter), and then click OK. C) Follow the onscreen instructions. When prompted, select Through the Network, and then click Next. When the installer shows the available printers, select the appropriate IP address. D) Click Finish. If prompted, restart the computer.
28 • Go to step 35. .35 • انتقل إلى اخلطوة • Passez à l’étape 35.
29 • Macintosh network installation. Connect the network cable to the printer. Note: Ensure that all cables are HP-compliant حتقق من أن جميع الكبالت: مالحظة. قم بتوصيل كبل الشبكة بالطابعة.Macintosh • التثبيت من خالل الشبكة في أنظمة تشغيل HP متوافقة مع • Installation réseau sous Macintosh. Branchez le câble réseau à l’imprimante. Remarque : Assurez-vous que tous les câbles sont compatibles HP.
30 • Find the IP address or the Bonjour printer name by printing a Configuration Page. A) At the control-panel, press Menu, use the the and buttons to scroll to Information, and then press to select. B) Use the and buttons to scroll to Print Configuration and then press to select. C) On the printed Embedded JetDirect page (the second printed page) the IP address appears under HP Direct Configuration. Note: Depending on the type of network that is installed, you might need to assign at IP address.
31 • Configure an IP address, if necessary. A) At the control-panel, press Menu, use the the Configure Device, and then press D) Scroll to TCP/IP, and press . B) Scroll to IO and press to select. Scroll to Config Method and press F) Use the and buttons to increase or decrease the number, and then press correct. Repeat as neccessary. (تكوينConfigure Device للتمرير إلى و هـ) قم بالتمرير. buttons to scroll to . . E) Scroll to Manual and press .
32 • Prepare for the software installation. Quit all programs (including terminate-and-stay resident [TSR], antivirus, and firewall programs) on the print server or on each computer that will use the printer. ) وبرامج جدار احلماية، وبرامج مكافحة الفيروسات،)TSR( قم بإنهاء كل البرامج (مبا في ذلك البرامج اخملزنة دائمًا بالذاكرة.• قم باإلعداد لتثبيت البرامج .املوجودة على خادم الطباعة أو على كل جهاز كمبيوتر سيستخدم الطابعة • Préparez l’installation du logiciel.
33 • Install the software. Insert the CD, run the installer, and complete an Easy Install. Click Quit when the installation is finished. (إنهاء) عند انتهاءQuit انقر فوق.) (تثبيت سهلEasy Install ثم قم باستكمال، أدخل القرص املضغوط وقم بتشغيل املثبِّت.• قم بتثبيت البرنامج .عملية التثبيت • Installez le logiciel. Introduisez le CD, exécutez le programme d’installation, puis effectuez une installation standard. Cliquez sur Quitter une fois l’installation terminée.
34 • Add the printer. A) Go to the HD/Applications/Utilities/Printer Setup Utility or the Print Center, and then click Add. B) To add the printer by using the IP address, click IP Printer, type the IP address in the address field, and then click Add. C) To add the printer by using the Bonjour printer name, click the drop-down menu and select Bonjour. Under Printer Name, select the printer, and then click Add.
35 36 • Print a test page. Print a page from any program to make sure that the software is correctly installed. . اطبع صفحة اختبار من أي برنامج للتأكد من أن البرنامج مت تثبيته بشكل صحيح.• قم بطباعة صفحة اختبار • Imprimez une page de test. Imprimez une page à partir de n’importe quel programme pour vous assurer que le logiciel est correctement installé. • Congratulations! The printer is ready to use. The user guide is located on the CD and in the HP ToolboxFX.
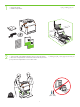
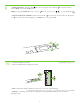
37 • Blank display after start up. A) Turn the printer off. B) Pull the formatter partially out (callouts1,2), then push the formatter in until the black levers click into a secure position (callout 3). C) Turn the printer on. If the problem is not resolved, call customer support. املنسق للداخل ِّ ثم ادفع،)2 و1 املنسق للخارج بشكل جزئي (وسيلتا الشرح ِّ ب) اسحب. أ) قم بإيقاف تشغيل الطابعة.• الشاشة فارغة بعد بدء التشغيل اتصل بدعم، في حالة عدم حل املشكلة. ج) قم بتشغيل الطابعة.
• Paper sizes • Formats de papier • أحجام الورق 216 x 356 mm (8.5 x 14 inches) 148 x 210 mm (5.83 x 8.27 inches) 216 x 356 mm (8.5 x 14 inches) 148 x 210 mm (5.83 x 8.27 inches) 216 x 356 mm (8.5 x 14 inches) 148 x 210 mm (5.83 x 8.27 inches) • For supplies, please visit www.hp.com/support/cljcp3505. .www.hp.com/support/cljcp3505 يرجى زيارة املوقع،• بالنسبة للمستلزمات • Pour les fournitures, visitez l’adresse www.hp.com/support/cljcp3505.
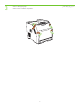
HP Color LaserJet CP3505 Series printers • Clearing Jams • Suppression de bourrages • إزالة االنحشار 1 2 3 • Questions? • Questions ? • أسئلة؟ http://www.hp.com/support/go/cljcp3505 http://www.hp.com/support/go/cljcp3505 http://www.hp.
© 2007 Hewlett-Packard Development Company, L.P. www.hp.