HP Color LaserJet CP3505 Series Printers Getting Started Guide מדריך לתחילת העבודה
Copyright and License © 2007 Copyright Hewlett-Packard Development Company, L.P. Reproduction, adaptation or translation without prior written permission is prohibited, except as allowed under the copyright laws. The information contained herein is subject to change without notice. The only warranties for HP products and services are set forth in the express warranty statements accompanying such products and services. Nothing herein should be construed as constituting an additional warranty.
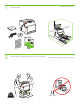
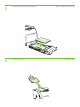
229 mm (9 in) 1 .• הוצא את המדפסת מהאריזה • Unpack the printer. ) .5 in m (3 89 m ) .5 in m (3 89 m 178 mm (7 i n) 356 m m( 2 • Select a sturdy, well-ventilated, dust-free area to position the printer. in) . מאוורר וללא אבק כדי להציב את המדפסת,• בחר אזור יציב 17° - 25°C (62.6° - 77°F) 21.5 Kg. 47.4 lbs.
3 .• הסר את סרט השילוח • Remove all shipping tape.
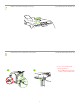
4 • Remove print cartridge shipping locks and reinstall cartridges. 1 .
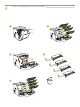
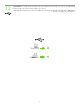
5 6 .• כוונן את מכווני הנייר וטען חומרי הדפסה • Adjust paper guides, and load print media. .• התקן את סל הפלט • Install the output bin.
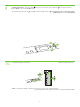
8 1 • Attach control panel overlay (if neccessary). .)• חבר את מכסה לוח הבקרה (בעת הצורך • Connect the power cord and turn on the printer. .• חבר את כבל המתח והפעל את המדפסת • Do not connect USB until the software prompts you. עד אשרUSB-• אל תחבר את כבל ה .
9 • Control-panel features. 1) Use the and buttons to select the menu options. 2) Press 3) Press Cancel to return to the Ready screen. ) לחץ על3 .כדי לאשר את הבחירה ) לחץ על2 .כדי לבחור אפשרויות בתפריט to accept the selection. ) השתמש בלחצן ובלחצן1 .• מאפייני לוח הבקרה .)(מוכן Ready (ביטול) כדי לחזור למסךCancel 2 1 3 10 .• הגדר שפה ומיקום ברירת מחדל • Set default language and location. • Note: If control-panel display is blank with no light or text, go to step 37 (Blank Display).
11 • Set the media size and type. At the control-panel, press Menu, use the and then press Press and buttons to scroll to Paper Handling, to select the tray to configure. Set the Type and Size for each tray by using the and buttons. to select the settings. Paper כדי לגלול אל ובלחצן השתמש בלחצן,) (תפריטMenu לחץ על, בלוח הבקרה.• הגדר סוג וגודל של חומרי הדפסה (גודל) לכל מגש באמצעותSize- (סוג) וType הגדר.
12 • USB Installation. To install software for Windows by using a direct connection (USB), go to step 14. To install software for Macintosh by using a direct connection (USB), go to step 19. Macintosh להתקנת תוכנה עבור.14 עבור לשלב,)USB( תוך שימוש בחיבור ישירWindows להתקנת תוכנה עבור.USB • התקנת .
13 • Network Installation. To install software for Windows by using a network connection, go to step 23. To install software for Macintosh by using a network connection, go to step 29. תוךMacintosh להתקנת תוכנה עבור.23 עבור לשלב, תוך שימוש בחיבור רשתWindows להתקנת תוכנה עבור.• התקנת רשת .
14 • Windows USB installation. Insert the CD, and follow the onscreen instructions. Do not plug in the USB cable until prompted by the software. Note: If New Hardware Found appears, insert the CD and follow the onscreen instructions. עד אשר תונחהUSB- אל תחבר את כבל ה.גבי המסך- הכנס את התקליטור ופעל בהתאם להוראות שעל.Windows- בUSB • התקנת הכנס את התקליטור ופעל,) (זוהתה חומרה חדשהNew Hardware Found אם מופיעה ההודעה: הערה.ידי התוכנה-לעשות זאת על .
15 • On the Welcome screen, click Install. If the welcome screen does not appear, click Start, click Run, type x:setup (where x represents the CD-ROM drive letter), and then click OK. לחץ על,) (התחלStart לחץ על,) (ברוך הבאWelcome אם לא מופיע המסך.) (התקןInstall לחץ על,) (ברוך הבאWelcome • במסך .) (אישורOK ולאחר מכן לחץ על,) מייצג את אות כונן התקליטוריםx (כאשרx:setup הקלד,) (הפעלהRun 16 • Follow the onscreen instructions.
17 • When prompted, connect a USB cable that is no longer than 2 meters (6.5 feet) to the printer and the computer. Note: HP does not recommend using USB hubs with this printer. אינה ממליצה על שימוש ברכזותHP : הערה. מטרים2 שאינו עולה באורכו עלUSB חבר למדפסת ולמחשב כבל,• כשתונחה לעשות זאת . עם מדפסת זוUSB 18 • Click Finish. If prompted, restart the computer. Go to step 35. .35 עבור לשלב. הפעל מחדש את המחשב, אם תונחה לעשות זאת.
19 • Macintosh USB installation. A) Insert the CD and run the installer. B) Complete an Easy Install. C) Click Quit when the installation is finished. עם סיוםQuit ג) לחץ על.Easy Install ב) בצע. א) הכנס את התקליטור והפעל את תוכנית ההתקנה.Macintosh- בUSB • התקנת .
20 • Connect the USB cable. A) Connect a USB cable that is no longer than 2 meters (6.5 feet) to the printer and the computer. B) Restart the computer. Note: HP does not recommend using USB hubs with this printer. . ב) הפעל מחדש את המחשב. מטרים2 שאינו עולה באורכו עלUSB א) חבר למדפסת ולמחשב כבל.USB-• חבר את כבל ה .
21 • Go to the HD/Applications/Utilities/Printer Setup Utility or the Print Center. If the printer name appears in the Printer List, the installation is complete. If the printer name does not appear in the Printer List, go to the next step. תושלם,Printer List- אם שם המדפסת מופיע ב.Print Center או אלHD/Applications/Utilities/Printer Setup Utility • עבור אל . עבור לשלב הבא,Printer List- אם שם המדפסת אינו אינו מופיע ב.
22 • Add the printer. A) In the HD/Applications/Utilities/Printer Setup Utility or Print Center, click Add. Click the dropdown menu, and select USB. B) In the Printer Model drop-down list, select HP. C) Under Printer Name, select the printer, and then click Add. Go to step 35. לחץ על התפריט.Add לחץ על,Print Center- או בHD/Applications/Utilities/Printer Setup Utility- א) ב.• הוספת מדפסת בחר את המדפסת ולאחר מכן לחץ על,Printer Name ג) תחת.HP בחר,Printer Model ב) ברשימה הנפתחת.
23 • Windows network installation. Connect a network cable to the printer. Note: Ensure that all cables are HP-compliant. .HP- ודא שכל הכבלים תואמים ל: הערה. חבר כבל רשת למדפסת.
24 • Find the IP address by printing a Configuration Page. A) At the control-panel, press Menu, use the the buttons to scroll to Information, and then press to select. B) Use the and and buttons to scroll to Print Configuration and then press to select. C) On the printed Embedded JetDirect page (the second printed page) the IP address appears under HP Direct Configuration. Note: Depending on the type of network that is installed, you might need to assign at IP addres. See step 25.
25 • Configure an IP address, if necessary. A) At the control panel, press Menu, use the the Configure Device, and then press D) Scroll to TCP/IP, and press . B) Scroll to IO and press to select. Scroll to Config Method and press F) Use the and buttons to increase or decrease the number, and then press correct. Repeat as neccessary. Configure כדי לגלול אל . ובלחצן חזור.לבחירת המספר המתאים buttons to scroll to . . E) Scroll to Manual and press .
26 • Prepare for the software installation. Quit all programs (including terminate-and-stay resident [TSR], antivirus, and firewall programs) on the print server or on each computer that will use the printer. וירוס ותוכניות חומת אש) בשרת ההדפסה- אנטי,]TSR[ הפסק את כל התוכניות (לרבות תוכנית שוכנת זיכרון.• הכנות להתקנת התוכנה .
27 • Install the software. A) Insert the CD. B) On the welcome screen, click Install. If the welcome screen does not appear, click Start, click Run, type x:setup (where x represents the CD-ROM drive letter), and then click OK. C) Follow the onscreen instructions. When prompted, select Through the Network, and then click Next. When the installer shows the available printers, select the appropriate IP address. D) Click Finish. If prompted, restart the computer. (ברוךWelcome אם המסך.
28 • Go to step 35. .
29 • Macintosh network installation. Connect the network cable to the printer. Note: Ensure that all cables are HP-compliant HP- ודא שכל הכבלים תואמים ל: הערה. חבר את כבל הרשת למדפסת.
30 • Find the IP address or the Bonjour printer name by printing a Configuration Page. A) At the control-panel, press Menu, use the the and buttons to scroll to Information, and then press to select. B) Use the and buttons to scroll to Print Configuration and then press to select. C) On the printed Embedded JetDirect page (the second printed page) the IP address appears under HP Direct Configuration. Note: Depending on the type of network that is installed, you might need to assign at IP address.
31 • Configure an IP address, if necessary. A) At the control-panel, press Menu, use the the Configure Device, and then press D) Scroll to TCP/IP, and press . B) Scroll to IO and press to select. Scroll to Config Method and press ,Configure Device כדי לגלול אל ו) השתמש בלחצן. או בלחצן buttons to scroll to . E) Scroll to Manual and press F) Use the and buttons to increase or decrease the number, and then press correct. Repeat as neccessary. ולחץ על,TCP/IP ד) גלול אל. and .
32 • Prepare for the software installation. Quit all programs (including terminate-and-stay resident [TSR], antivirus, and firewall programs) on the print server or on each computer that will use the printer. וירוס ותוכניות חומת אש) בשרת ההדפסה- אנטי,]TSR[ הפסק את כל התוכניות (לרבות תוכנית שוכנת זיכרון.• הכנות להתקנת התוכנה .
33 • Install the software. Insert the CD, run the installer, and complete an Easy Install. Click Quit when the installation is finished. . עם סיום ההתקנהQuit לחץ על.Easy Install ובצע, הפעל את תוכנית ההתקנה, הכנס את התקליטור.
34 • Add the printer. A) Go to the HD/Applications/Utilities/Printer Setup Utility or the Print Center, and then click Add. B) To add the printer by using the IP address, click IP Printer, type the IP address in the address field, and then click Add. C) To add the printer by using the Bonjour printer name, click the drop-down menu and select Bonjour. Under Printer Name, select the printer, and then click Add. .
35 36 • Print a test page. Print a page from any program to make sure that the software is correctly installed. . הדפס דף מכל תכנית שהיא כדי לוודא שהתוכנה מותקנת כראוי.• הדפס דף ניסיון • Congratulations! The printer is ready to use. The user guide is located on the CD and in the HP ToolboxFX. Save the boxes and the packaging materials in case you need to transport the printer. Register the printer at www.register.hp.com.
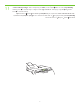
37 • Blank display after start up. A) Turn the printer off. B) Pull the formatter partially out (callouts1,2), then push the formatter in until the black levers click into a secure position (callout 3). C) Turn the printer on. If the problem is not resolved, call customer support. דחוף את, לאחר מכן,)2 ,1 ב) משוך כלפי חוץ את לוח האם באופן חלקי (איורים. א) כבה את המדפסת.• תצוגה ריקה לאחר הפעלה . פנה לתמיכת הלקוחות, אם הבעיה לא נפתרה. ג) הפעל את המדפסת.
• Paper sizes • גודלי נייר • For supplies, please visit www.hp.com/support/cljcp3505. • Part numbers 216 x 356 mm (8.5 x 14 inches) 148 x 210 mm (5.83 x 8.27 inches) 216 x 356 mm (8.5 x 14 inches) 148 x 210 mm (5.83 x 8.27 inches) 216 x 356 mm (8.5 x 14 inches) 148 x 210 mm (5.83 x 8.27 inches) .www.hp.
HP Color LaserJet CP3505 Series printers • Clearing Jams • שחרור חסימות נייר 1 2 3 • Questions? ?• שאלות http://www.hp.com/support/go/cljcp3505 http://www.hp.com/support/go/cljcp3505 http://www.hp.
© 2007 Hewlett-Packard Development Company, L.P. www.hp.