HP Color LaserJet CP3505 Series Printers Getting Started Guide 入门指南 Panduan persiapan Awal セットアップ ガイド 시작 설명서 คู่มือการเริ่มต้นใช้งาน 入門指南 Terdaftar di Deperindag Provinsi DKI Jakarta No : 0089/1.824.
Copyright and License © 2007 Copyright Hewlett-Packard Development Company, L.P. Reproduction, adaptation or translation without prior written permission is prohibited, except as allowed under the copyright laws. The information contained herein is subject to change without notice. The only warranties for HP products and services are set forth in the express warranty statements accompanying such products and services. Nothing herein should be construed as constituting an additional warranty.
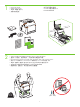
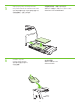
Unpack the printer. Membongkar printer. 프린터 포장을 풉니다. 拆開印表機包裝。 • 打开打印机的包装。 • プリンタの梱包を開きます。 • แกะกล่องเครื่องพิมพ์ 229 mm (9 in) 1 • • • • ) .5 in m (3 89 m ) .5 in m (3 89 m 178 mm (7 i n) 356 m m( 2 • • • • • • • Select a sturdy, well-ventilated, dust-free area to position the printer. 选择一个稳固、通风良好、无尘的地方放置打印机。 Pilih tempat yang kokoh, berventilasi baik dan bebas debu untuk menaruh printer. 安定していて換気がよく、ほこりが少ない場所を選んでプリンタを設置します。 표면이 평평하고 통풍이 잘 되며 먼지가 없는 곳에 프린터를 놓습니다.
3 • • • • Remove all shipping tape. Lepaskan semua pita rekat kemasan pengiriman. 포장용 테이프를 모두 제거합니다.
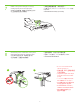
4 • • • • • • • Remove print cartridge shipping locks and reinstall cartridges. 取出打印碳粉盒的装运锁,重新安装碳粉盒。 Lepaskan kunci kemasan pengiriman kartrid cetak kemudian pasang kembali kartridnya. プリント カートリッジの保護キャップをすべて取り外し、 カートリッジを取り付け直します。 카트리지에서 포장용 잠금 장치를 제거한 후 카트리지를 다시 설치합니다.
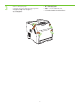
5 6 • Adjust paper guides, and load print media. • Atur pemandu kertas lalu masukkan media cetak. • 调整纸张导板,并装入打印介质。 • 用紙ガイドを調整して、印刷メディアをセットします。 • 용지 조정대를 조정한 후 인쇄 용지를 넣습니다. • 調整紙張導板,並裝入列印紙材。 • ปรับตัวกั้นกระดาษ และใส่สื่อที่ใช้พิมพ์ • • • • • 安装出纸槽。 • 排紙ビンを取り付けます。 • ใส่ถาดกระดาษออก Install the output bin. Pasang nampan keluaran. 출력 용지함을 설치합니다.
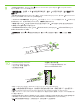
8 1 • • • • Attach control panel overlay (if neccessary). Pasang lapisan panel kontrol (jika perlu). 제어판 오버레이를 부착합니다(필요한 경우). 貼上控制面板貼紙 (如有需要)。 • 安装控制面板贴面(如有必要)。 • 必要に応じて、 コントロール パネルにオーバーレイを貼 り付けます。 • ติดแผ่นปะหน้าแผงควบคุม (หากจำ�เป็น) • • • • Connect the power cord and turn on the printer. Hubungkan kabel listrik lalu hidupkan printer. 전원 코드를 연결한 후 프린터를 켭니다.
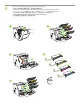
9 • Control-panel features. 1) Use the and buttons to select the menu options. 2) Press 3) Press Cancel to return to the Ready screen. 控制面板功能。1)使用 就绪屏幕。 • 和 按钮选择菜单选项。2)按 to accept the selection. 接受所作选择。3)按取消返回到 • Fitur-fitur panel kontrol. 1) Gunakan tombol dan untuk memilih berbagai opsi menu. 2) Tekan pilihan. 3) Tekan Batal untuk kembali ke layar Ready [Siap]. untuk menerima • コントロール パネルの操作方法 。1) ボタンと ボタンを使って、 メニュー オプションを選択します。2) 択項目を決定します。3) [キャンセル] ボタンを押すと、[準備完了] 画面に戻ります。 • 제어판 기능.
11 • Set the media size and type. At the control-panel, press Menu , use the and then press Press and buttons to scroll to Paper Handling, to select the tray to configure. Set the Type and Size for each tray by using the and buttons. to select the settings. 设置介质尺寸和类型。在控制面板上,按菜单,使用 和 按钮滚动到纸张处理,然后按 选择要配置的纸盘。设置每个纸盘的类型和尺寸,方法是使用 和 按钮。按 选择 设置。 • • Setel ukuran dan jenis media.
12 • USB Installation. To install software for Windows by using a direct connection (USB), go to step 14. To install software for Macintosh by using a direct connection (USB), go to step 19. USB 安装。要使用直接连接 (USB) 安装适用于 Windows 的软件,请转至步骤 14。要使用 直接连接 (USB) 安装适用于 Macintosh 的软件,请转至步骤 19。 • • Penginstalan USB. Untuk menginstal perangkat lunak Windows dengan menggunakan koneksi langsung (USB), lanjutkan ke langkah 14.
13 • Network Installation. To install software for Windows by using a network connection, go to step 23. To install software for Macintosh by using a network connection, go to step 29. 网络安装。要使用网络连接安装适用于 Windows 的软件,请转至步骤 23。要使用网络连接 安装适用于 Macintosh 的软件,请转至步骤 29。 • • Penginstalan Jaringan. Untuk menginstal perangkat lunak Windows dengan menggunakan koneksi jaringan, lanjutkan ke langkah 23. Untuk menginstal perangkat lunak Macintosh dengan menggunakan koneksi jaringan, lanjutkan ke langkah 29.
14 • Windows USB installation. Insert the CD, and follow the onscreen instructions. Do not plug in the USB cable until prompted by the software. Note: If New Hardware Found appears, insert the CD and follow the onscreen instructions. Windows USB 安装。插入 CD,然后按照屏幕上的说明进行操作。在出现软件提示之前,请不要 插入 USB 电缆。注意:如果出现找到了新硬件,则插入 CD,然后按照屏幕上的说明进行操作。 • • Penginstalan USB Windows. Masukkan CD, kemudian ikuti petunjuk pada layar. Jangan memasangkan kabel USB sampai diperintahkan oleh perangkat lunak.
15 • On the Welcome screen, click Install. If the welcome screen does not appear, click Start, click Run, type x:setup (where x represents the CD-ROM drive letter), and then click OK. 在“欢迎使用”屏幕上,单击安装。如果没有出现“欢迎使用”屏幕,请依次单击开始、运 行,键入 x:setup(其中 x 代表 CD-ROM 的驱动器盘符),然后单击确定。 • • Pada layar Welcome [Selamat Datang], klik Install [Instal]. Jika layar selamat datang tidak muncul, klik Start [Mulai], klik Run [Jalankan], ketik x:setup (x adalah huruf untuk drive CD-ROM), kemudian klik OK.
17 • When prompted, connect a USB cable that is no longer than 2 meters (6.5 feet) to the printer and the computer. Note: HP does not recommend using USB hubs with this printer. 出现提示时,用长度不超过 2 米(6.5 英尺)的 USB 电缆连接打印机与计算机。 注意:HP 建议不要使用 USB 集线器连接此打印机。 • • Setelah diperintahkan, hubungkan kabel USB yang panjangnya tidak lebih dari 2 meter (6,5 kaki) ke printer dan ke komputer. Catatan: HP tidak menganjurkan penggunaan hub USB dengan printer ini.
19 • Macintosh USB installation. A) Insert the CD and run the installer. B) Complete an Easy Install. C) Click Quit when the installation is finished. Macintosh USB 安装。A) 插入 CD 并运行安装程序。B) 完成简易安装。C) 安装完成后, 单击退出。 • • Penginstalan USB Macintosh. A) Masukkan CD lalu jalankan installer. B) Selesaikan Easy Install [Instal Mudah]. C) Klik Quit [Keluar] setelah penginstalan selesai. • Macintosh での USB 接続 。A) CD を挿入して、インストーラを起動します。B) [簡易インストール] を実行します。 C) インストールが完了したら、[終了] をクリックします。 • Macintosh USB 설치.
20 • Connect the USB cable. A) Connect a USB cable that is no longer than 2 meters (6.5 feet) to the printer and the computer. B) Restart the computer. Note: HP does not recommend using USB hubs with this printer. 连接 USB 电缆。A) 用长度不超过 2 米(6.5 英尺)的 USB 电缆连接打印机与计算机。 B) 重新启动计算机。注意: HP 建议不要使用 USB 集线器连接此打印机。 • • Menghubungkan kabel USB. A) Hubungkan kabel USB yang panjangnya tidak lebih dari 2 meter (6,5 kaki) ke printer dan ke komputer. B) Restart komputer.
21 • Go to the HD/Applications/Utilities/Printer Setup Utility or the Print Center. If the printer name appears in the Printer List, the installation is complete. If the printer name does not appear in the Printer List, go to the next step. 转至 HD/应用程序/实用程序/打印机设置实用程序或打印中心。如果打印机名称出现在“打印 机列表”中,则表明已完成安装。如果打印机名称没有出现在“打印机列表”中,请转至下一步。 • • Lanjutkan ke HD/Applications/Utilities/Printer Setup Utility atau Print Center. Jika nama printer muncul dalam Daftar Printer, berarti penginstalan sudah selesai.
22 • Add the printer. A) In the HD/Applications/Utilities/Printer Setup Utility or Print Center, click Add. Click the dropdown menu, and select USB. B) In the Printer Model drop-down list, select HP. C) Under Printer Name, select the printer, and then click Add. Go to step 35. 添加打印机。A) 在 HD/应用程序/实用程序/打印机设置实用程序或打印中心中,单击添加。 单击下拉菜单,然后选择 USB。B) 在打印机型号下拉菜单中,选择 HP。C) 在打印机名称下, 选择打印机,然后单击添加。转至步骤 35。 • • Menambahkan printer. A) Di HD/Applications/Utilities/Printer Setup Utility atau Print Center, klikAdd.
23 • Windows network installation. Connect a network cable to the printer. Note: Ensure that all cables are HP-compliant. • Windows 网络安装。将网络电缆连接至打印机。注意:确保所有电缆均符合 HP 标准。 • Penginstalan jaringan Windows. Hubungkan kabel jaringan ke printer. Catatan: Pastikan semua kabel sesuai standar HP. • Windows でのネットワーク接続 。ネットワーク ケーブルをプリンタに接続します。注記:ケーブルはすべて HP 対応品 を使用してください。 • Windows 네트워크 설정. 프린터에 네트워크 케이블을 연결합니다. 주: 모든 케이블이 HP 호환 제품인지 확인하십시오.
24 • Find the IP address by printing a Configuration Page. A) At the control-panel, press Menu, use the the buttons to scroll to Information, and then press to select. B) Use the and and buttons to scroll to Print Configuration and then press to select. C) On the printed Embedded JetDirect page (the second printed page) the IP address appears under HP Direct Configuration. Note: Depending on the type of network that is installed, you might need to assign at IP addres. See step 25.
25 • Configure an IP address, if necessary. A) At the control panel, press Menu, use the the Configure Device, and then press D) Scroll to TCP/IP, and press . B) Scroll to IO and press and buttons to scroll to . C) Scroll to Embedded JetDirect and press to select. Scroll to Config Method and press . . E) Scroll to Manual and press F) Use the and buttons to increase or decrease the number, and then press correct. Repeat as neccessary. .
26 • Prepare for the software installation. Quit all programs (including terminate-and-stay resident [TSR], antivirus, and firewall programs) on the print server or on each computer that will use the printer. 准备安装软件。退出打印服务器上或每台将使用打印机的计算机上的所有程序(包括终止并驻 留 [TSR] 程序、防病毒程序和防火墙程序)。 • • Persiapan untuk penginstalan perangkat lunak. Tutup semua program (termasuk program terminate-and-stay resident [TSR], antivirus dan firewall) pada server cetak atau pada tiap komputer yang akan menggunakan printer.
27 • Install the software. A) Insert the CD. B) On the welcome screen, click Install. If the welcome screen does not appear, click Start, click Run, type x:setup (where x represents the CD-ROM drive letter), and then click OK. C) Follow the onscreen instructions. When prompted, select Through the Network, and then click Next. When the installer shows the available printers, select the appropriate IP address. D) Click Finish. If prompted, restart the computer.
28 • Go to step 35. • 转至步骤 35。 • Lanjutkan ke langkah 35. • 手順 35 に進みます。 • 35단계로 이동합니다.
29 • Macintosh network installation. Connect the network cable to the printer. Note: Ensure that all cables are HP-compliant • Macintosh 网络安装。将网络电缆连接至打印机。注意:确保所有电缆均符合 HP 标准 • Penginstalan jaringan Macintosh. Hubungkan kabel jaringan ke printer. Catatan: Pastikan semua kabel sesuai standar HP • Macintosh でのネットワーク接続 。ネットワーク ケーブルをプリンタに接続します。注記:ケーブルはすべ て HP 対応品を使用してください。 • Macintosh 네트워크 설정. 프린터에 네트워크 케이블을 연결합니다. 주: 모든 케이블이 HP 호환 제품인 지 확인하십시오.
30 • Find the IP address or the Bonjour printer name by printing a Configuration Page. A) At the control-panel, press Menu, use the the and buttons to scroll to Information, and then press to select. B) Use the and buttons to scroll to Print Configuration and then press to select. C) On the printed Embedded JetDirect page (the second printed page) the IP address appears under HP Direct Configuration. Note: Depending on the type of network that is installed, you might need to assign at IP address.
31 • Configure an IP address, if necessary. A) At the control-panel, press Menu, use the the Configure Device, and then press D) Scroll to TCP/IP, and press . B) Scroll to IO and press and buttons to scroll to . C) Scroll to Embedded JetDirect and press to select. Scroll to Config Method and press . . E) Scroll to Manual and press F) Use the and buttons to increase or decrease the number, and then press correct. Repeat as neccessary. .
32 • Prepare for the software installation. Quit all programs (including terminate-and-stay resident [TSR], antivirus, and firewall programs) on the print server or on each computer that will use the printer. 准备安装软件。退出打印服务器上或每台将使用打印机的计算机上的所有程序(包括终止并驻 留 [TSR] 程序、防病毒程序和防火墙程序)。 • • Persiapan untuk penginstalan perangkat lunak. Tutup semua program (termasuk program terminate-and-stay resident [TSR], antivirus dan firewall) pada server cetak atau pada tiap komputer yang akan menggunakan printer.
33 • Install the software. Insert the CD, run the installer, and complete an Easy Install. Click Quit when the installation is finished. • 安装软件。插入 CD,运行安装程序,然后完成简易安装。安装完成后,单击退出。 • Menginstal perangkat lunak. Masukkan CD, jalankan installer lalu selesaikan Easy Install [Instal Mudah]. Klik Quit [Keluar] setelah penginstalan selesai. • ソフトウェアをインストールします。CD を挿入してインストーラを起動し、[簡易インストール] を実行します。インストー ルが完了したら、[終了] をクリックします。 • 소프트웨어 설치. CD를 넣고 설치 프로그램을 실행한 후 손쉬운 설치를 완료합니다. 설치가 완료되면 종료를 누릅 니다.
34 • Add the printer. A) Go to the HD/Applications/ Utilities/Printer Setup Utility or the Print Center, and then click Add. B) To add the printer by using the IP address, click IP Printer, type the IP address in the address field, and then click Add. C) To add the printer by using the Bonjour printer name, click the drop-down menu and select Bonjour. Under Printer Name, select the printer, and then click Add.
35 • Print a test page. Print a page from any program to make sure that the software is correctly installed. • 打印测试页。从任意程序中打印页面以确保软件安装正确。 • Cetak halaman uji. Cetak halaman dari program apa pun untuk memastikan bahwa perangkat lunak sudah diinstal dengan benar. • テスト ページの印刷 。お使いのプログラムから印刷して、 ソフトウェアが正しくインストールされたかを確認します。 • 테스트 페이지 인쇄. 아무 프로그램에서나 페이지를 인쇄하여 소프트웨어가 제대로 설치되었는지 확인합니다.
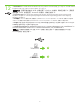
37 • Blank display after start up. A) Turn the printer off. B) Pull the formatter partially out (callouts1,2), then push the formatter in until the black levers click into a secure position (callout 3). C) Turn the printer on. If the problem is not resolved, call customer support. 启动后显示屏空白。A) 关闭打印机电源。B) 部分拔出格式化板(图 1、2),然后推入格式 化板,直至黑色手柄卡入到位(图 3)。C) 打开打印机电源。如果问题没有得到解决,请致电 客户支持部门。 • • Layar kosong setelah start up. A) Matikan printer.
• Paper sizes • • 용지 크기 • ขนาดกระดาษ • Ukuran kertas 纸张尺寸 • 用紙サイズ • 紙張尺寸 216 x 356 mm (8.5 x 14 inches) 148 x 210 mm (5.83 x 8.27 inches) 216 x 356 mm (8.5 x 14 inches) 148 x 210 mm (5.83 x 8.27 inches) 216 x 356 mm (8.5 x 14 inches) 148 x 210 mm (5.83 x 8.27 inches) • 有关耗材信息,请访问 www.hp.com/support/cljcp3505。 • Untuk persediaan, silakan mengunjungi www.hp.com/support/cljcp3505. • サプライ品については、www.hp.com/support/cljcp3505 をご覧ください。 • 소모품에 대한 자세한 내용은 www.hp.com/support/cljcp3505를 참조하십시오.
HP Color LaserJet CP3505 Series printers • Clearing Jams • 용지 걸림 해결 • 清除卡纸 • การแก้ปัญหากระดาษติด • Menghilangkan kemacetan • 清除卡紙 • 紙詰まりの解除 1 2 3 • Questions? • • 의문 사항 • คำ�ถาม? 是否有问题? • Pertanyaan? • ご質問はありますか? • 若有其他問題: http://www.hp.com/support/go/cljcp3505 http://www.hp.com/support/go/cljcp3505 http://www.hp.
有毒有害物质表 根据中国电子信息产品污染控制管理办法的要求而出台 有毒有害物质和元素 铅 (Pb) 部件名称 打印引擎 控制面板 塑料外壳 格式化板组件 碳粉盒 X 0 0 X X 汞 (Hg) 0 0 0 0 0 镉 (Cd) X 0 0 0 0 六价铬 (Cr(VI)) X 0 0 0 0 多溴联苯 (PBB) 0 0 0 0 0 多溴二苯醚 (PBDE) 0 0 0 0 0 0:表示在此部件所用的所有同类材料中,所含的此有毒或有害物质均低于 SJ/T11363-2006 的限制要求。 X:表示在此部件所用的所有同类材料中,至少一种所含的此有毒或有害物质高于 SJ/T11363-2006 的限制要求。 注:引用的“环保使用期限”是根据在正常温度和湿度条件下操作使用产品而确定的。
© 2007 Hewlett-Packard Development Company, L.P. www.hp.