HP Color LaserJet CP3505 Series Printers Getting Started Guide Opsætningsvejledning Alustusjuhend Aloitusopas s pamcba Darbo pradžios vadovas Hurtigstartveiledning Starthandbok
Copyright and License © 2007 Copyright Hewlett-Packard Development Company, L.P. Reproduction, adaptation or translation without prior written permission is prohibited, except as allowed under the copyright laws. The information contained herein is subject to change without notice. The only warranties for HP products and services are set forth in the express warranty statements accompanying such products and services. Nothing herein should be construed as constituting an additional warranty.
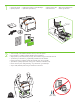
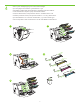
• Pakkige printer lahti. • Ota tulostin pakkauksesta. • Packa upp skrivaren. • Pakk ut skriveren. 229 mm (9 in) 1 • Unpack the printer. • Sådan tages printeren ud af emballagen. • Izpakojiet printeri. • Išpakuokite spausdintuv. ) .5 in m (3 89 m ) .5 in m (3 89 m 178 mm (7 i n) 356 m m( 2 • Select a sturdy, well-ventilated, dust-free area to position the printer. • Placer printeren i et stabilt og støvfrit område med god ventilation.
3 • • • • • Fjern al transporttape. • Irrota pakkausteipit. • Nuplškite visas transportavimo juosteles. • Ta bort all transporttejp. Remove all shipping tape. Eemaldage kõik kleeplindid. Noemiet visas transportšanai izmantots lentes. Fjern all frakttape.
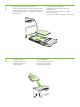
4 • Remove print cartridge shipping locks and reinstall cartridges. • Fjern forseglinger til tonerkassette og sæt kassetterne i igen. • Eemaldage prindikassettide transpordilukud ja paigaldage kassetid seadmesse. • Irrota tulostuskasettien kuljetussuojat ja asenna kasetit takaisin. • Noemiet drukas kasetu transportšanas uzlikas un uzstdiet kasetnes viet. • Nuimkite spausdinimo kaseči transportavimo fiksatorius ir iš naujo dkite kasetes.
5 6 • Adjust paper guides, and load print media. • Reguleerige paberijuhikud ja asetage seadmesse paberit. • Reguljiet papra vadotnes un ievietojiet drukas materilus. • Juster papirbreddeskinnene, og legg i papir eller annet utskriftsmateriale. • • • • Install the output bin. Paigaldage väljastussalv. Uzstdiet izvades tvertni. Installer utskuffen. • Juster papirstyrene, og læg papir i. • Säädä paperinohjaimet ja lataa laitteeseen tulostusmateriaalia.
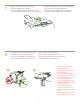
8 1 • • • • Attach control panel overlay (if neccessary). Kinnitage juhtpaneeli kate (vajadusel). Pievienojiet vadbas panea uzliku (ja nepieciešams). Fest kontrollpanelsjablongen til skriveren (hvis nødvendig). • • • • Connect the power cord and turn on the printer. Ühendage toitejuhe ja lülitage seade sisse. Pievienojiet strvas kabeli un iesldziet printeri. Koble til strømledningen, og slå på skriveren. • Monter overlay til kontrolpanelet, hvis det er nødvendigt.
9 • Control-panel features. 1) Use the and buttons to select the menu options. 2) Press 3) Press Cancel to return to the Ready screen. to accept the selection. • Funktioner i kontrolpanelet. 1) Brug knapperne og til at vælge menuindstillingerne. 2) Tryk på valget. 3) Tryk på Annuller for at vende tilbage til skærmen Klar. for at acceptere • Juhtpaneeli funktsioonid. 1) Menüükäskude valimiseks kasutage nuppe ja . 2) Valiku kinnitamiseks vajutage nuppu .
11 • Set the media size and type. At the control-panel, press Menu, use the and then press Press and buttons to scroll to Paper Handling, to select the tray to configure. Set the Type and Size for each tray by using the and buttons. to select the settings. • Indstil medieformat og -type. Tryk på Menu i kontrolpanelet og brug knapperne derefter på knappperne og til at rulle til Papirhåndtering, tryk for at vælge den bakke, der skal konfigureres.
12 • USB Installation. To install software for Windows by using a direct connection (USB), go to step 14. To install software for Macintosh by using a direct connection (USB), go to step 19. • USB- installation. Gå til trin 14 for at installere software til Windows ved hjælp af en direkte forbindelse (USB). Gå til trin 19 for at installere software til Macintosh ved hjælp af en direkte forbindelse (USB). • USB abil installimine. Windowsi tarkvara installimiseks otseühenduse (USB) abil jätkake juhisest 14.
13 • Network Installation. To install software for Windows by using a network connection, go to step 23. To install software for Macintosh by using a network connection, go to step 29. • Netværksinstallation. Gå til trin 23 for at installere software til Windows ved hjælp af en netværksforbindelse. Gå til trin 29 for at installere software til Macintosh ved hjælp af en netværksforbindelse. • Võrgu abil installimine. Windowsi tarkvara installimiseks võrguühenduse abil jätkake juhisest 23.
14 • Windows USB installation. Insert the CD, and follow the onscreen instructions. Do not plug in the USB cable until prompted by the software. Note: If New Hardware Found appears, insert the CD and follow the onscreen instructions. • USB-installation til Windows. Isæt cd'en, og følg anvisningerne på skærmen. Sæt ikke USB-kablet i, før du bliver bedt om det af softwaren. Bemærk! Hvis meddelelsen Der er fundet ny hardware vises, skal du indsætte cd'en og følge anvisningerne på skærmen.
15 • On the Welcome screen, click Install. If the welcome screen does not appear, click Start, click Run, type x:setup (where x represents the CD-ROM drive letter), and then click OK. • Klik på Installer i skærmbilledet Velkommen. Hvis skærmbilledet Velkommen ikke vises, skal du klikke på Start, Kør, indtast x:setup (hvor x angiver cd-rom-drevets drevbogstav), og klik derefter på OK. • Klõpsake tervituskuval nuppu Install (Installi).
17 • When prompted, connect a USB cable that is no longer than 2 meters (6.5 feet) to the printer and the computer. Note: HP does not recommend using USB hubs with this printer. • Når du bliver bedt om, skal du slutte et USB-kabel, som højst er på 2 meter, til printeren og computeren. Bemærk! HP anbefaler, at der ikke bruges en USB-hub til denne printer. • Vastava viiba kuvamisel ühendage USB-kaabel (mitte pikem kui 2 m) printeri ja arvutiga. Märkus. HP ei soovita selle printeriga kasutada USB-jaotureid.
19 • Macintosh USB installation. A) Insert the CD and run the installer. B) Complete an Easy Install. C) Click Quit when the installation is finished. • Installation af USB til Macintosh. A) Isæt cd'en, og kør installationsprogrammet. B) Udfør en Easy installation (let installation). C) Klik på Afslut, når installationen er udført. • USB abil installimine Macintoshis. A) Sisestage CD ja käivitage installer. B) Tehke Easy Install (Lihtne install).
20 • Connect the USB cable. A) Connect a USB cable that is no longer than 2 meters (6.5 feet) to the printer and the computer. B) Restart the computer. Note: HP does not recommend using USB hubs with this printer. • Tilslut USB-kablet. A) Slut et USB-kabel på højst 2 meter til printeren og computeren. B) Genstart computeren. Bemærk! HP anbefaler, at der ikke bruges en USB-hub til denne printer. • Ühendage USB-kaabel. A) Ühendage USB-kaabel (mitte pikem kui 2 m) printeri ja arvutiga.
21 • Go to the HD/Applications/Utilities/Printer Setup Utility or the Print Center. If the printer name appears in the Printer List, the installation is complete. If the printer name does not appear in the Printer List, go to the next step. • Gå til HD/Applications/Utilities/Printer Setup Utility eller Printercentral. Hvis printernavnet vises i printerlisten, er installationen fuldført. Hvis printernavnet ikke vises på printerlisten, skal du gå til næste trin.
22 • Add the printer. A) In the HD/Applications/Utilities/Printer Setup Utility or Print Center, click Add. Click the dropdown menu, and select USB. B) In the Printer Model drop-down list, select HP. C) Under Printer Name, select the printer, and then click Add. Go to step 35. • Tilføj printeren. A) Klik på Tilføj i HD/Applications/Utilities/Printer Setup Utility eller Printercentral. Klik i rullemenuen, og vælg USB. B) Vælg HP i rullemenuen Printermodel.
23 • Windows network installation. Connect a network cable to the printer. Note: Ensure that all cables are HP-compliant. • Netværksinstallation i Windows. Slut et netværkskabel til printeren. Bemærk! Sørg for, at alle kabler er HP-kompatible. • Võrgu installimine Windowsis. Ühendage võrgukaabel printeriga. Märkus. Veenduge, et kõik kaablid sobiksid HP seadmetega. • Windows-käyttöjärjestelmän verkkoasennus. Liitä verkkokaapeli tietokoneeseen.
24 • Find the IP address by printing a Configuration Page. A) At the control-panel, press Menu, use the the buttons to scroll to Information, and then press to select. B) Use the and and buttons to scroll to Print Configuration and then press to select. C) On the printed Embedded JetDirect page (the second printed page) the IP address appears under HP Direct Configuration. Note: Depending on the type of network that is installed, you might need to assign at IP addres. See step 25.
25 • Configure an IP address, if necessary. A) At the control panel, press Menu, use the the Configure Device, and then press D) Scroll to TCP/IP, and press . B) Scroll to IO and press and buttons to scroll to . C) Scroll to Embedded JetDirect and press to select. Scroll to Config Method and press . . E) Scroll to Manual and press F) Use the and buttons to increase or decrease the number, and then press correct. Repeat as neccessary. • Sådan konfigureres en IP-adresse, hvis det er nødvendigt.
26 • Prepare for the software installation. Quit all programs (including terminate-and-stay resident [TSR], antivirus, and firewall programs) on the print server or on each computer that will use the printer. • Sådan klargøres til softwareinstallation. Afslut alle programmer (herunder TSR (terminate-and-stay resident), antivirus og firewall-programmer) på printserveren eller på hver enkelt computer, som printeren skal bruges til. • Ettevalmistamine tarkvara installimiseks.
27 • Install the software. A) Insert the CD. B) On the welcome screen, click Install. If the welcome screen does not appear, click Start, click Run, type x:setup (where x represents the CD-ROM drive letter), and then click OK. C) Follow the onscreen instructions. When prompted, select Through the Network, and then click Next. When the installer shows the available printers, select the appropriate IP address. D) Click Finish. If prompted, restart the computer. • Installer softwaren. A) Isæt cd'en.
28 • Go to step 35. • Gå til trin 35. • Jätkake juhisest 35. • Siirry vaiheeseen 35. • Prejiet uz 35. darbbu. • Pereikite prie 35 veiksmo. • Gå til trinn 35. • Gå till steg 35.
29 • Macintosh network installation. Connect the network cable to the printer. Note: Ensure that all cables are HP-compliant • Netværksinstallation i Macintosh. Slut netværkskablet til printeren. Bemærk! Sørg for, at alle kabler er HP-kompatible • Võrgu installimine Macintoshis. Ühendage võrgukaabel printeriga. Märkus. Veenduge, et kõik kaablid sobiksid HP seadmetega. • Macintosh-käyttöjärjestelmän verkkoasennus. Liitä verkkokaapeli tietokoneeseen.
30 • Find the IP address or the Bonjour printer name by printing a Configuration Page. A) At the control-panel, press Menu, use the the and buttons to scroll to Information, and then press to select. B) Use the and buttons to scroll to Print Configuration and then press to select. C) On the printed Embedded JetDirect page (the second printed page) the IP address appears under HP Direct Configuration. Note: Depending on the type of network that is installed, you might need to assign at IP address.
31 • Configure an IP address, if necessary. A) At the control-panel, press Menu, use the the Configure Device, and then press D) Scroll to TCP/IP, and press . B) Scroll to IO and press and buttons to scroll to . C) Scroll to Embedded JetDirect and press to select. Scroll to Config Method and press . . E) Scroll to Manual and press F) Use the and buttons to increase or decrease the number, and then press correct. Repeat as neccessary. .
32 • Prepare for the software installation. Quit all programs (including terminate-and-stay resident [TSR], antivirus, and firewall programs) on the print server or on each computer that will use the printer. • Sådan klargøres til softwareinstallation. Afslut alle programmer (herunder TSR (terminate-and-stay resident), antivirus og firewall-programmer) på printserveren eller på hver enkelt computer, som printeren skal bruges til. • Ettevalmistamine tarkvara installimiseks.
33 • Install the software. Insert the CD, run the installer, and complete an Easy Install. Click Quit when the installation is finished. • Installer softwaren. Isæt cd'en, kør installationsprogrammet, og udfør en Easy Install (let installation). Klik på Afslut, når installationen er fuldført. • Tarkvara installimine. Sisestage CD, käivitage installer ja valige Easy Install (Lihtne install). Kui installimine on lõpule viidud, klõpsake nuppu Quit (Välju). • Asenna ohjelmisto.
34 • Add the printer. A) Go to the HD/Applications/ Utilities/Printer Setup Utility or the Print Center, and then click Add. B) To add the printer by using the IP address, click IP Printer, type the IP address in the address field, and then click Add. C) To add the printer by using the Bonjour printer name, click the drop-down menu and select Bonjour. Under Printer Name, select the printer, and then click Add. • Tilføj printeren.
35 • Print a test page. Print a page from any program to make sure that the software is correctly installed. • Sådan udskrives en testside. Udskriv en side fra et hvilket som helst program for at sikre, at softwaren er installeret korrekt. • Testlehe printimine. Kontrollimaks, kas tarkvara on õigesti installitud, printige leht suvalisest programmist. • Tulosta testisivu. Tulosta sivu mistä tahansa ohjelmasta varmistaaksesi, että ohjelmisto on asennettu oikein. • Izdrukjiet testa lapu.
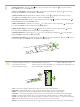
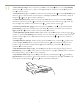
37 • Blank display after start up. A) Turn the printer off. B) Pull the formatter partially out (callouts1, 2), then push the formatter in until the black levers click into a secure position (callout 3). C) Turn the printer on. If the problem is not resolved, call customer support. • Tomt display efter opstart. A) Sluk printeren. B) Tryk processoren delvist ud (billedforklaring 1, 2), og skub derefter processoren ind, indtil de sorte håndtag klikker på plads i en sikker position (billedforklaring 3).
• Paper sizes • Papirformater • Paberiformaadid • Paperikoot • Papra formti • Popieriaus dydžiai • Papirstørrelser • Pappersstorlekar 216 x 356 mm (8.5 x 14 inches) 148 x 210 mm (5.83 x 8.27 inches) 216 x 356 mm (8.5 x 14 inches) 148 x 210 mm (5.83 x 8.27 inches) 216 x 356 mm (8.5 x 14 inches) 148 x 210 mm (5.83 x 8.27 inches) • Gå ind på www.hp.com/support/cljcp3505 vedrørende forbrugsvarer. • For supplies, please visit www.hp.com/support/cljcp3505.
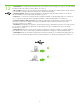
HP Color LaserJet CP3505 Series printers • Clearing Jams • Iestrguša papra izemšana • Udbedring af papirstop • Strigči šalinimas • Ummistuste kõrvaldamine • Fjerne fastkjørt papir • Tukosten poistaminen • Åtgärda trassel 1 2 3 • Questions? • Spørgsmål? • Kas on küsimusi? • Kysymyksiä? • Jautjumi? • Turite klausim? • Spørsmål? • Frågor? http://www.hp.com/support/go/cljcp3505 http://www.hp.com/support/go/cljcp3505 http://www.hp.
© 2007 Hewlett-Packard Development Company, L.P. www.hp.