HP Color LaserJet CP3505 Series Printers Getting Started Guide Vodič za početak korištenja Instalační píručka Podrczna instrukcja obsługi Ghid de pornire Úvodná príručka Priročnik za začetek Alapvet tudnivalók kézikönyve
Copyright and License © 2007 Copyright Hewlett-Packard Development Company, L.P. Reproduction, adaptation or translation without prior written permission is prohibited, except as allowed under the copyright laws. The information contained herein is subject to change without notice. The only warranties for HP products and services are set forth in the express warranty statements accompanying such products and services. Nothing herein should be construed as constituting an additional warranty.
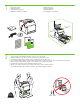
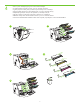
• • • • Unpack the printer. Rozbalte tiskárnu. Despachetai imprimanta. Odstranite embalažo tiskalnika. Otpakirajte pisač. Rozpakuj drukark. Vybate tlačiare. Csomagolja ki a nyomtatót. 229 mm (9 in) 1 • • • • ) .5 in m (3 89 m ) .5 in m (3 89 m 178 mm (7 i n) 356 m m( 2 • • • • • • • • 14 in) Select a sturdy, well-ventilated, dust-free area to position the printer. Odaberite stabilan, čist i dobro prozračan prostor za postavljanje pisača.
3 • • • • Remove all shipping tape. Odstrate všechny pepravní pásky. Îndeprtai în totalitate banda de protecie la transport. Odstranite trak. • Uklonite sve zaštitne trake za transport. • Usu tam zabezpieczajc. • Odstráte prepravnú pásku. • Távolítson el minden rögzítszalagot.
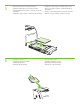
4 • • • • • • • • Remove print cartridge shipping locks and reinstall cartridges. Izvadite blokade spremnika s tintom i ponovno umetnite spremnike. Vyjmte pepravní zámky tiskových kazet a potom kazety znovu nainstalujte. Wyjmij blokady transportowe kaset drukujcych i ponownie zainstaluj kasety. Îndeprtai siguranele cartuşelor de imprimare şi reinstalai cartuşele. Vyberte prepravné poistky tlačových kaziet a kazety znovu nainštalujte.
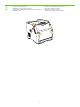
5 6 • Adjust paper guides, and load print media. • Nastavte vodítka papíru a vložte tisková média. •R eglai ghidajele pentru hârtie şi încrcai suportul de imprimare. • Prilagodite vodila za papir in naložite medij za tiskanje. • Prilagodite vodilice papira i umetnite medij za ispis. • Dopasuj prowadnice papieru i załaduj materiały do drukowania. • Upravte vodiace lišty papiera a vložte tlačové médiá. • Állítsa be a papírvezetket, és töltsön be papírt. • • • • • • • • Install the output bin.
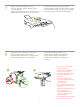
8 1 • Attach control panel overlay (if neccessary). •P ipevnte pekryvný segment ovládacího panelu (v pípad poteby). • Ataşai masca panoului de control (dac este necesar). • Pritrdite maska nadzorne plošče (če je to potrebno). • • • • Pričvrstite masku upravljačke ploče (po potrebi). Dołcz nakładk na panel sterowania (w razie potrzeby). K ovládaciemu panelu pripevnite fóliu (ak je to potrebné). Ha szükséges, helyezze fel a kezelpanel borítását.
9 • Control-panel features. 1) Use the and buttons to select the menu options. 2) Press 3) Press Cancel to return to the Ready screen. to accept the selection. • Značajke upravljačke ploče. 1) Mogućnosti izbornika odaberite pom oću gumba i . 2) Za prihvat odabira pritisnite . 3) Pritisnite gumb Cancel (Odustani) za povratak na zaslon Ready (Spreman). • Funkce ovládacího panelu. 1) Pomocí tlačítek a vybírejte volby v nabídkách.
11 • Set the media size and type. At the control-panel, press Menu, use the and then press Press and buttons to scroll to Paper Handling, to select the tray to configure. Set the Type and Size for each tray by using the and buttons. to select the settings. • Postavljanje veličine i vrste medija. Na upravljačkoj ploči pritisnite gumb Menu (Izbornik) te pomoću gumba pomaknite se na Paper Handling (Rukovanje papirom), a zatim pritisnite Type (Vrsta) i Size (Veličina) za svaku ladicu pomoću gumba i .
12 • USB Installation. To install software for Windows by using a direct connection (USB), go to step 14. To install software for Macintosh by using a direct connection (USB), go to step 19. • USB instalacija. Idite na korak 14 za instaliranje softvera za sustav Windows pomoću izravne veze (USB). Idite na korak 19 za instaliranje softvera za Macintosh pomoću izravne veze (USB). • Instalace pomocí rozhraní USB. Chcete-li nainstalovat software pro Windows pomocí pímého pipojení (USB), pejdte ke kroku 14.
13 • Network Installation. To install software for Windows by using a network connection, go to step 23. To install software for Macintosh by using a network connection, go to step 29. • Mrežna instalacija. Idite na korak 23 za instaliranje softvera za sustav Windows preko mrežne veze. Idite na korak 29 za instaliranje softvera za Macintosh preko mrežne veze. • Sít'ová instalace. Chcete-li nainstalovat software pro Windows pomocí sít'ového pipojení, pejdte ke kroku 23.
14 • Windows USB installation. Insert the CD, and follow the onscreen instructions. Do not plug in the USB cable until prompted by the software. Note: If New Hardware Found appears, insert the CD and follow the onscreen instructions. • Windows USB instalacija. Umetnite CD i slijedite upute na zaslonu. Nemojte priključiti USB kabel sve dok softver to ne zatraži. Napomena: Ako se prikaže prozor New Hardware Found (Pronađen novi hardver) umetnite CD i slijedite upute na zaslonu.
15 • On the Welcome screen, click Install. If the welcome screen does not appear, click Start, click Run, type x:setup (where x represents the CD-ROM drive letter), and then click OK. • Na zaslonu Welcome (Dobrodošli) kliknite Install (Instaliraj). Ako se zaslon dobrodošlice ne prikaže kliknite Start, kliknite Run (Pokreni), upišite x:setup (gdje x predstavlja slovo oznake CD-ROM pogona), a zatim kliknite OK (U redu). • Na úvodní obrazovce klepnte na položku Instalace.
17 • When prompted, connect a USB cable that is no longer than 2 meters (6.5 feet) to the printer and the computer. Note: HP does not recommend using USB hubs with this printer. • Kada softver zatraži, na pisač i računalo priključite USB kabel koji nije duži od 2 metra (6,5 stopa). Napomena: HP ne preporučuje korištenje USB čvorišta s ovim pisačem. • Po zobrazení výzvy pipojte kabel USB, který není delší než 2 metry, k tiskárn a k počítači.
19 • Macintosh USB installation. A) Insert the CD and run the installer. B) Complete an Easy Install. C) Click Quit when the installation is finished. • Macintosh USB instalacija. A) Umetnite CD i pokrenite program za instalaciju. B) Izvršite Easy Install (Jednostavna instalacija). C) Kliknite Quit (Izađi) nakon dovršene instalacije. • Instalace v systému Macintosh pomocí rozhraní USB. A) Vložte disk CD a spust'te instalační program. B) Dokončete jednoduchou instalaci.
20 • Connect the USB cable. A) Connect a USB cable that is no longer than 2 meters (6.5 feet) to the printer and the computer. B) Restart the computer. Note: HP does not recommend using USB hubs with this printer. • Priključivanje USB kabela. A) Na pisač i računalo priključite USB kabel koji nije duži od 2 metra (6,5 stopa). B) Ponovno pokrenite računalo. Napomena: HP ne preporučuje korištenje USB čvorišta s ovim pisačem. • Pipojte kabel USB.
21 • Go to the HD/Applications/Utilities/Printer Setup Utility or the Print Center. If the printer name appears in the Printer List, the installation is complete. If the printer name does not appear in the Printer List, go to the next step. • Idite na HD/Applications/Utilities/Printer Setup Utility (Tvrdi disk/Aplikacije/Uslužni programi/Uslužni program za postavljanje pisača) ili Print Center (Središte za ispis). Ako je naziv pisača prikazan u Printer List (Popis pisača), instalacija je dovršena.
22 • Add the printer. A) In the HD/Applications/Utilities/Printer Setup Utility or Print Center, click Add. Click the dropdown menu, and select USB. B) In the Printer Model drop-down list, select HP. C) Under Printer Name, select the printer, and then click Add. Go to step 35. • Dodavanje pisača. A) U HD/Applications/Utilities/Printer Setup Utility (Tvrdi disk/Aplikacije/Uslužni programi/ Uslužni program za postavljanje pisača) ili Print Center (Središte za ispis), kliknite Add (Dodaj).
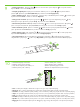
23 • Windows network installation. Connect a network cable to the printer. Note: Ensure that all cables are HP-compliant. • Windows mrežna instalacija. Priključite mrežni kabel na pisač. Napomena: Provjerite jesu li svi kablovi sukladni s HP‑om. • Sít'ová instalace v systému Windows. Pipojte sít'ový kabel k tiskárn. Poznámka: Ujistte se, zda jsou všechny kabely kompatibilní s tiskárnami HP. • Instalacja sieciowa w systemie Windows. Podłcz kabel sieciowy do drukarki.
24 • Find the IP address by printing a Configuration Page. A) At the control-panel, press Menu, use the the buttons to scroll to Information, and then press to select. B) Use the and and buttons to scroll to Print Configuration and then press to select. C) On the printed Embedded JetDirect page (the second printed page) the IP address appears under HP Direct Configuration. Note: Depending on the type of network that is installed, you might need to assign at IP addres. See step 25.
25 • Configure an IP address, if necessary. A) At the control panel, press Menu, use the the Configure Device, and then press D) Scroll to TCP/IP, and press F) Use the and . B) Scroll to IO and press and buttons to scroll to . C) Scroll to Embedded JetDirect and press to select. Scroll to Config Method and press buttons to increase or decrease the number, and then press . E) Scroll to Manual and press . . to select the number when it is correct. Repeat as neccessary.
26 • Prepare for the software installation. Quit all programs (including terminate-and-stay resident [TSR], antivirus, and firewall programs) on the print server or on each computer that will use the printer. • Priprema za instalaciju softvera. Na poslužitelju za ispis ili na ostalim računalima koji će koristiti pisač zatvorite sve programe (uključujući pozadinske aplikacije [TSR], antiviruse i vatrozid). • Pipravte se na instalaci softwaru.
27 • Install the software. A) Insert the CD. B) On the welcome screen, click Install. If the welcome screen does not appear, click Start, click Run, type x:setup (where x represents the CD-ROM drive letter), and then click OK. C) Follow the onscreen instructions. When prompted, select Through the Network, and then click Next. When the installer shows the available printers, select the appropriate IP address. D) Click Finish. If prompted, restart the computer. • Instalacija softvera. A) Umetnite CD.
28 • Go to step 35. • Idite na korak 35. • Pejdte ke kroku 35. • Przejd do kroku 35. • Trecei la pasul 35. • Prejdite na krok 35. • Pojdite na 35. korak. • Folytassa a 35. lépéssel.
29 • Macintosh network installation. Connect the network cable to the printer. Note: Ensure that all cables are HP-compliant • Macintosh mrežna instalacija. Priključite mrežni kabel na pisač. Napomena: Provjerite jesu li svi kablovi sukladni s HP-om • Sít'ová instalace v systému Macintosh. Pipojte sít'ový kabel k tiskárn. Poznámka: Ujistte se, zda jsou všechny kabely kompatibilní s tiskárnami HP. • Instalacja sieciowa na komputerze Macintosh. Podłcz kabel sieciowy do drukarki.
30 • Find the IP address or the Bonjour printer name by printing a Configuration Page. A) At the control-panel, press Menu, use the the and buttons to scroll to Information, and then press to select. B) Use the and buttons to scroll to Print Configuration and then press to select. C) On the printed Embedded JetDirect page (the second printed page) the IP address appears under HP Direct Configuration. Note: Depending on the type of network that is installed, you might need to assign at IP address.
31 • Configure an IP address, if necessary. A) At the control-panel, press Menu, use the the and buttons to scroll to Configure Device, and then press . B) Scroll to IO and press . C) Scroll to Embedded JetDirect and press . D) Scroll to TCP/IP, and press to select. Scroll to Config Method and press . E) Scroll to Manual and press . F) Use the and buttons to increase or decrease the number, and then press to select the number when it is correct. Repeat as neccessary.
32 • Prepare for the software installation. Quit all programs (including terminate-and-stay resident [TSR], antivirus, and firewall programs) on the print server or on each computer that will use the printer. • Priprema za instalaciju softvera. Na poslužitelju za ispis ili na ostalim računalima koji će koristiti pisač zatvorite sve programe (uključujući pozadinske aplikacije [TSR], antiviruse i vatrozid). • Pipravte se na instalaci softwaru.
33 • Install the software. Insert the CD, run the installer, and complete an Easy Install. Click Quit when the installation is finished. • Instalacija softvera. Umetnite CD, pokrenite instalacijski program i izvršite Easy Install (Jednostavna instalacija). Kliknite Quit (Izađi) nakon dovršene instalacije. • Nainstalujte software.. Vložte disk CD, soust'te instalační program a dokončete jednoduchou instalaci. Po dokončení instalace klepnte na tlačítko Konec. • Instalowanie oprogramowania.
34 • Add the printer. A) Go to the HD/Applications/ Utilities/Printer Setup Utility or the Print Center, and then click Add. B) To add the printer by using the IP address, click IP Printer, type the IP address in the address field, and then click Add. C) To add the printer by using the Bonjour printer name, click the drop-down menu and select Bonjour. Under Printer Name, select the printer, and then click Add. • Dodavanje pisača.
35 • Print a test page. Print a page from any program to make sure that the software is correctly installed. • Ispis stranice za testiranje. Ispišite stranicu iz bilo kojeg programa kako bi provjerili je li softver pravilno instaliran. • Vytisknte zkušební stránku. Vytištním stránky z libovolné aplikace zkontrolujte, zda je software správn nainstalován. • Drukowanie strony testowej. Wydrukuj stron z dowolnego programu, aby upewnić si, e oprogramowanie zostało prawidłowo zainstalowane.
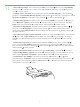
37 • Blank display after start up. A) Turn the printer off. B) Pull the formatter partially out (callouts 1,2), then push the formatter in until the black levers click into a secure position (callout 3). C) Turn the printer on. If the problem is not resolved, call customer support. • Prazan zaslon nakon pokretanja. A) Isključite pisač. B) Djelomično izvucite sklop ploče za proširenja (slike 1,2), zatim ga ponovno gurnite u pisač dok crna poluga ne sjedne na svoje mjesto (slika 3). C) Uključite pisač.
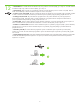
• Paper sizes • Veličine papira • Formáty papíru • Formaty papieru • Dimensiuni de hârtie • Vekosti papiera • Velikosti papirja • Papírméretek 216 x 356 mm (8.5 x 14 inches) 148 x 210 mm (5.83 x 8.27 inches) 216 x 356 mm (8.5 x 14 inches) 148 x 210 mm (5.83 x 8.27 inches) 216 x 356 mm (8.5 x 14 inches) 148 x 210 mm (5.83 x 8.27 inches) • For supplies, please visit www.hp.com/support/cljcp3505. • Za potrošni materijal pogledajte www.hp.com/support/cljcp3505.
HP Color LaserJet CP3505 Series printers • Clearing Jams • Îndeprtarea blocajelor • Čišćenje zaglavljenja • Odstránenie zaseknutého papiera • Odstranní uvíznutého papíru • Odstranjevanje zagozdenega papirja • Usuwanie zacić • Elakadások elhárítása 1 2 3 • Questions? • Pitanja? • Máte další otázky? • Pytania? • Întrebri? • Otázky? • Vprašanja? • Van kérdése? http://www.hp.com/support/go/cljcp3505 http://www.hp.com/support/go/cljcp3505 http://www.hp.
© 2007 Hewlett-Packard Development Company, L.P. www.hp.