
HP Color LaserJet CP3505 Printer - Software Technical Reference


If the printer is that you want to install is not listed and you want the installer to continue searching
network subnet masks, click Search Again…. The Check Printer Connection screen appears.
Click Next to perform another search.
If the printer that you want to install is not listed and you know its TCP/IP address, click Next. The
Confirm Network Settings dialog box opens. See
Figure 3-24 Confirm Network Settings dialog box
on page 96 and follow the instructions for changing the TCP/IP address.
If you click No, I want to install a different printer and then click Next, the Check Printer
Connection dialog box opens, advising you to make sure the cable is properly connected, and giving
you the option of searching again for a network printer or specifying a printer by address (see
Figure
3-26 Check Printer Connection dialog box on page 97).
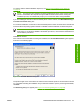
If you click Yes, install this printer and then click Next, the Confirm Network Settings dialog box
opens, as shown in the following figure.
Figure 3-24 Confirm Network Settings dialog box
In the Confirm Network Settings dialog box, click Next to continue the installation. The Installation
Type dialog box opens (see
Figure 3-28 Installation Type dialog box on page 99).
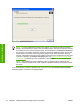
If you click Change Settings…, the Confirm Change Setting dialog box opens, as shown in the
following figure.
WARNING! When you change the TCP/IP configuration by using the Change Settings button,
you change the actual settings in the product Jetdirect card. You should make changes to these
settings only with the advice of your network administrator.
96 Chapter 3 Installing Windows printing-system components ENWW
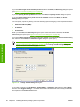
Installation in Windows