
HP Color LaserJet CP3505 Printer - Software Technical Reference


General MS Windows installation instructions
The following sections provide instructions for installing the print drivers on various Windows operating
systems.
Installation is similar for the Windows 2000, Windows XP, Windows Server 2003, and Windows Vista
operating systems. The Windows NT 4.0 operating system does not support the HP Color LaserJet
CP3505 printer.
If the HP Color LaserJet CP3505 printer is connected through a file or print server, the printing-system
software must first be installed on the server before being installed on any client systems. If the HP
LaserJet printing-system software is not first installed on the server, then bidirectional communication
and some driver autoconfiguration methods are not available to the client systems.
For Windows 2000, and Windows XP, administrator rights on the system are necessary to install the
software.
When the HP Color LaserJet CP3505 printing-system installer runs, the HP LaserJet uninstaller is
always added to the system.
MS Windows installation for direct connections
The printing-system software should be installed before the HP Color LaserJet CP3505 printer is
connected to the computer through a parallel or USB connection and turned on. During the installation
process, the software will prompt you to connect the device during installation.
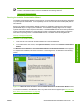
Installing from the printing-system CD
Follow these instructions to install the HP Color LaserJet CP3505 printing system from the CD that came
with the product.
1. Quit all software programs.
2. Insert the CD in the CD-ROM drive.
NOTE: If the CD does not start automatically, click Start, click Run, and then browse to
and double-click the SETUP.EXE file in the root directory of the CD.
3. Click Install and follow the onscreen prompts.
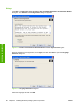
Installing print drivers by using Add Printer
Use the following steps to install the print drivers by using the Add Printer feature in Windows:
1. Insert the CD in the CD-ROM drive.
2. Go to the Add a printer feature in Windows.
In Windows XP, click Start on the desktop, click Settings, and then click Printers and Faxes.
The Printers and Faxes window appears. Click Add a printer. The Add a printer wizard screen
appears.
In Windows 2000, click Start on the desktop, click Settings, click Printers, and then click Add a
printer. The Add a printer wizard screen appears.
3. Use the Add a printer wizard to find and connect to the printer. The print drivers are loaded as a
part of this process.
76 Chapter 3 Installing Windows printing-system components ENWW
Installation in Windows